Repairing and using a Sharp ZQ-700 organiser as a pocket computer
Saturday, 21st March 2026
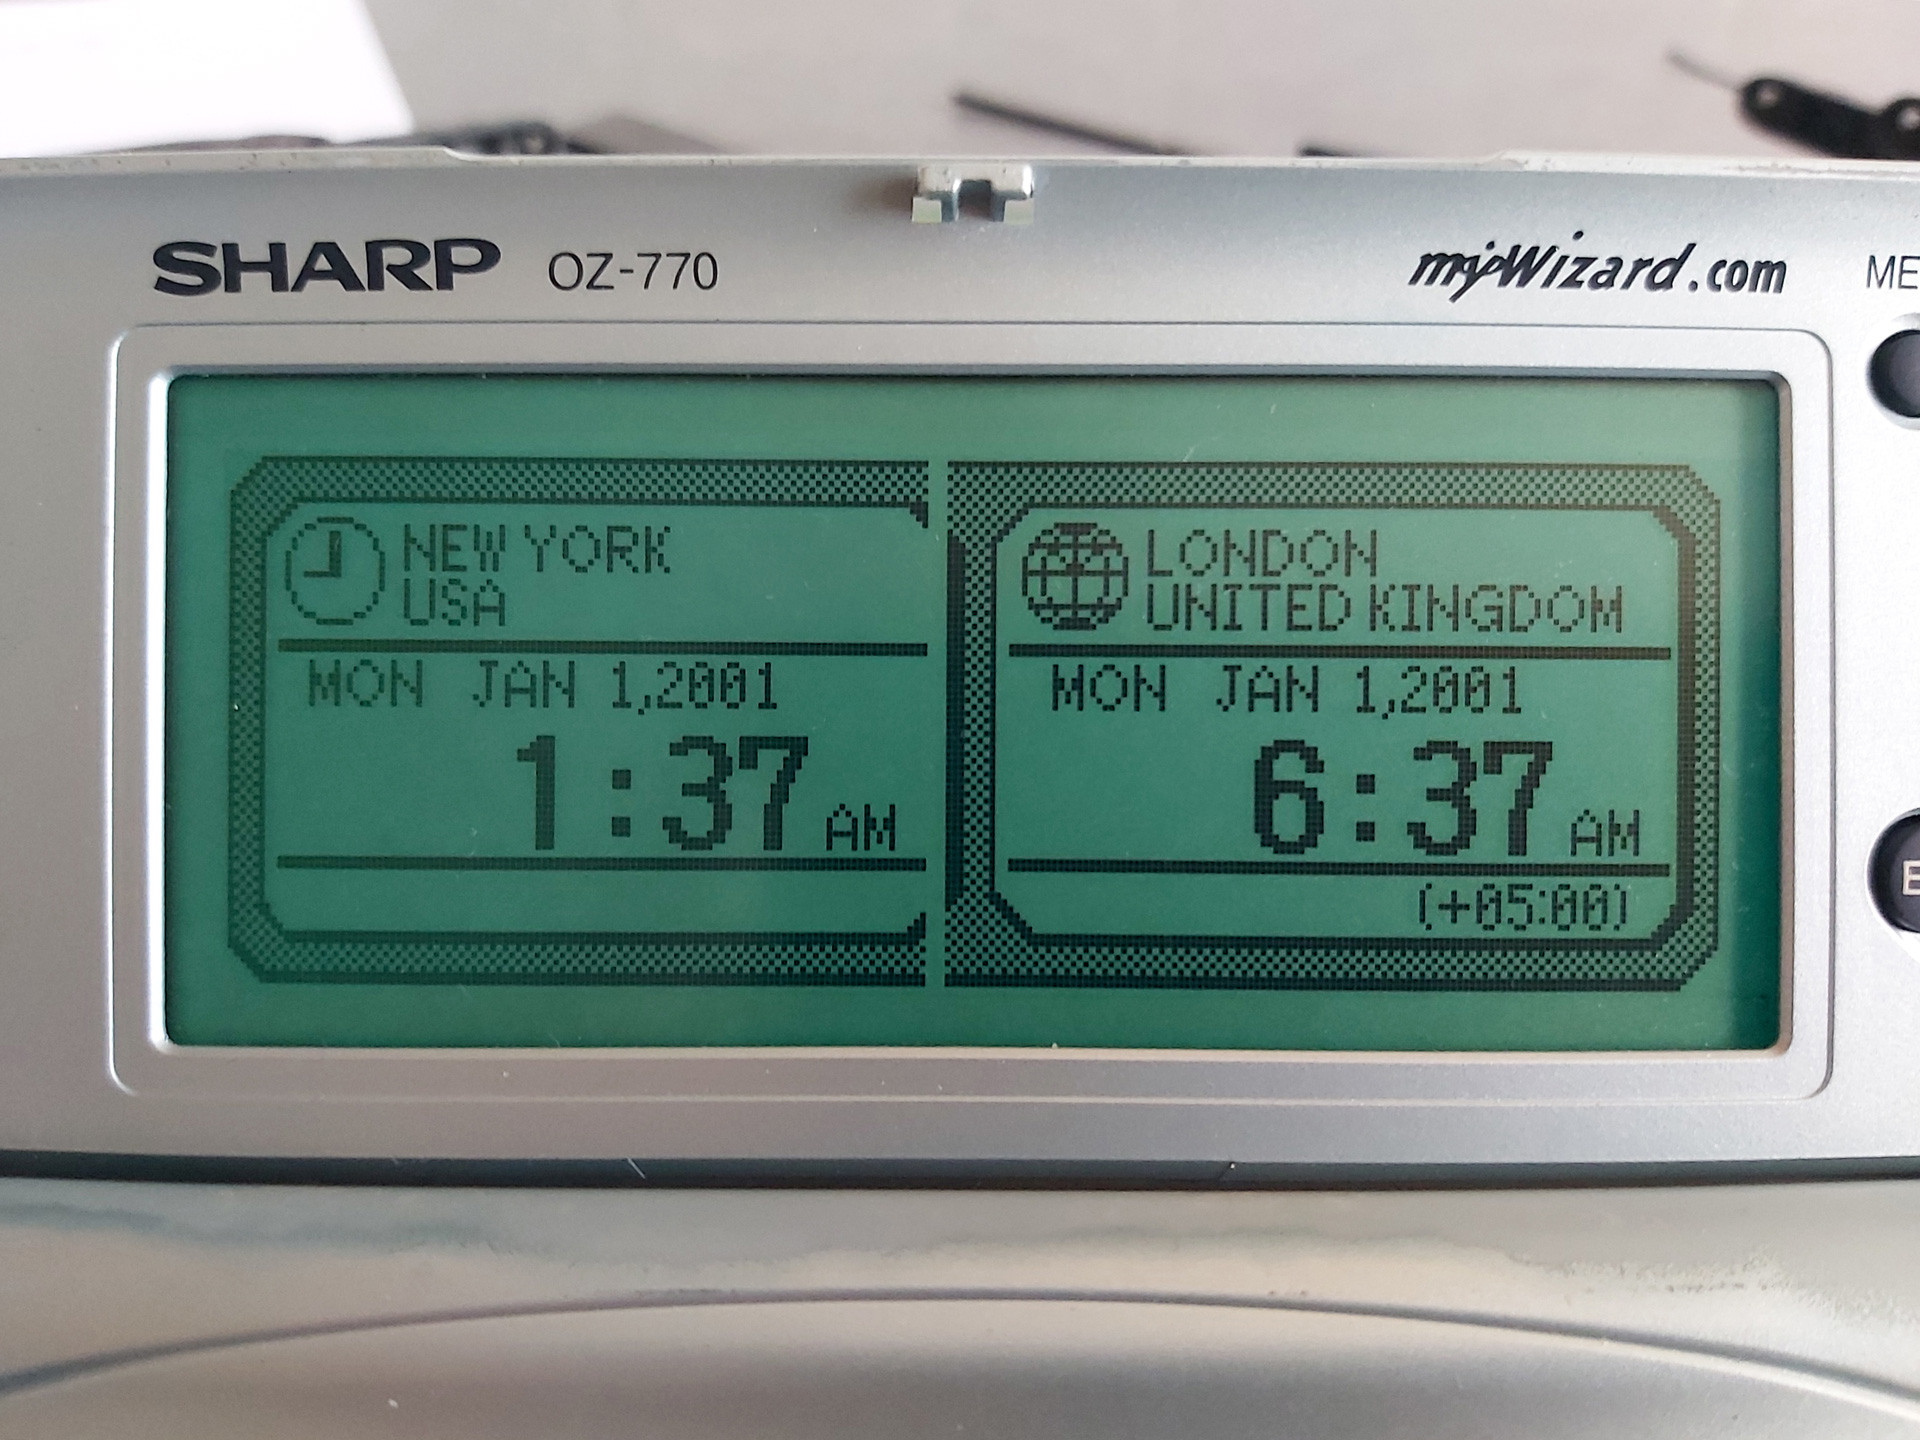
The Sharp ZQ-700 Electronic Organizer, also sold as the Sharp OZ-700 Wizard, was a pretty interesting device. Its large 239×80 pixel resolution back-lit LCD and QWERTY keyboard made it a comfortable device to use, though the built-in programs are somewhat simplified from Sharp's more sophisticated earlier offerings; there's also no card slot for software expansion and the connectivity is much more limited. Gone are the options to connect a serial modem, send a fax, print to a thermal printer or back up data to cassette tape, but perhaps this was all a sign of the times. The US version of the organiser proudly sports the mywizard.com domain name, and the features I mentioned were all pretty old hat in an era when the Internet was being rapidly embraced. Whilst the organiser could not directly connect to the Internet, the accompanying website allowed users to share and download data files for the organiser and synchronise them with a PC using the supplied data cable.
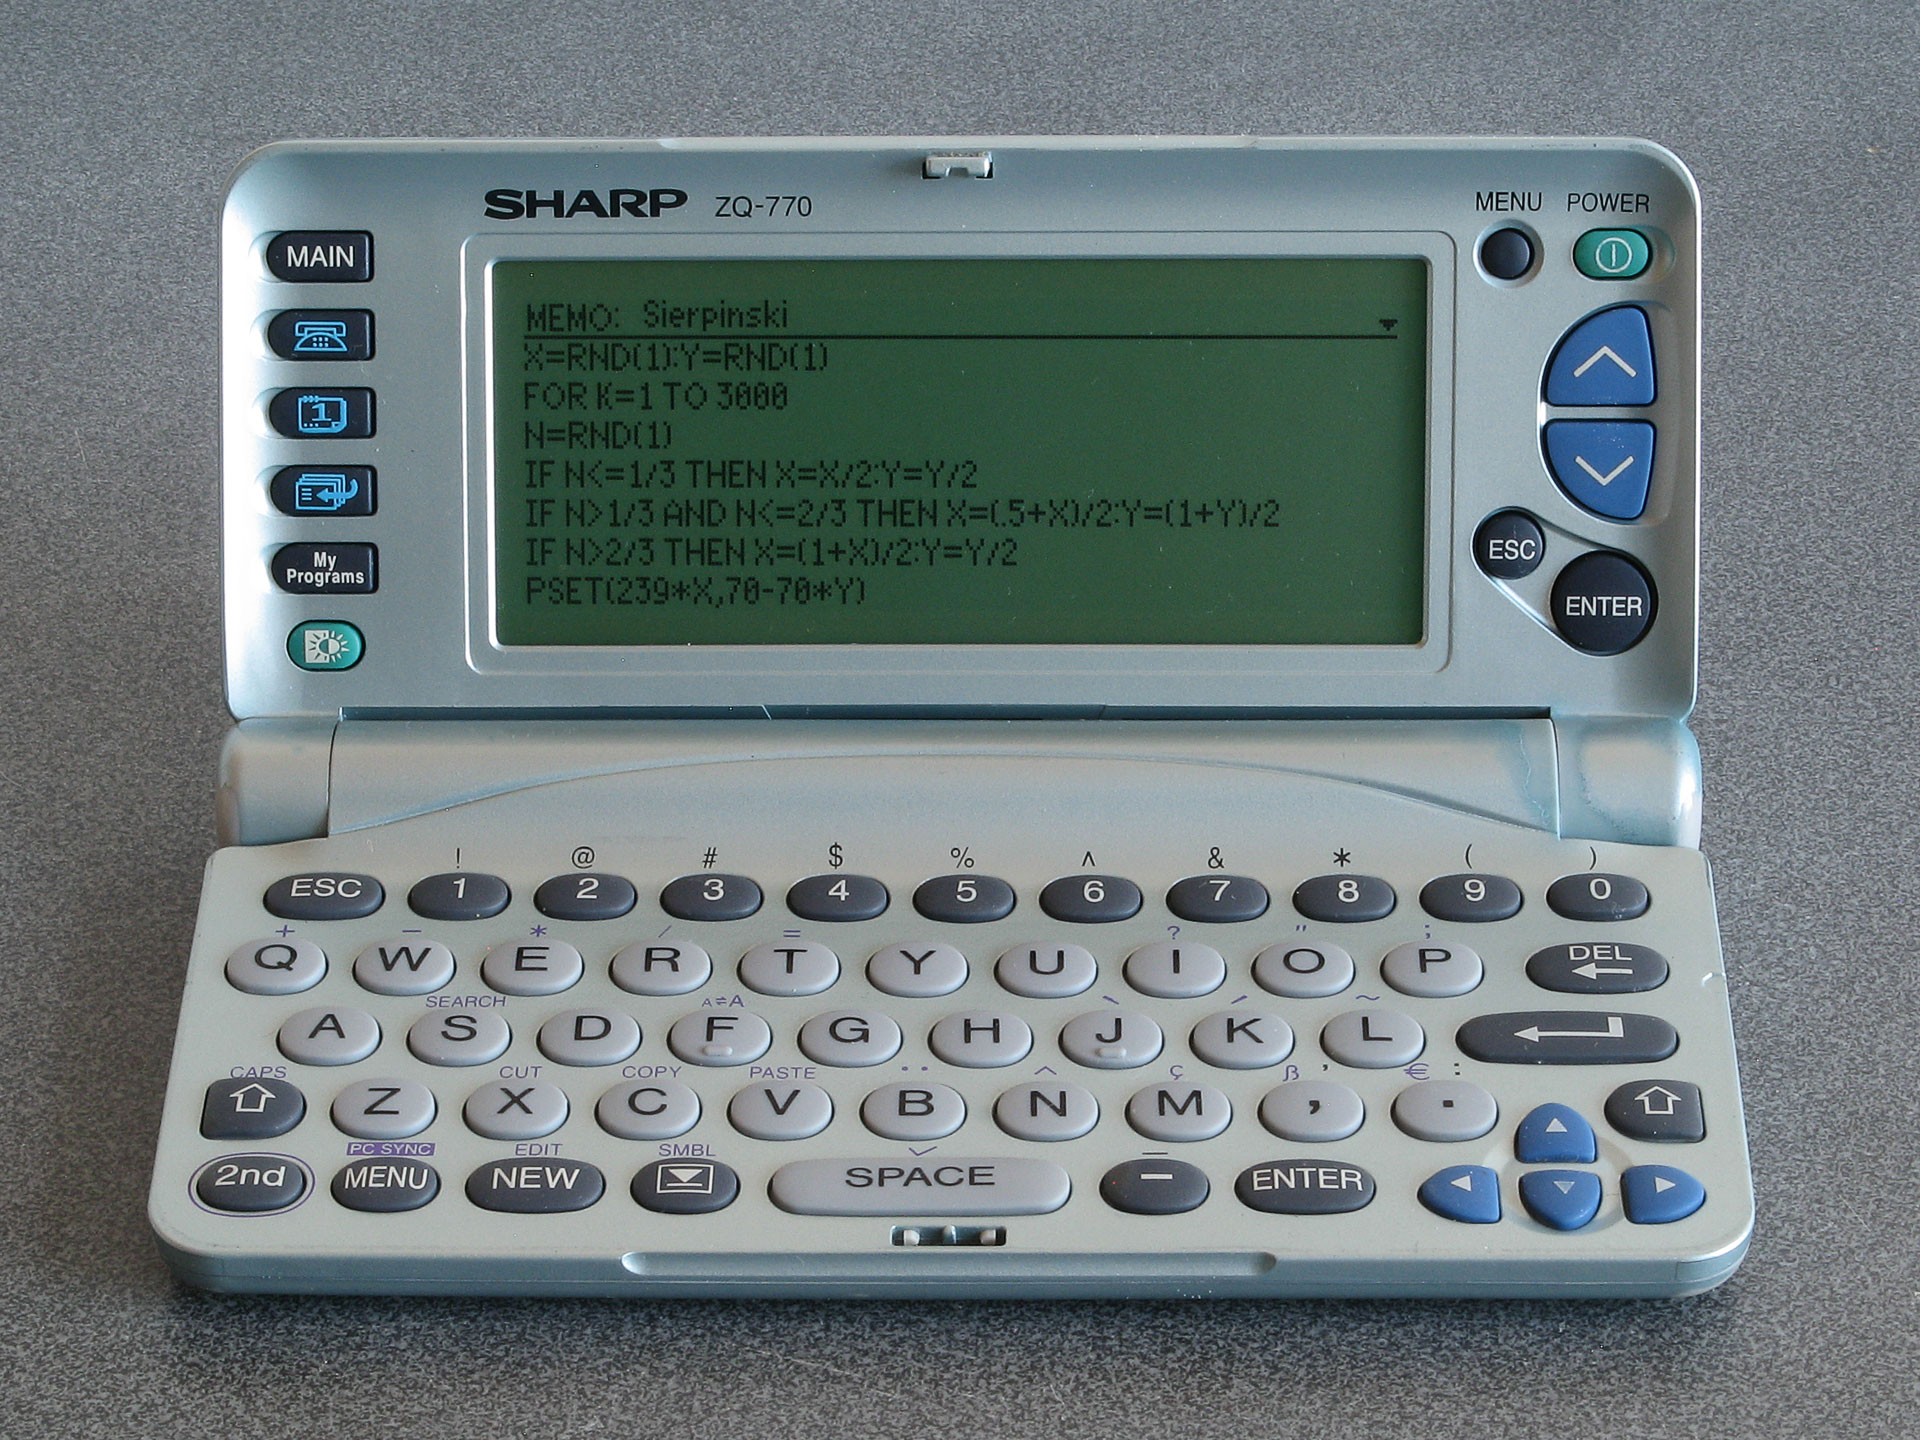
A programmable organiser: Sierpinski triangle code typed into a memo
Where this becomes particularly interesting the organiser's My Programs button. Previous Sharp organisers could be turned into pocket computers via the addition of a Scientific Computer card which included a powerful BASIC interpreter. The ZQ-700 has a BASIC interpreter built-in, and up to ten BASIC programs can be stored on the organiser and accessed via the My Programs button. Unfortunately, these BASIC programs cannot be edited directly on the organiser itself and there is no interactive BASIC prompt, but Sharp supplied a free SDK which let you edit BASIC programs and convert them into the tokenised form that could be transferred to the organiser. Being able to write your own programs to run on your organiser is an extremely powerful feature.
Even better, the BASIC interpreter does provide PEEK, POKE and CALL keywords even though these are not directly accessible when using Sharp's official SDK. By creating a BASIC program with a stub CALL at the start and appending machine code to the end of it it's possible to run native code on the organiser. The organiser is powered by a Z80 CPU, and so a user-developed alternative SDK (including a C compiler) was released, allowing people to write their own native code for the organiser.
Unfortunately, most of the sites relating to the ZQ-700 and its community are long-gone. The official mywizard.com has been offline since at least 2009, though interestingly Sharp do still host some downloads relating to the organiser on their global website. The mywizard.com site eventually required user registration to download files, so very little of the user-generated content has been preserved by the Internet Archive. However, some of the hobbyist sites about the organiser have been preserved there, so it is possible to scrape together a bit of a software collection that way.
LCD repair
Aside from the link rot there are some more pressing age-related issues with the ZQ-700 relating to its LCD. Or, as the case may be, non-pressing issues as the flat flex cable that provides an electrical connection between the main PCB and the LCD's rows and columns gradually comes unstuck.

The photo above shows the typical state of the organiser's LCD after all these years. The discoloured paintwork around the hinges is somewhat less typical; I bought two organisers recently for cheap due to their non-working condition, and both showed signs of severe alkaline battery leakage. The two organisers were sold as a pair, and both were showed the same owner's name and address when powered on. I always find it interesting if an electronic organiser has any old user data on it, as it gives you an impression of how much the owner appreciated the device; in this particular case these organisers were very heavily used, with around 5,000 records stored on each. This gave me all the more inclination to want to repair them. As well as thousands of contact details and diary entries there were also numerous BASIC programs in the My Programs section, all related to cars and financing, so I thought it would be worth trying to find a way of backing up said programs before erasing all of the personal data from memory.
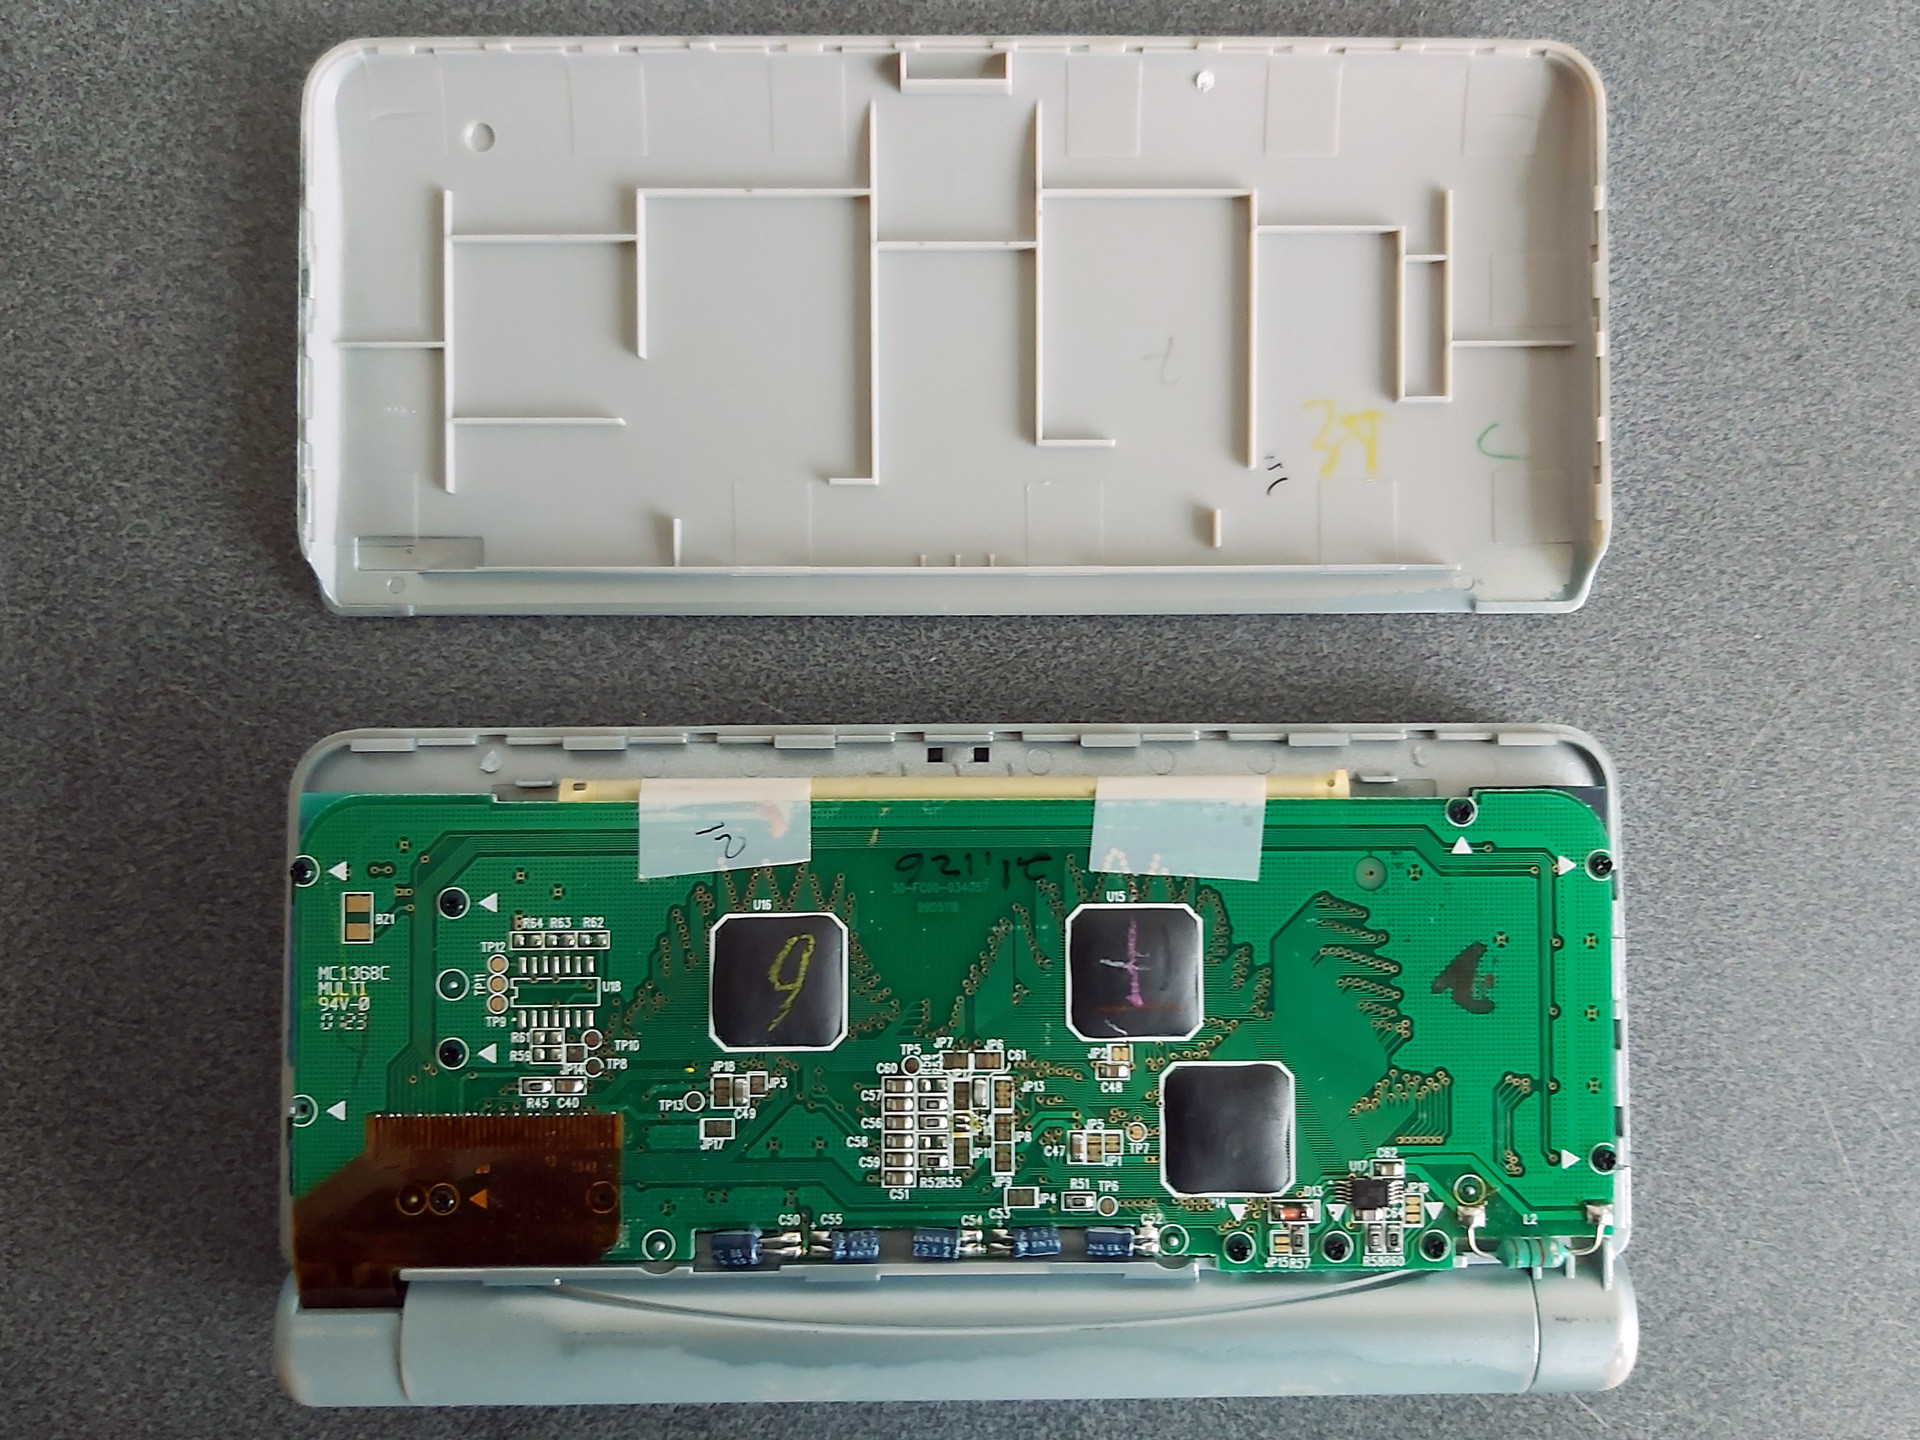
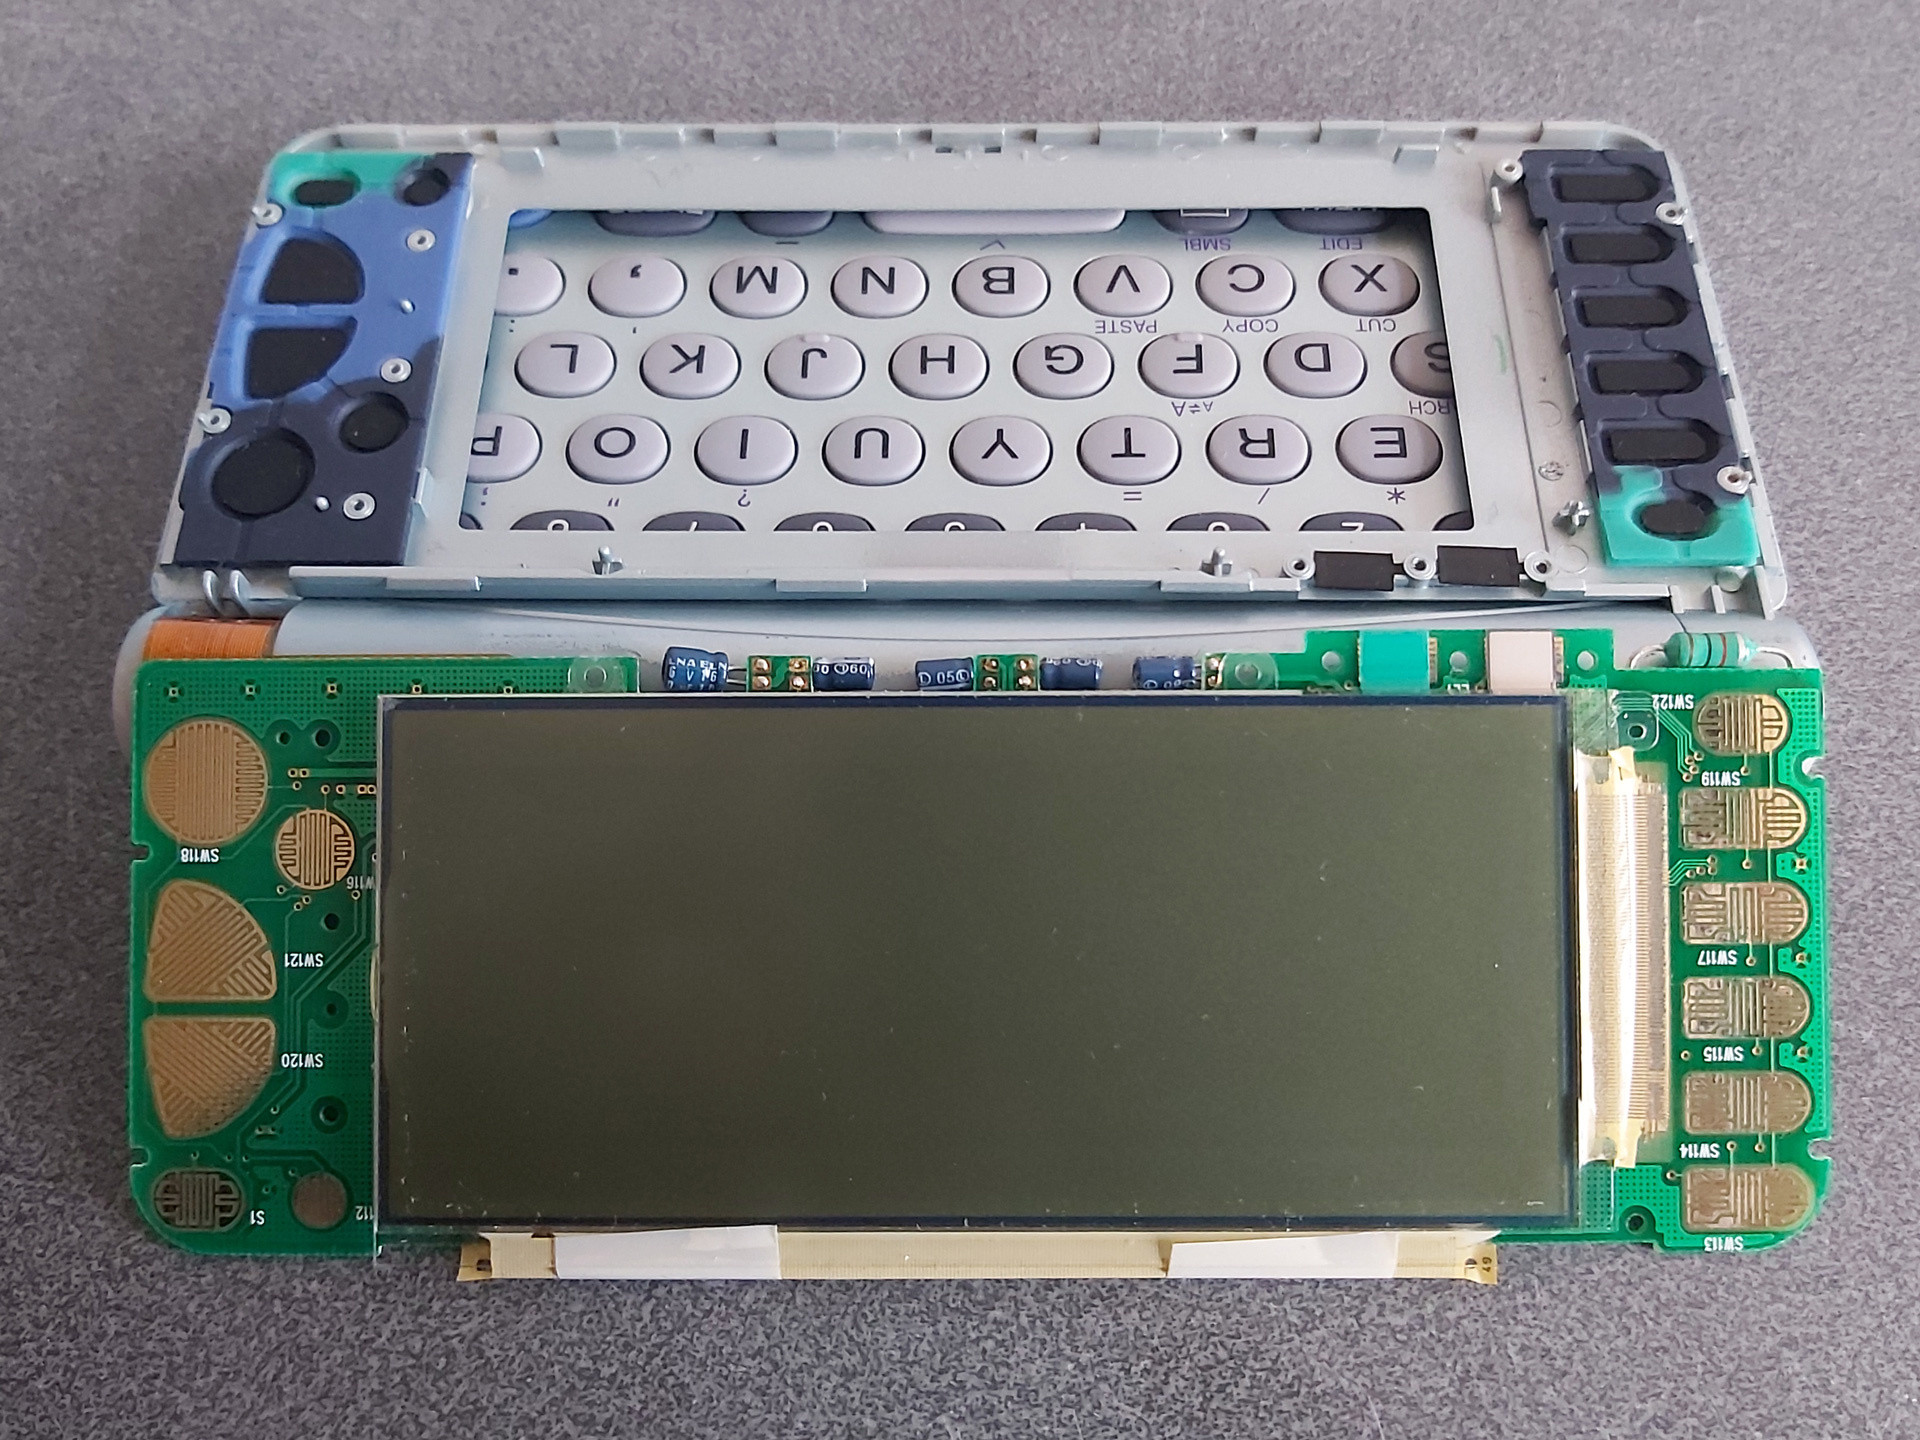
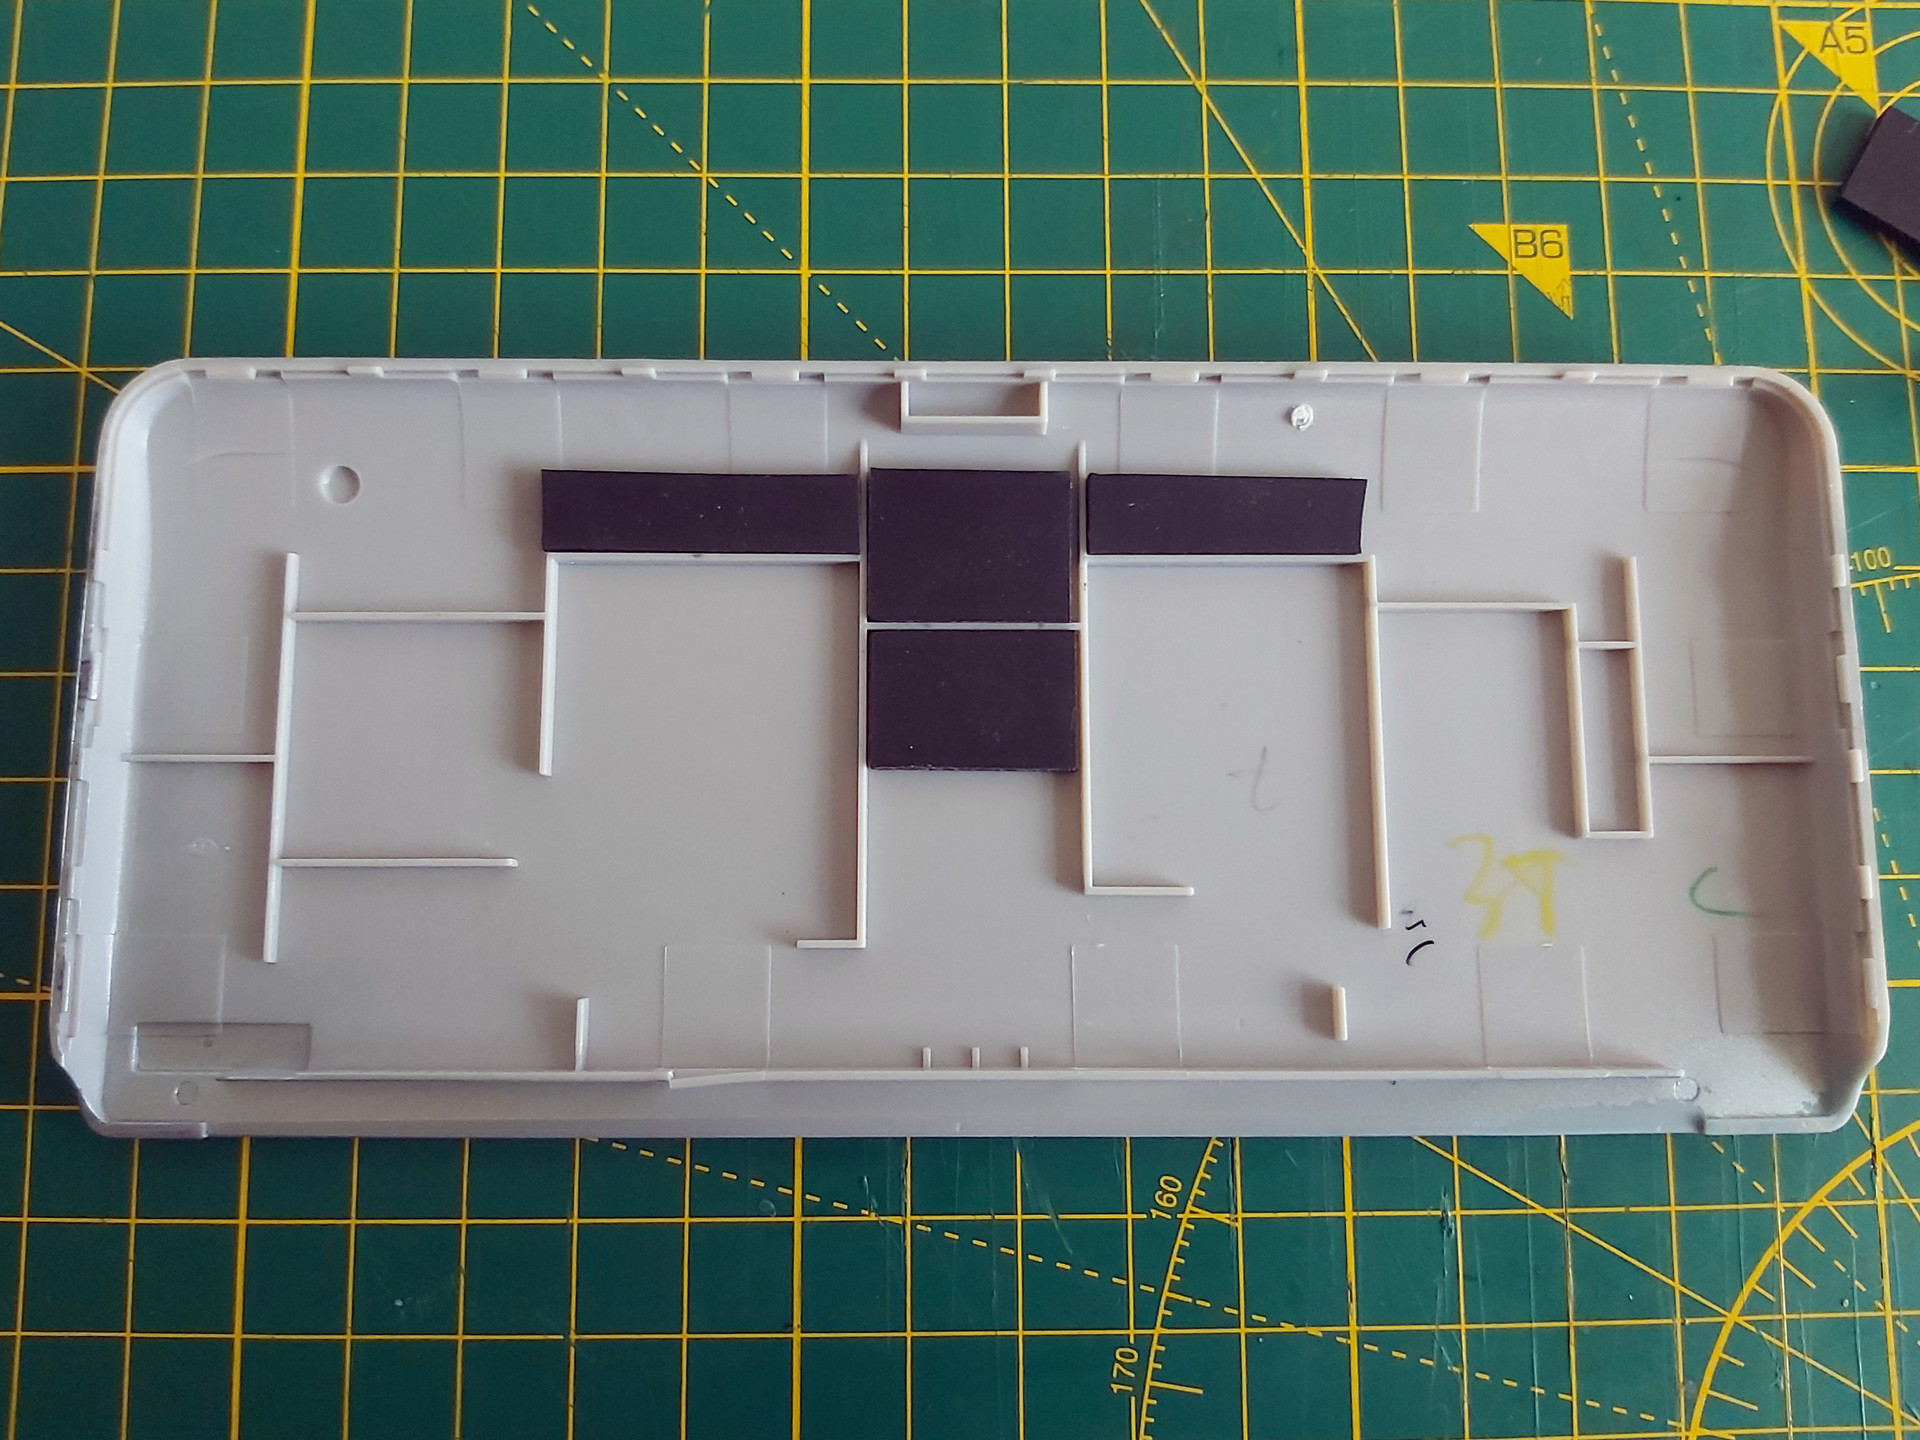
Getting access to the LCD is reasonably easy; the rear cover simply clips on. I find it easies to start popping it off near the hinge side, unclipping both sides and working up towards the top edge furthest away from the hinge. Some screws hold the PCB in, with each screw hole marked with a white triangle. In my case one screw was missing from the factory! The LCD glass itself is secured to the front of the screen housing with double-sided tape; some gentle pressure on the screen from the inside will unstick it.
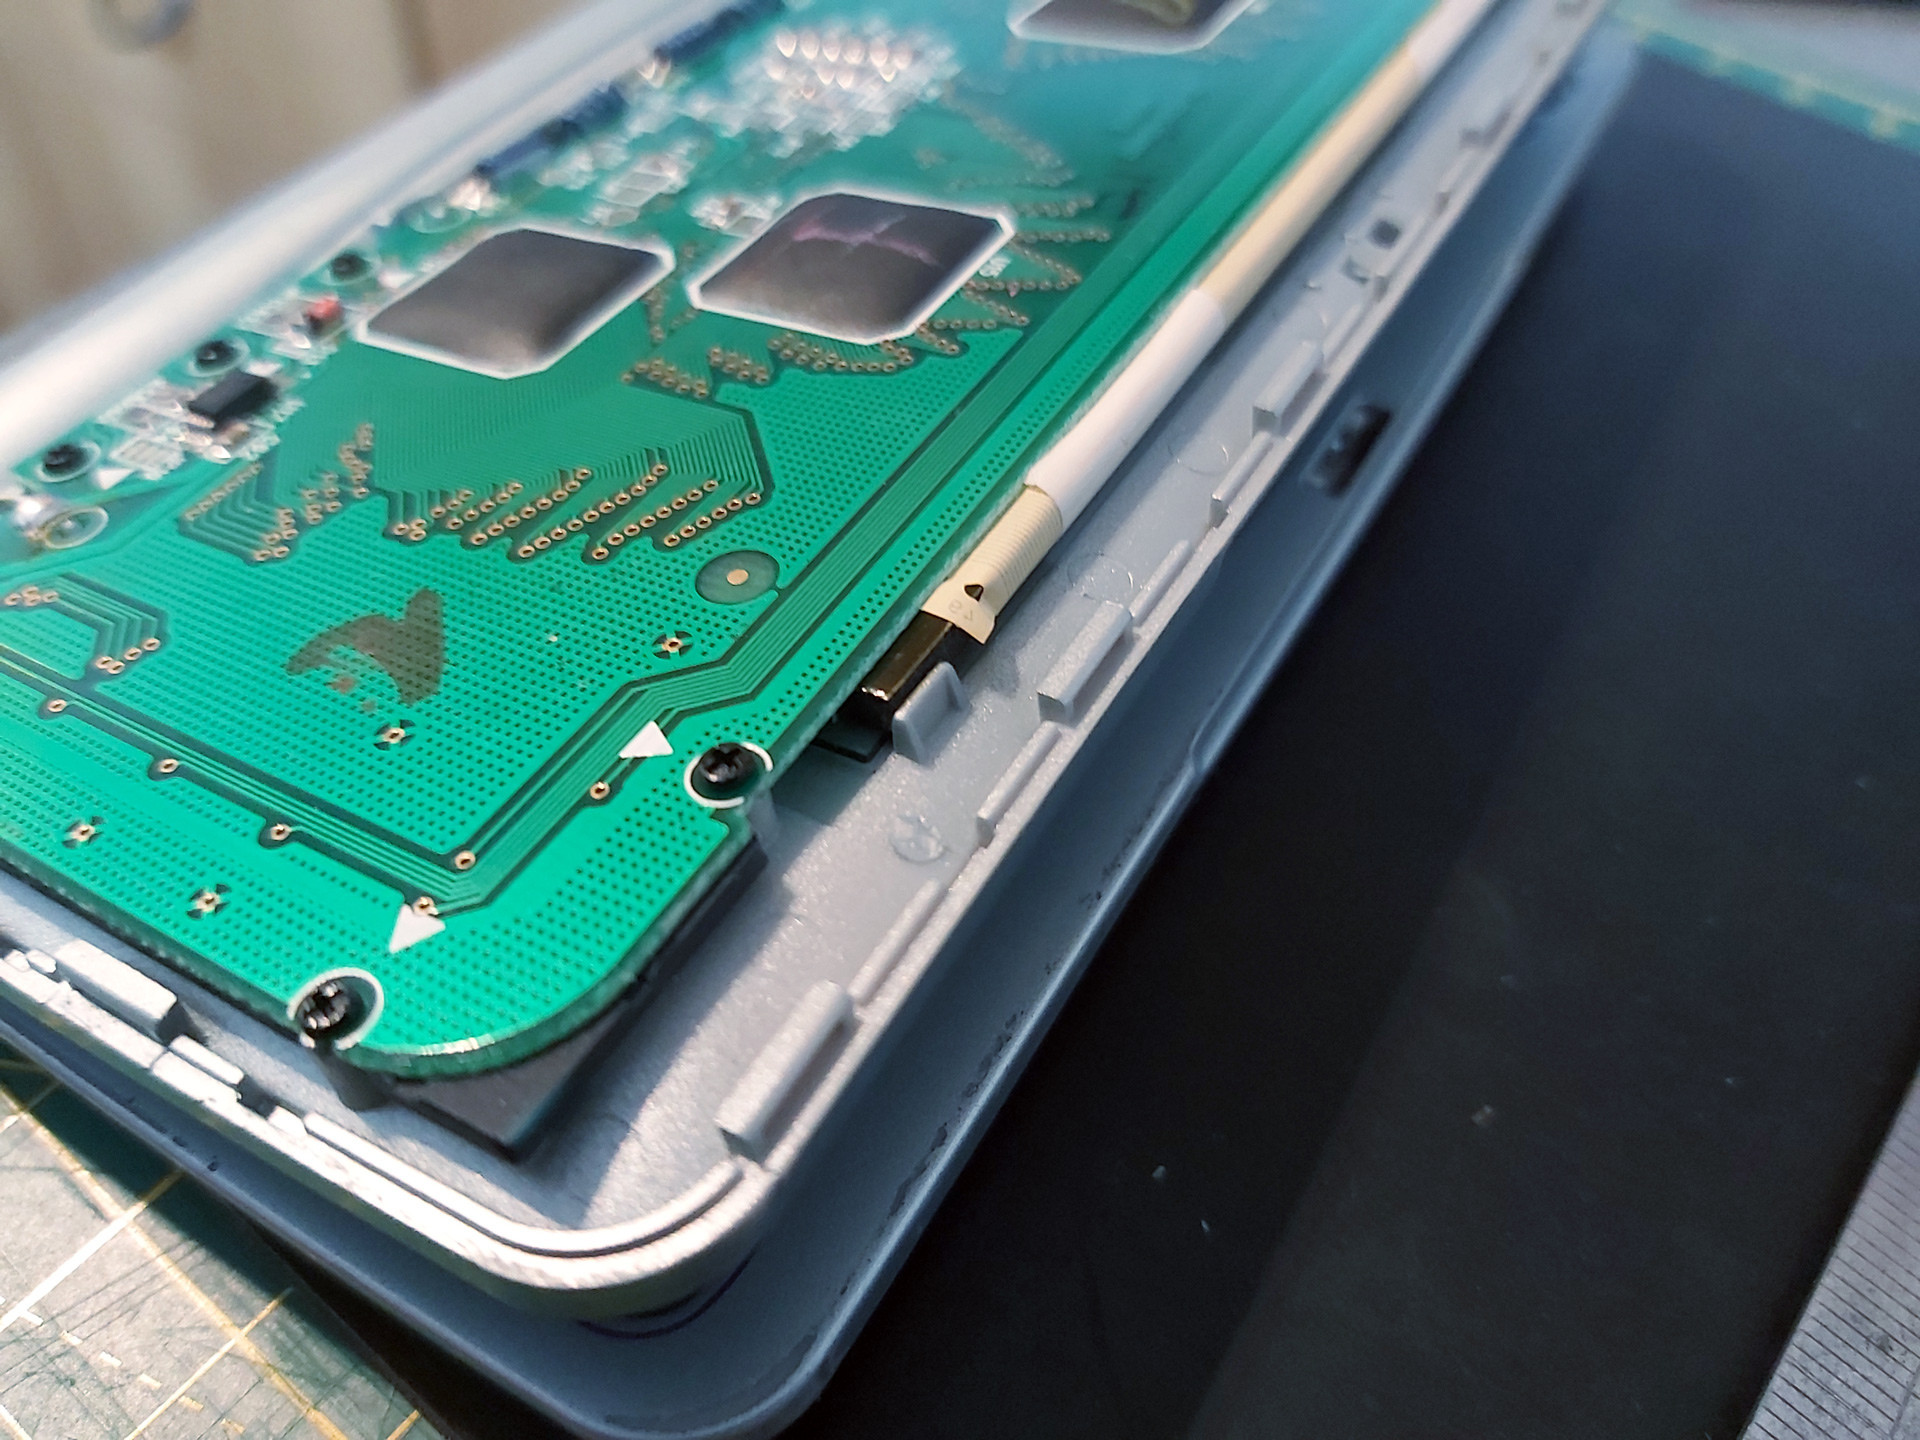
The flat flex cables that are stuck to the LCD glass use a heat-activated adhesive. One potential fix for the cables coming unstuck is to heat them with a soldering iron to reactivate the adhesive, though this is a somewhat risky procedure. In this case, however, that is not an option due to the use of two cables at right angles to each other, with the problematic column-driving cable being folded between the LCD and PCB with no easy way to access it with a soldering iron.
A mechanical fix can be an option, however. This involves finding some way to put pressure between the flex cable and the PCB and/or LCD to physically hold the cable against the contacts. Thin rubber sheeting can work well for this, and for the ZQ-700 series I've found cutting a piece that's 3mm wide and about 105mm long from a 2mm thick sheet does a good job.
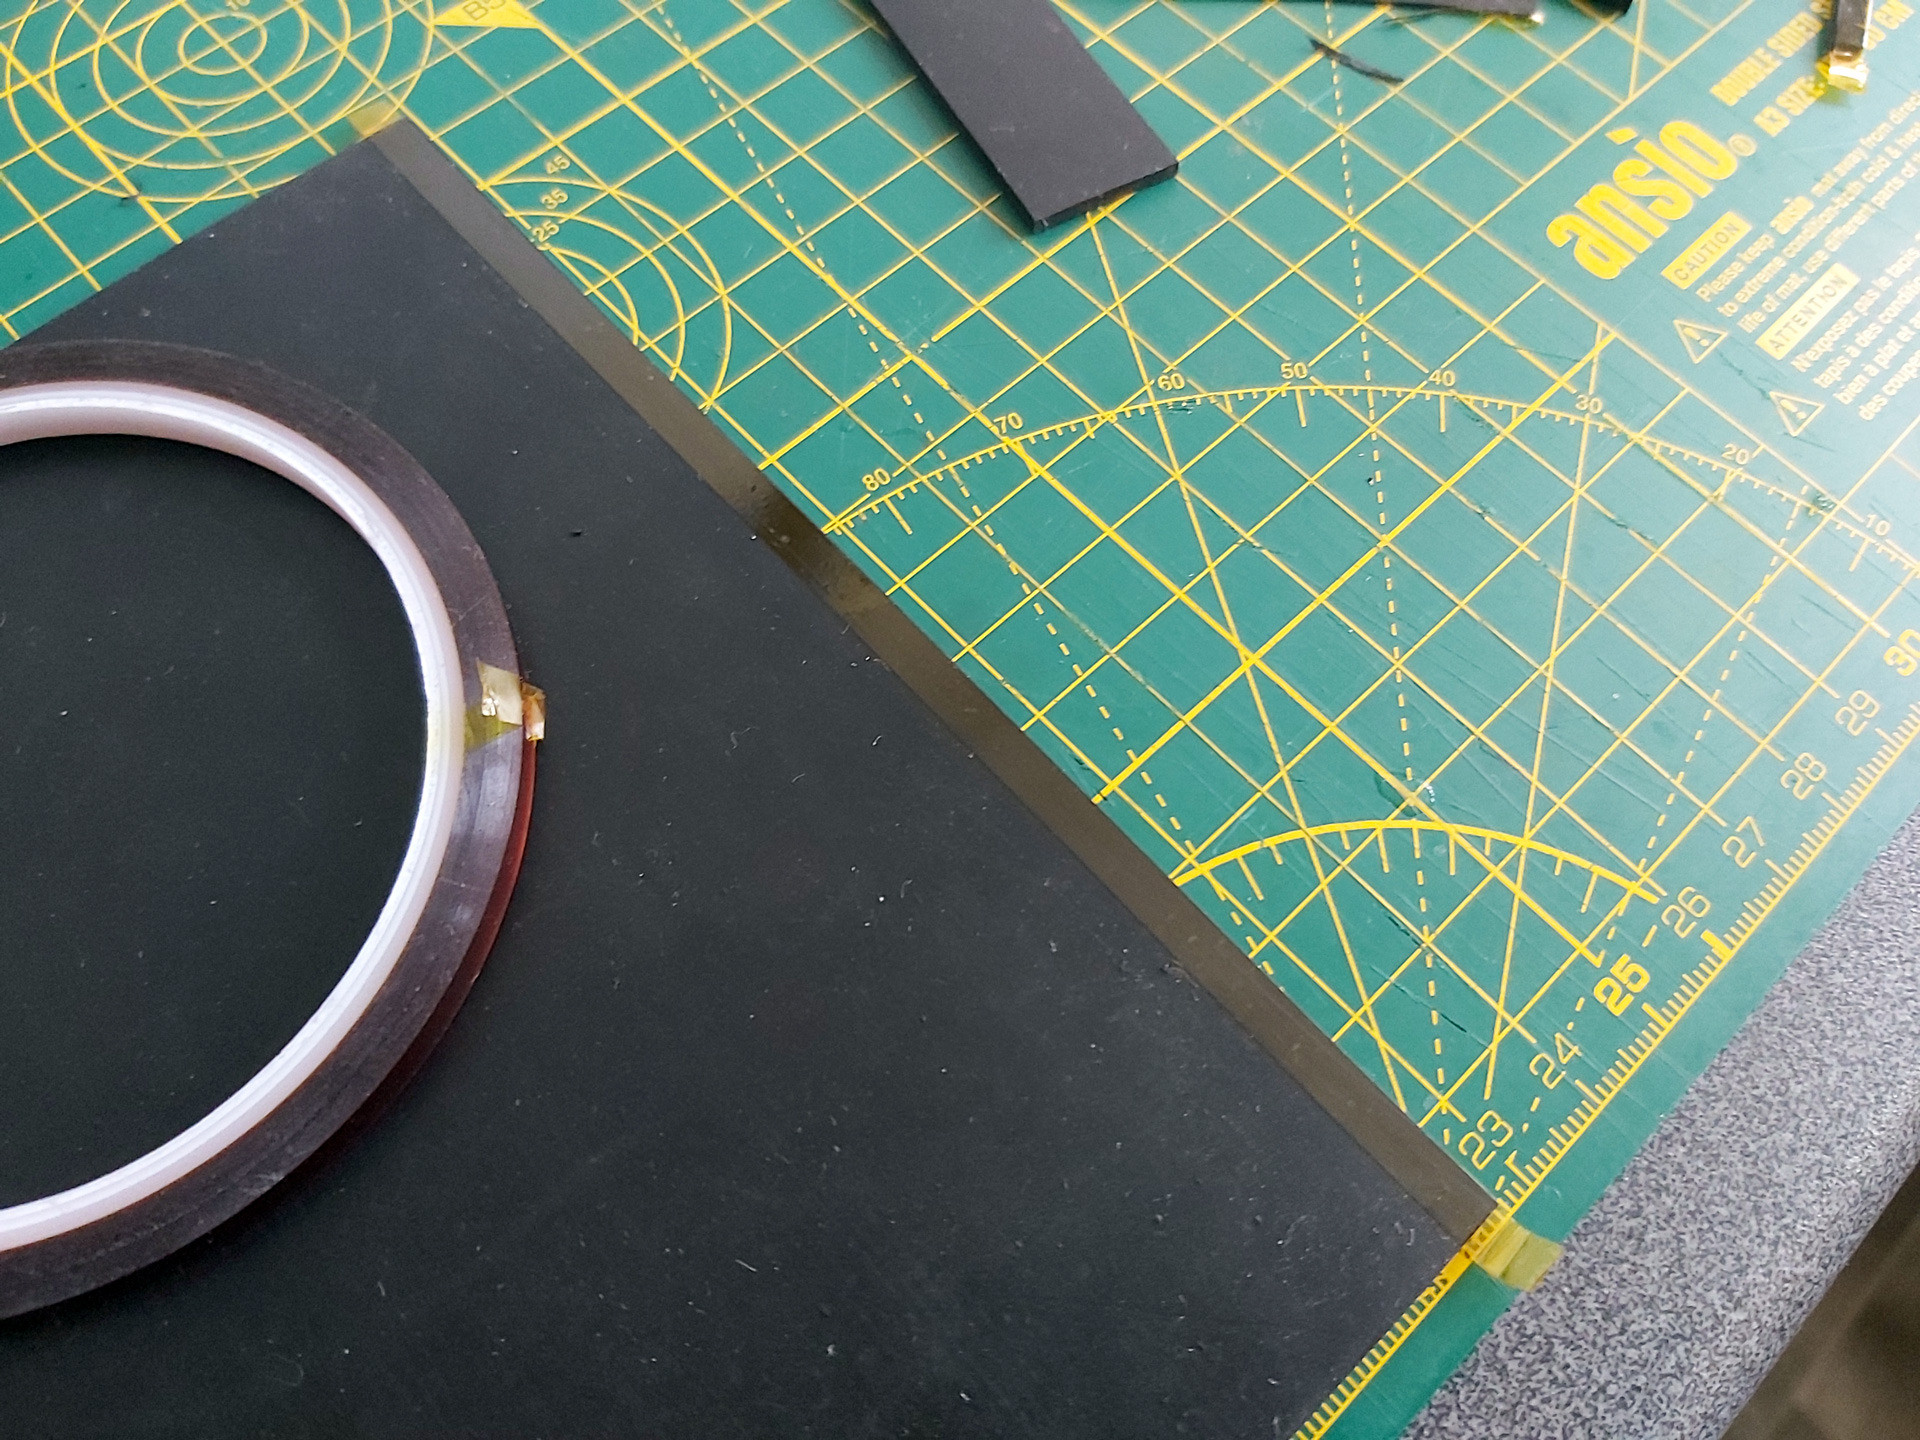
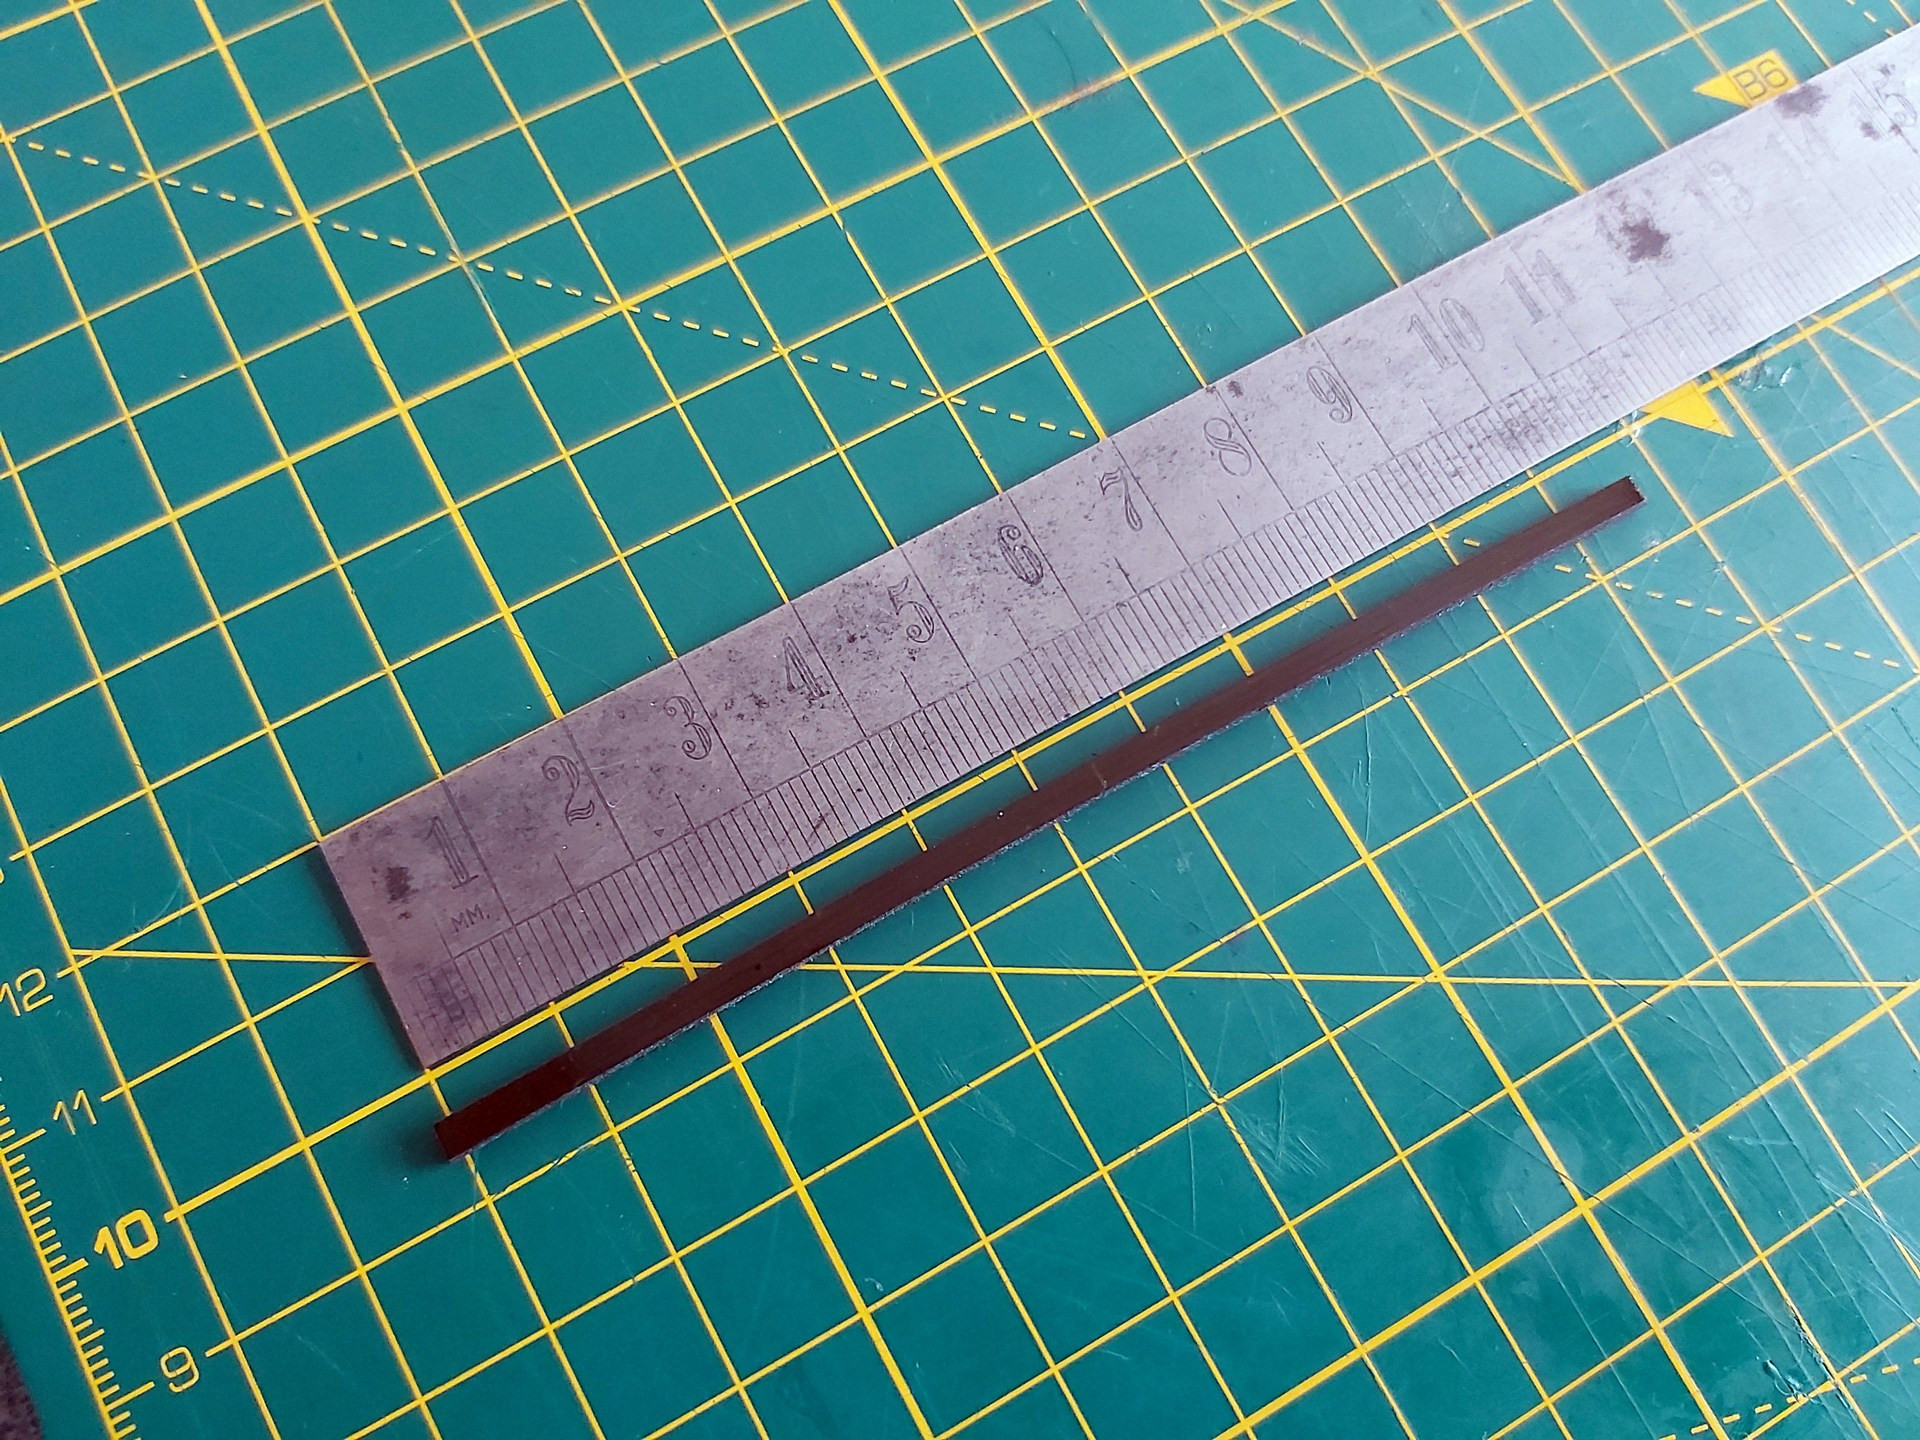
I also put two layers of Kapton tape on each side of the rubber strip before cutting it out. Aside from a little extra thickness, this gives the otherwise grippy rubber strip a smooth surface that will make it easier to slide into the fold of the flat flex cable between the LCD and its PCB.
There are two pieces of white tape stuck to the back of the PCB and the flat flex cable which pull on the cable slightly and can make it harder to install the rubber strip. Rather than remove these entirely I very carefully peeled them off the PCB and then cut them rather than try to peel them off the fragile flat flex cable and cause further damage.

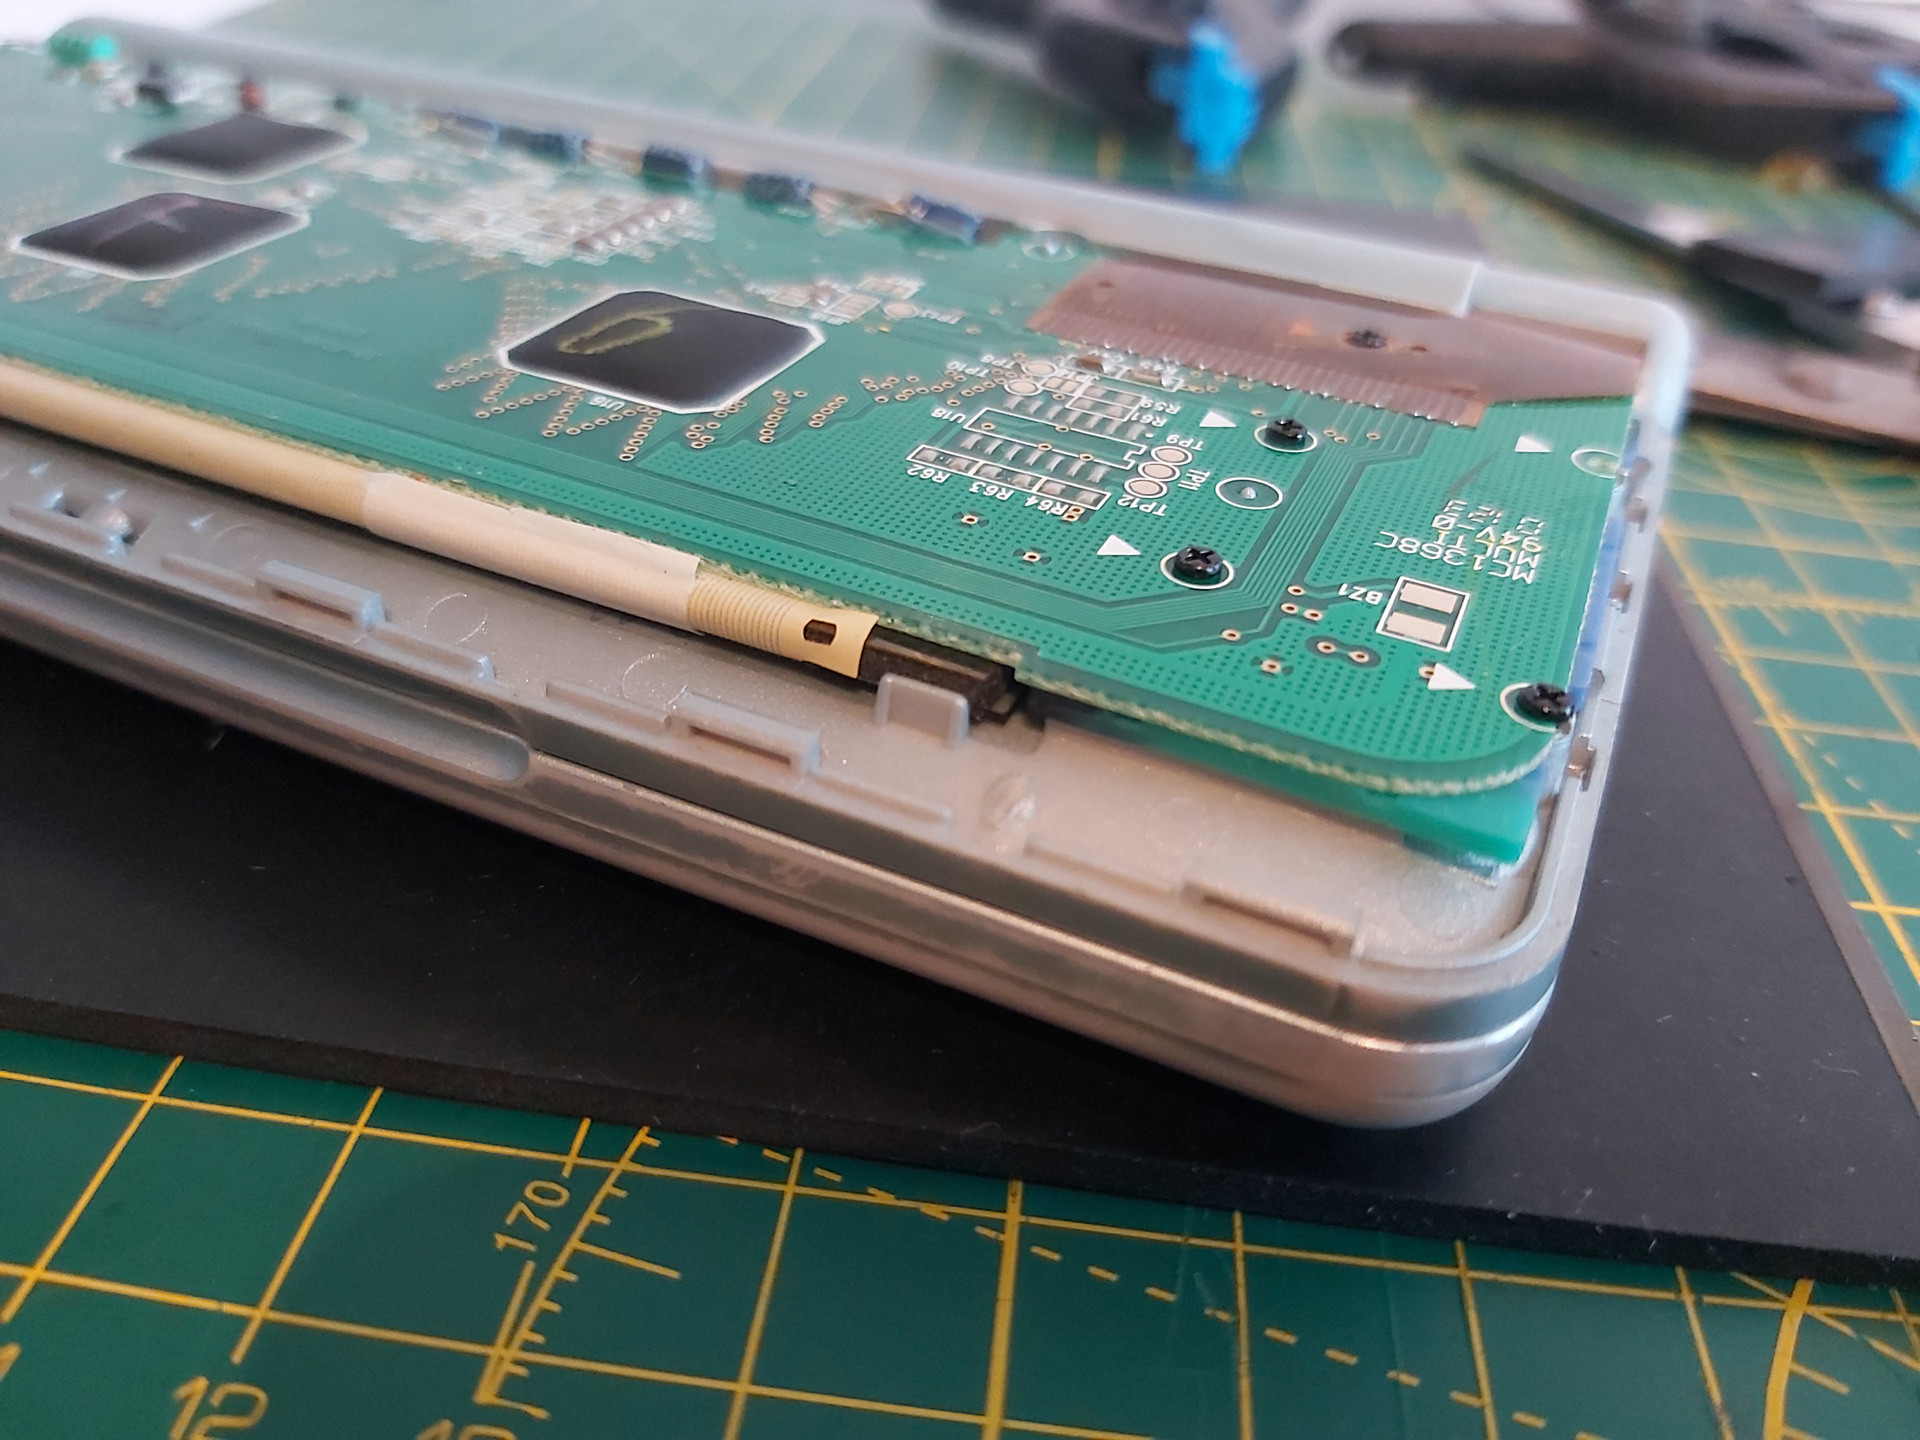
After installing the rubber strip and screwing the PCB back down, there was a notable improvement but not all of the columns came back. Putting some additional pressure on the back of the board in just the right place resulted in a complete picture. One possible way to apply this pressure is to put something inside the back cover so that when it's clipped back on it simulates what my thumb was doing in the previous set of photos:
Unfortunately in this organiser's case there was still one missing column, and this was with so much rubber stuck inside the back cover that the whole screen was bowing outwards and could no longer be clipped shut. This clearly wasn't the answer, so the rubber pieces inside the back cover were peeled off. Some targeted application of the heat treatment seemed like the next best option.
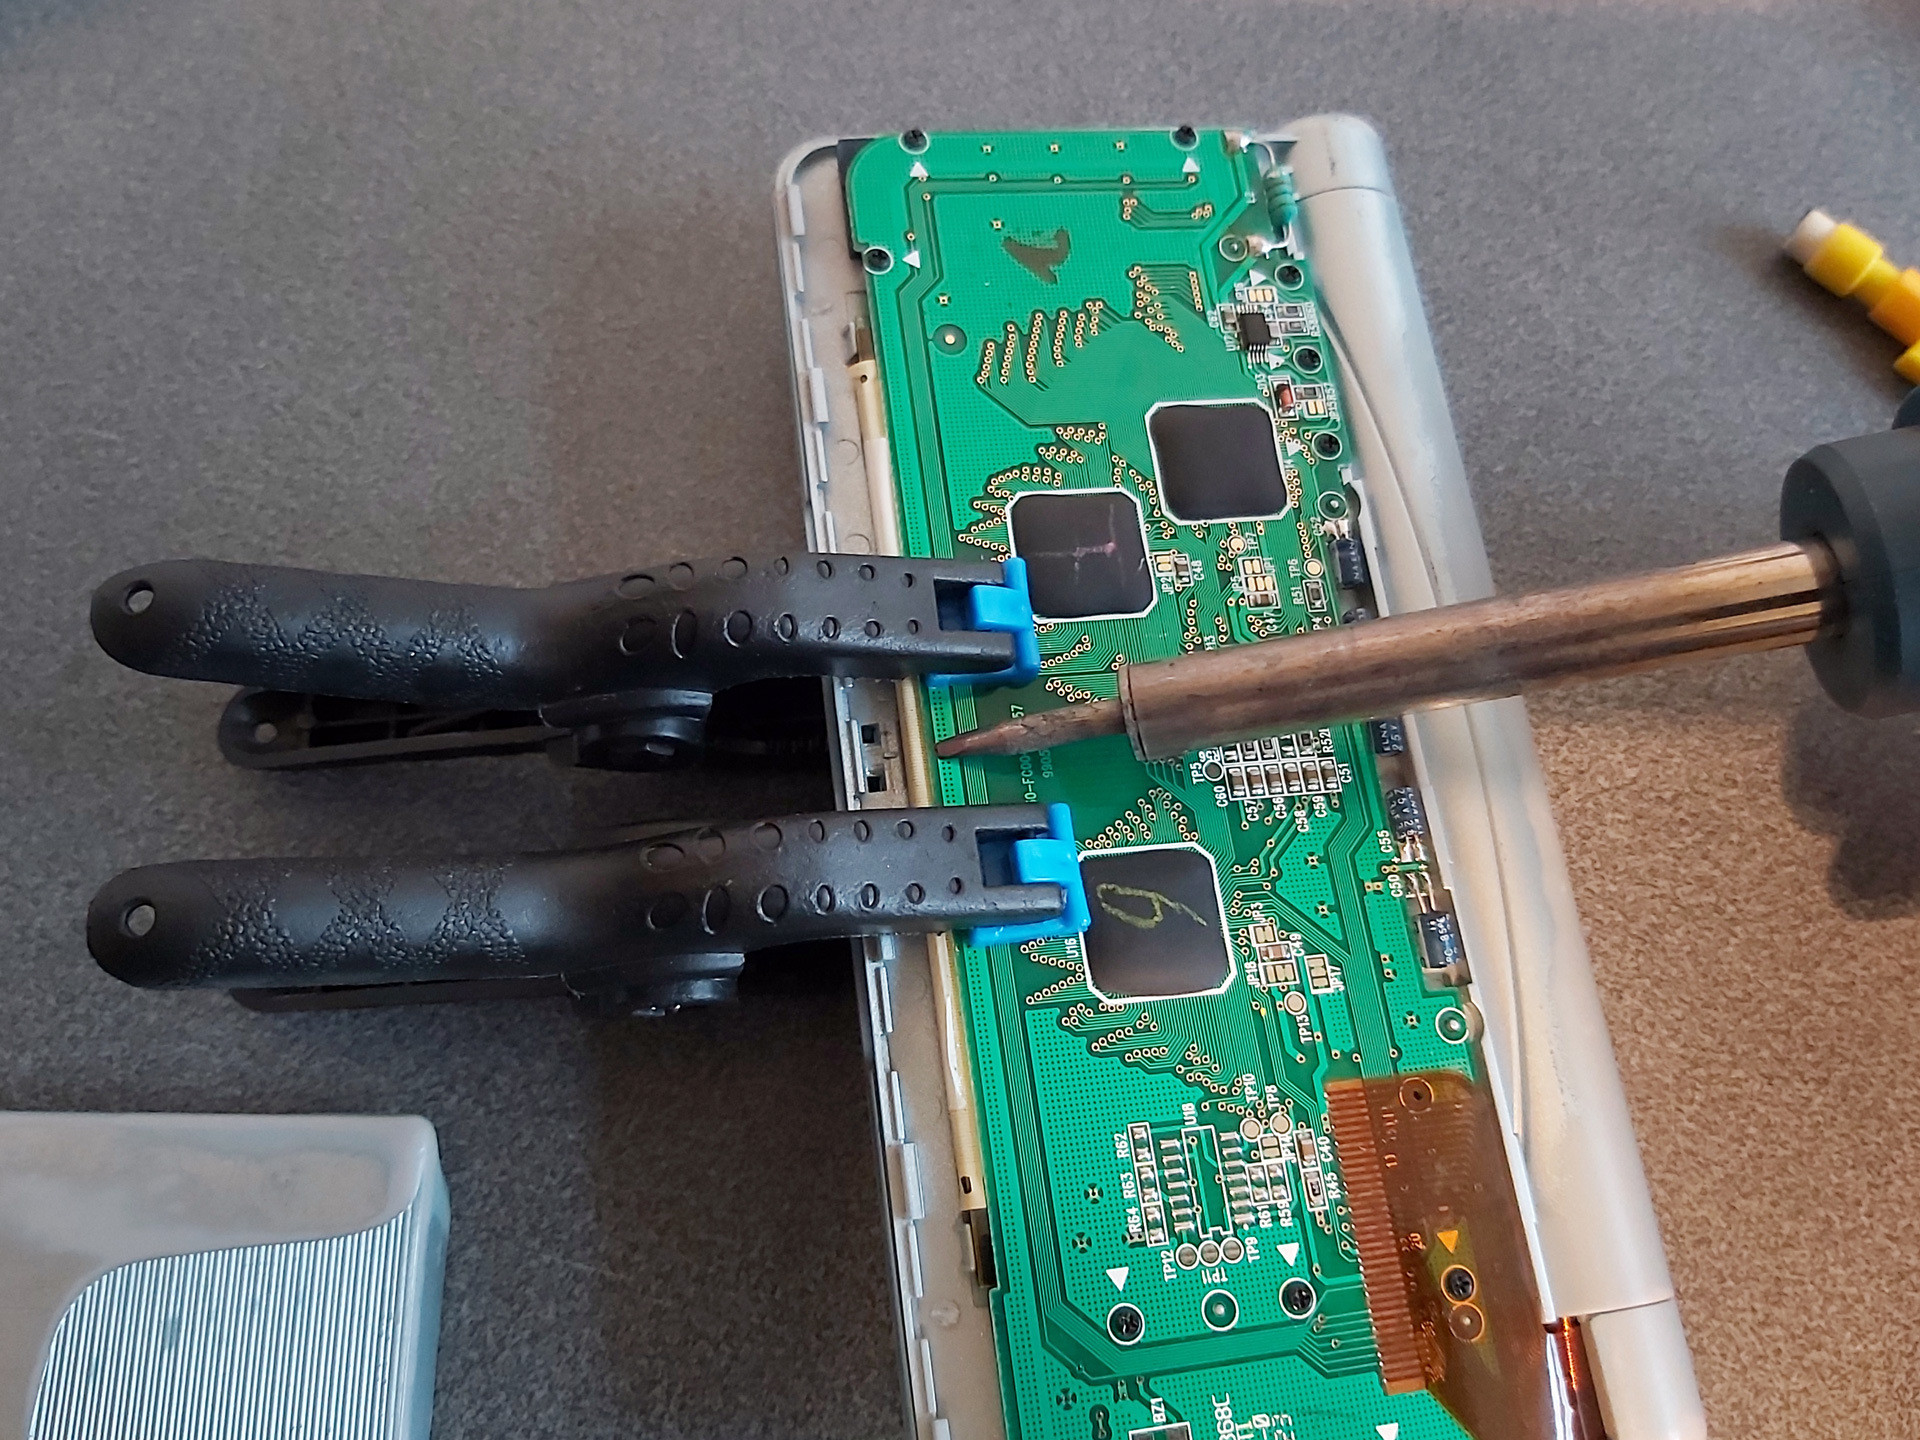
There is no direct access to the flex cable, however there is nothing too delicate on the opposite side of the PCB which we do have access to – mostly just a thick copper track. A pair of spring clamps were placed on either side of the missing columns, applying firm pressure to the cable courtesy of the rubber strip inside its fold. The soldering iron was set to 350°C and held against the copper track for a few seconds. Everything was left to cool, then the results were checked – all columns were back!
I must stress this is a risky operation, as the flex cable is very delicate and heating it can ruin it. 350°C is far too hot for directly heating the cable and if the soldering iron slips and makes contact with the cable you'll probably melt a hole in it. When directly heating the cable I use an iron at around 240°C, but even then I only lightly swipe it across the cable in the direction of the contacts – no prolonged contact and no firm pressure.
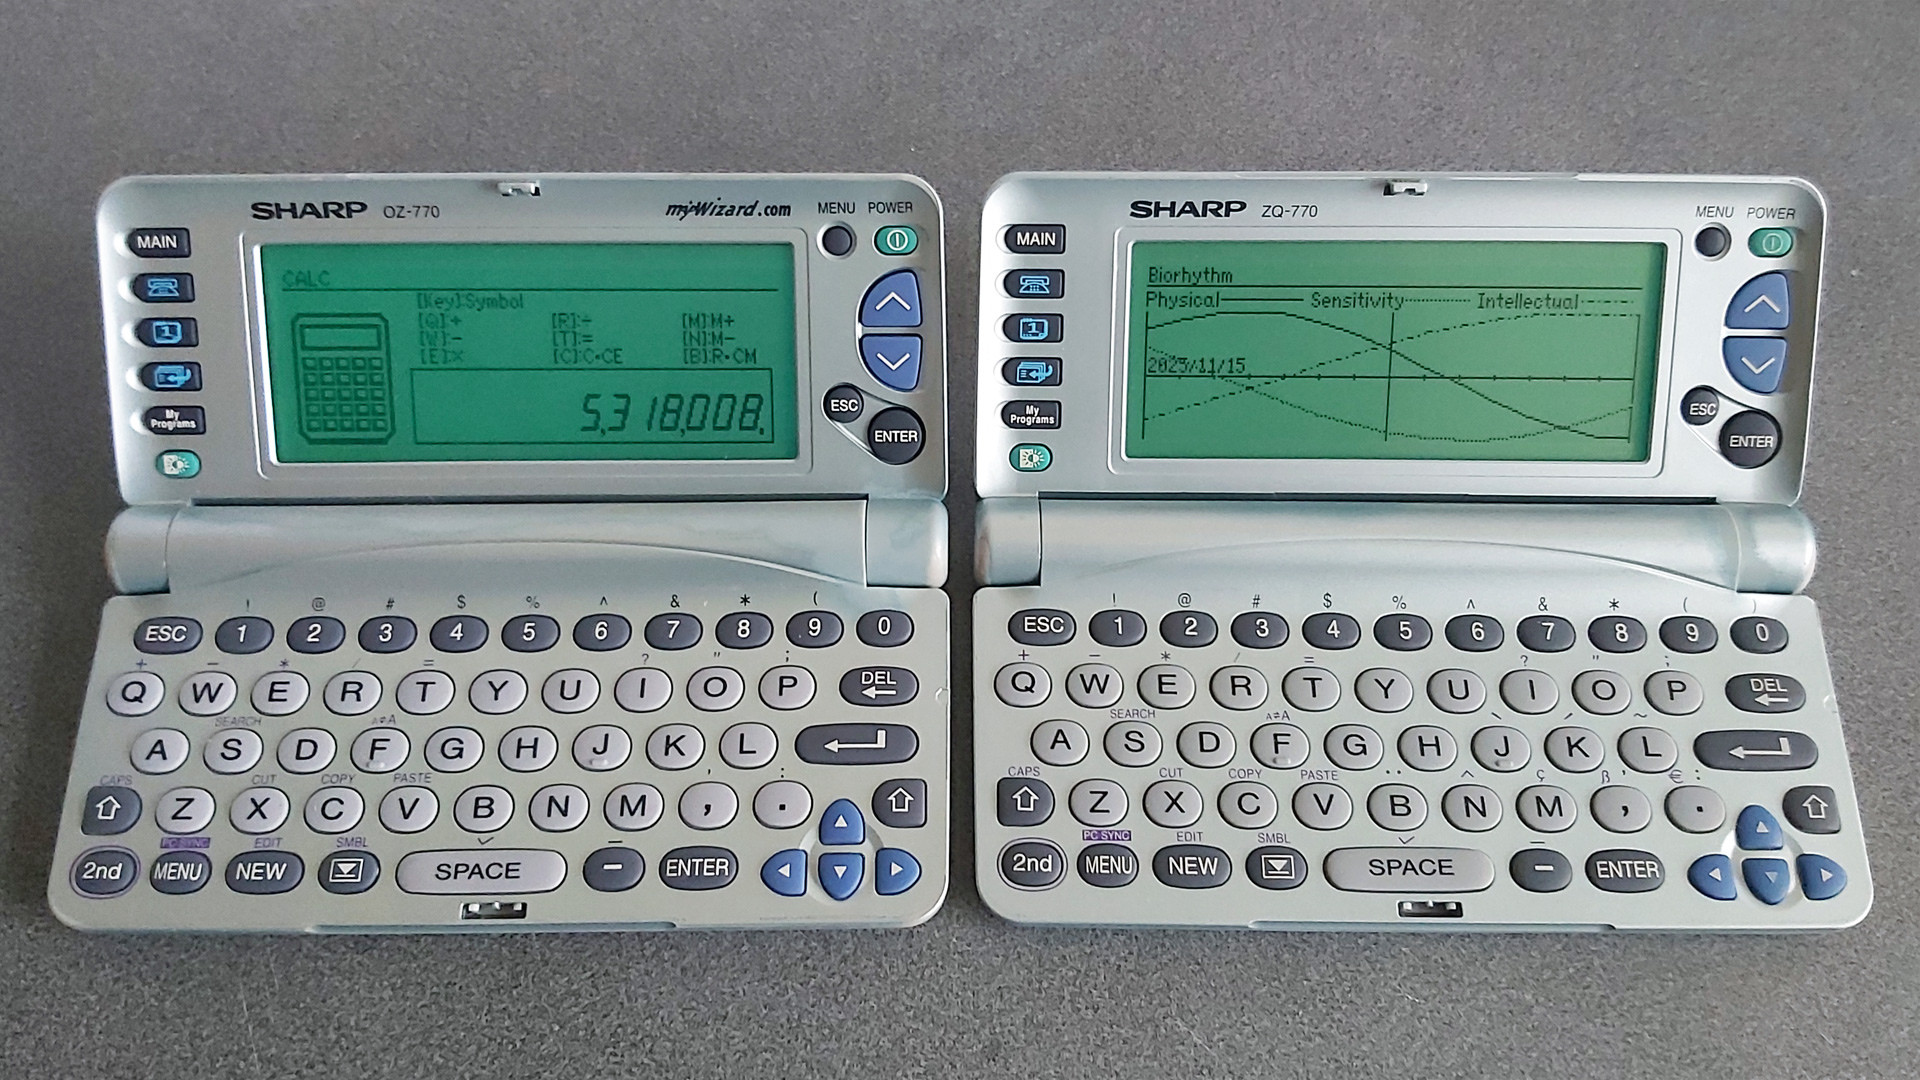
Once I had the OZ-770 working I turned my attention to the ZQ-770, the other organiser from the pair. This one also has faulty columns on its display, however the fault is rather more intermittent – gently flexing the screen brings the missing columns back, and once the organiser has been on for a short while they generally remain visible until the organiser is switched off for a while. It'll probably need repairing in the future, but for now it's working well enough that I don't want to risk accidentally making it worse.
Backing up My Programs from ZQ-700 series organisers
One of the two organisers I'd bought had a number of BASIC programs loaded into the My Programs area. Unlike the personal data, which I had wiped, I thought it would be interesting to preserve these BASIC programs. Connecting the organiser to a PC is easy enough via an RS-232 serial cable; though I don't have an original one, I was able to make my own from a 3.5mm TRRS connector and a DE-9 plug following the wiring diagram on IMSL Software's copy of a page from the OZdev website. IMSL Software also develop the XLink/Win software which can be used to synchronise data between a Windows PC and an organiser, though this won't let you back up the data from My Programs.
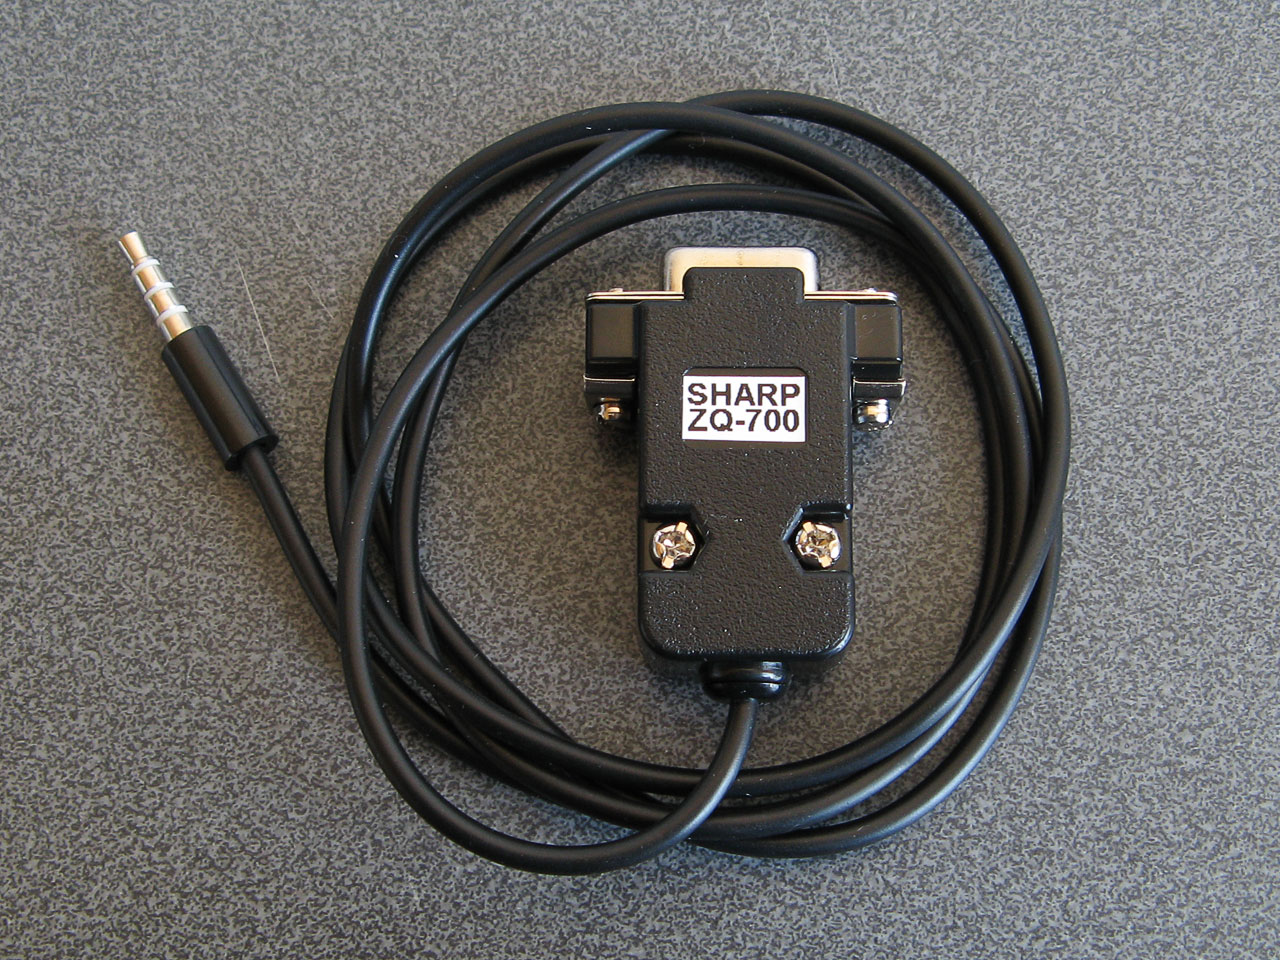
A home-made serial cable for the ZQ-770
Sharp supplied a copy of Day-Timer Organizer for similar purposes and though this won't help back up My Programs either there is a handy backup utility on the CD that can dump the entire contents of the organiser to a file. Someone has uploaded a copy of this OZ-700 Software CD-ROM to the Internet Archive, and though it can't seem to restore backups on modern versions of Windows it happily created backup images from my organisers.
I did take a look at the created backup files and though they looked like nonsense at first I think this is because all of the bit values are inverted. After flipping the bits back I could find various program fragments, though they not contiguous so I suspect there's a file system or similar data structure embedded in the backups that make pulling out the data a little more difficult.
Fortunately this is a solved problem: SbkExplorer can open the backup .sbk file and export the programs as individual .wzd files, ready for reinstallation on other organisers.
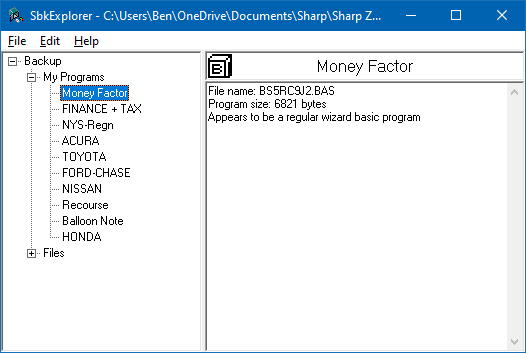
Extracting files from the My Programs portion of a backup using SbkExplorer.
When these BASIC programs were originally developed using Sharp's SDK they were stored as a .bas containing the source code as a plain text file and a .prj project file that contained some information about the program such as its full name and a text description. The program would be "compiled" into a .obj file (effectively a tokenised BASIC program with the comments stripped out) and then published as a .wzd file which is an XML-like file containing the description from the project file and the compiled object file as raw binary data. Sharp's downloader tool could then open the .wzd file, show the project description on the screen, and allow the user to transfer the compiled BASIC program to their organiser's My Programs menu.
The .wzd file recovered by SbkExplorer won't be a perfect match for the one used to install the program originally, as it will be missing any descriptive text. However, it's good enough to back up an installable version of the original program file. If you wanted to edit the source code for the program, then the Sharp Wizard Decompiler can be used to extract a .bas file from the .wzd. Again, this won't be a perfect match for the source material as any comments would have been stripped out by the Sharp SDK, but it's definitely a good starting point to recovering old programs.
Links to OZ-770 resources
Unfortunately, a lot of the old sites that used to host information about this series of Sharp Organisers are long gone. Fortunately, the Internet Archive's Wayback Machine has copies of a lot of them, and I've linked to those archived copies where the original sites are no longer online.
General tools
- Sharp's Software Downloads ZQ-700 series page still hosts the Downloader, Data Creation and SDK tools for the organiser as well as some sample installable .wzd files.
- IMSL Software show how to make a serial cable for the organiser and sell XLink/Win linking software that is compatible with the organiser.
- Day-Time Organizer: Sharp Edition was originally bundled with the organiser on CD-ROM and can be used to back up and restore data from the organiser.
- SbkExplorer can be used to extract data from a .sbk backup (created using the Backup Utility on the previous CD-ROM).
File archives and information about the organiser
- Wizworld.
- The OZ-750 Paradise.
- Marshall's Amazing Wizard Organizer.
- Nadisha Ranmuthu's Wizard.
- Grigori Fursin's Homepage (FSFM).
- Software for the PC and for Sharp Wizard OZ/ZQ 7xx Organizers mainly by Alex Pruss.
Software development
- OZdev Wizard Development: 2001, 2002. Lots of good information but the archives have some broken links, hence two captures from the two different domains are provided.
- Official Sharp SDK to develop programs using BASIC.
- Zifnab, an alternative SDK for developing BASIC programs (includes additional keywords like PEEK, POKE and CALL).
- Bacon, an organiser add-on that lets you execute BASIC programs created directly on the organiser as memos.
- Sharp Wizard Decompiler to decompile .wzd files into BASIC source files.
- C SDK with a lot of sample code.
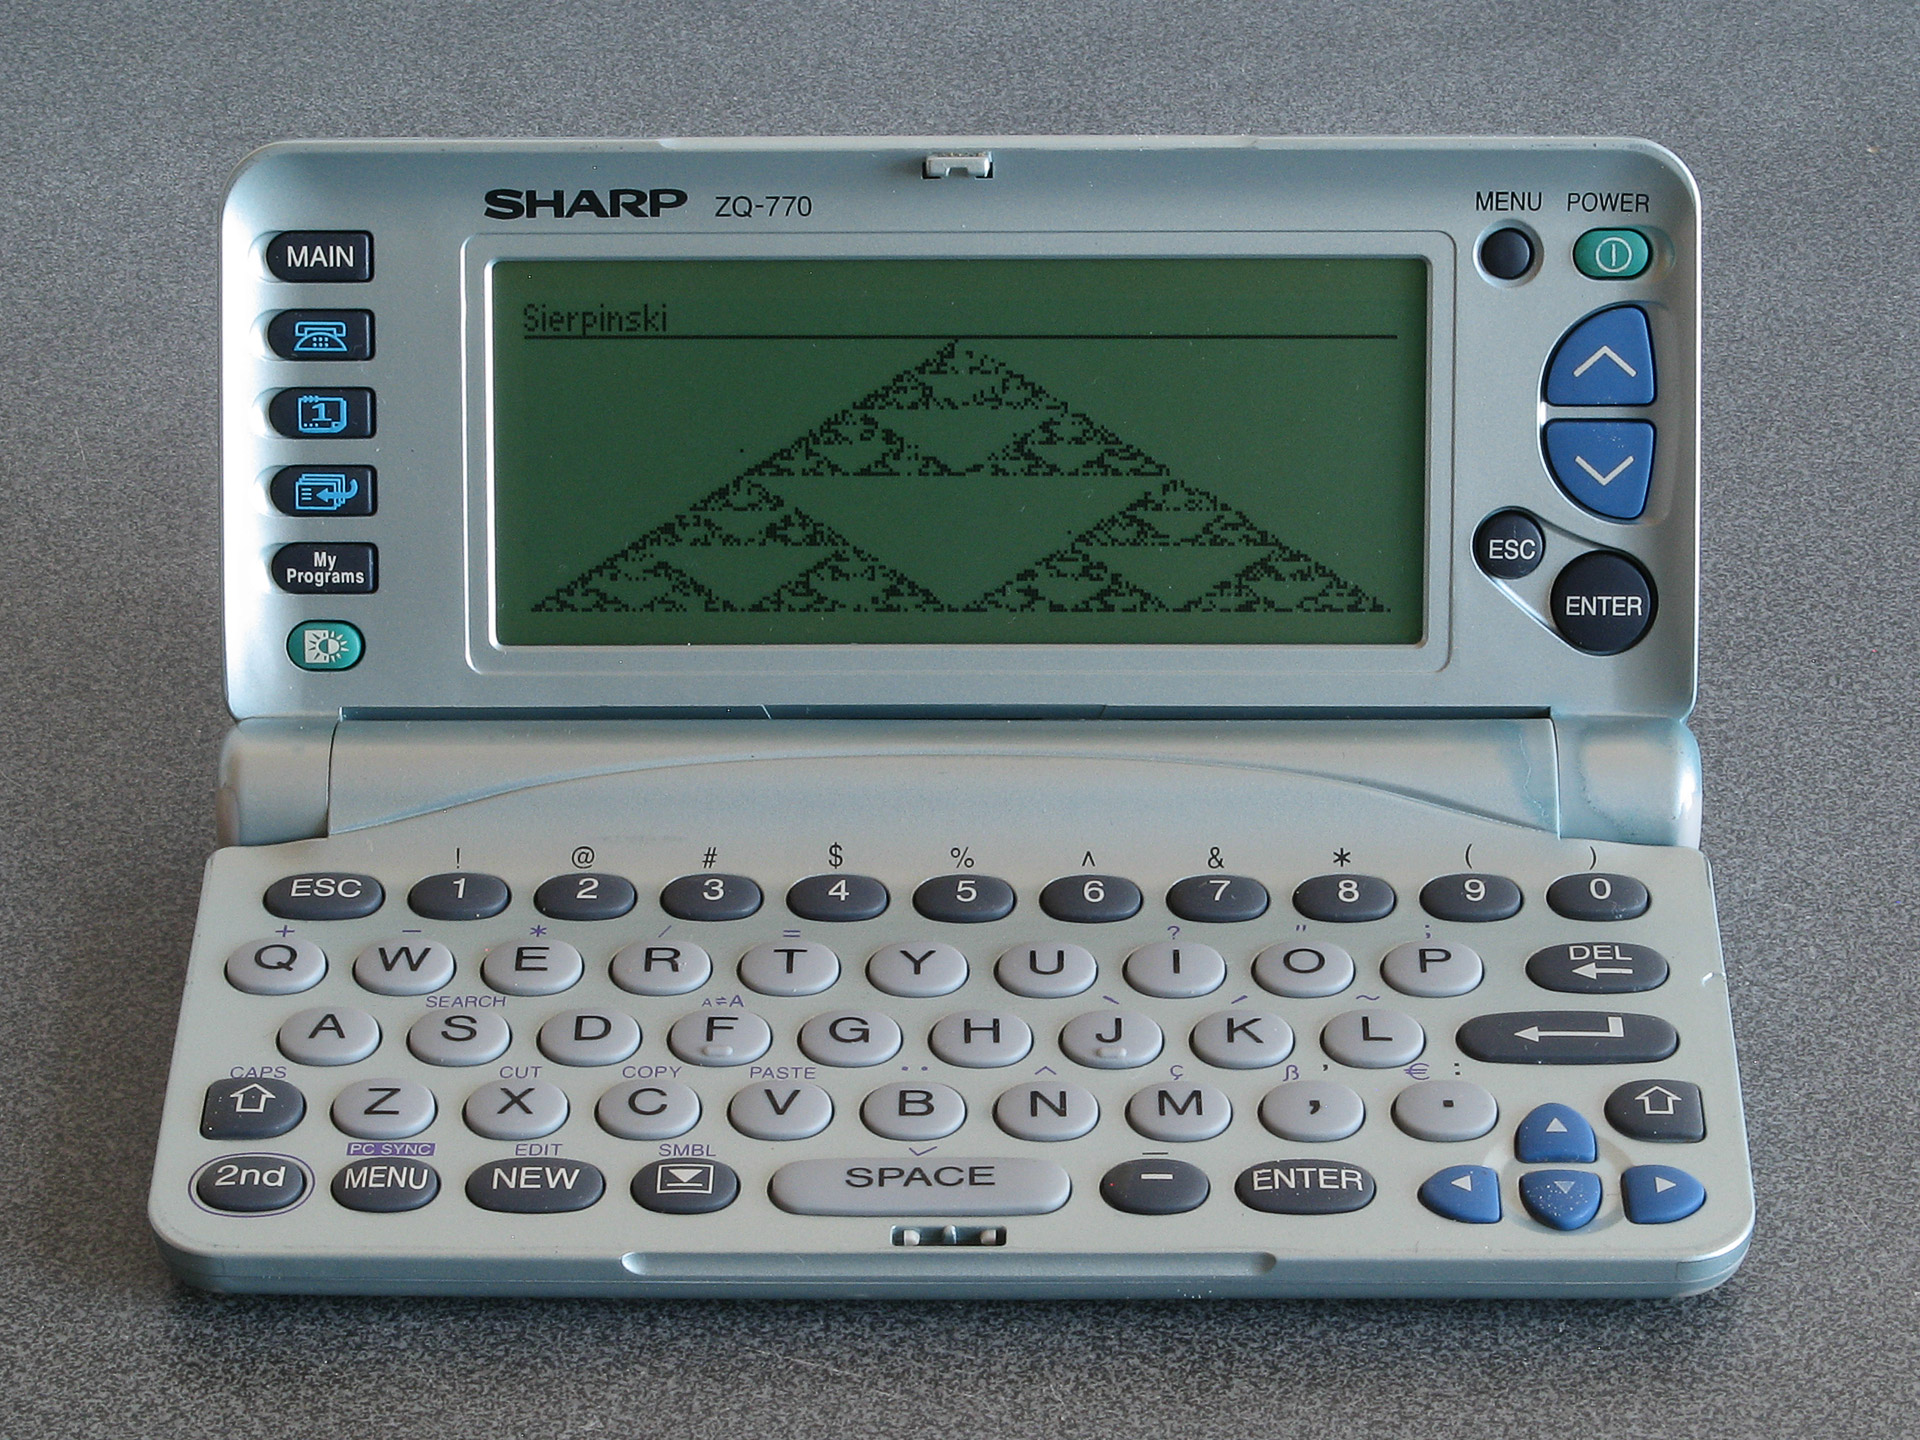
The result of running the Sierpinski triangle code from the earlier memo using Bacon
If you pick up one of these old organisers you can probably have quite a lot of fun with it as a pocket computer containing a Z80 CPU, a large LCD and QWERTY keyboard. It's just a shame about the poor durability of the screen.
40-column text modes on Sharp organisers with the 16-column IQ-707 BASIC card
Wednesday, 2nd July 2025
Recent posts on here have taken a bit of a detour into Sharp Pocket Computer territory. When hunting down parts or accessories for them on eBay I'll occasionally be recommended other Sharp devices, such as their calculators or organisers, if an exact match for the thing I'm actually hunting for can't be found. Calculators are indeed a useful tool, so I appreciate those recommendations, but mid-1980s electronic organisers are not usually the sort of thing I'd be too interested in.
However, some of Sharp's organisers are definitely worth a look, and these are often considerably cheaper to pick up second-hand than pocket computers or calculators. I suspect this is partially due to difficulty in testing them and perhaps a bit of user error – they often require a large number of CR2032 cells to be installed, usually after removing a screwed-on back cover, and have a series of interlock switches that all need to be set just right before the device will even try to switch on. As a result, I've acquired quite a large collection of them for very little money, mostly sold as faulty or untested but all working just fine.
These particular organisers have a card slot on them, which can be used to expand the device's capabilities via a credit card-sized "IC card". The most common sort that you'll find is a RAM expansion card, which allows you to store more data (notes, calendar appointments, address book entries and the like) in a separate area to the device's built-in memory. More interesting, however, are the application IC cards. Dictionaries, thesauri, spreadsheets and even games were made available.
To me the most appealing is the Scientific Computer Card. The organisers do have a simple calculator built in, but the Scientific Computer Card adds more advanced calculator features such as trigonometric functions, logarithms and a statistics package. This is all handled via a very capable BASIC interpreter built into the card, and you can write your own programs on the organiser. The organisers also have a 4-pin "option" port that can be connected to a printer and cassette interface, and a 15-pin "PC link" serial port, so when you slot the card into your organiser you are in effect turning it into a pocket computer (though with all the accessories attached, you might need pretty large pockets!)
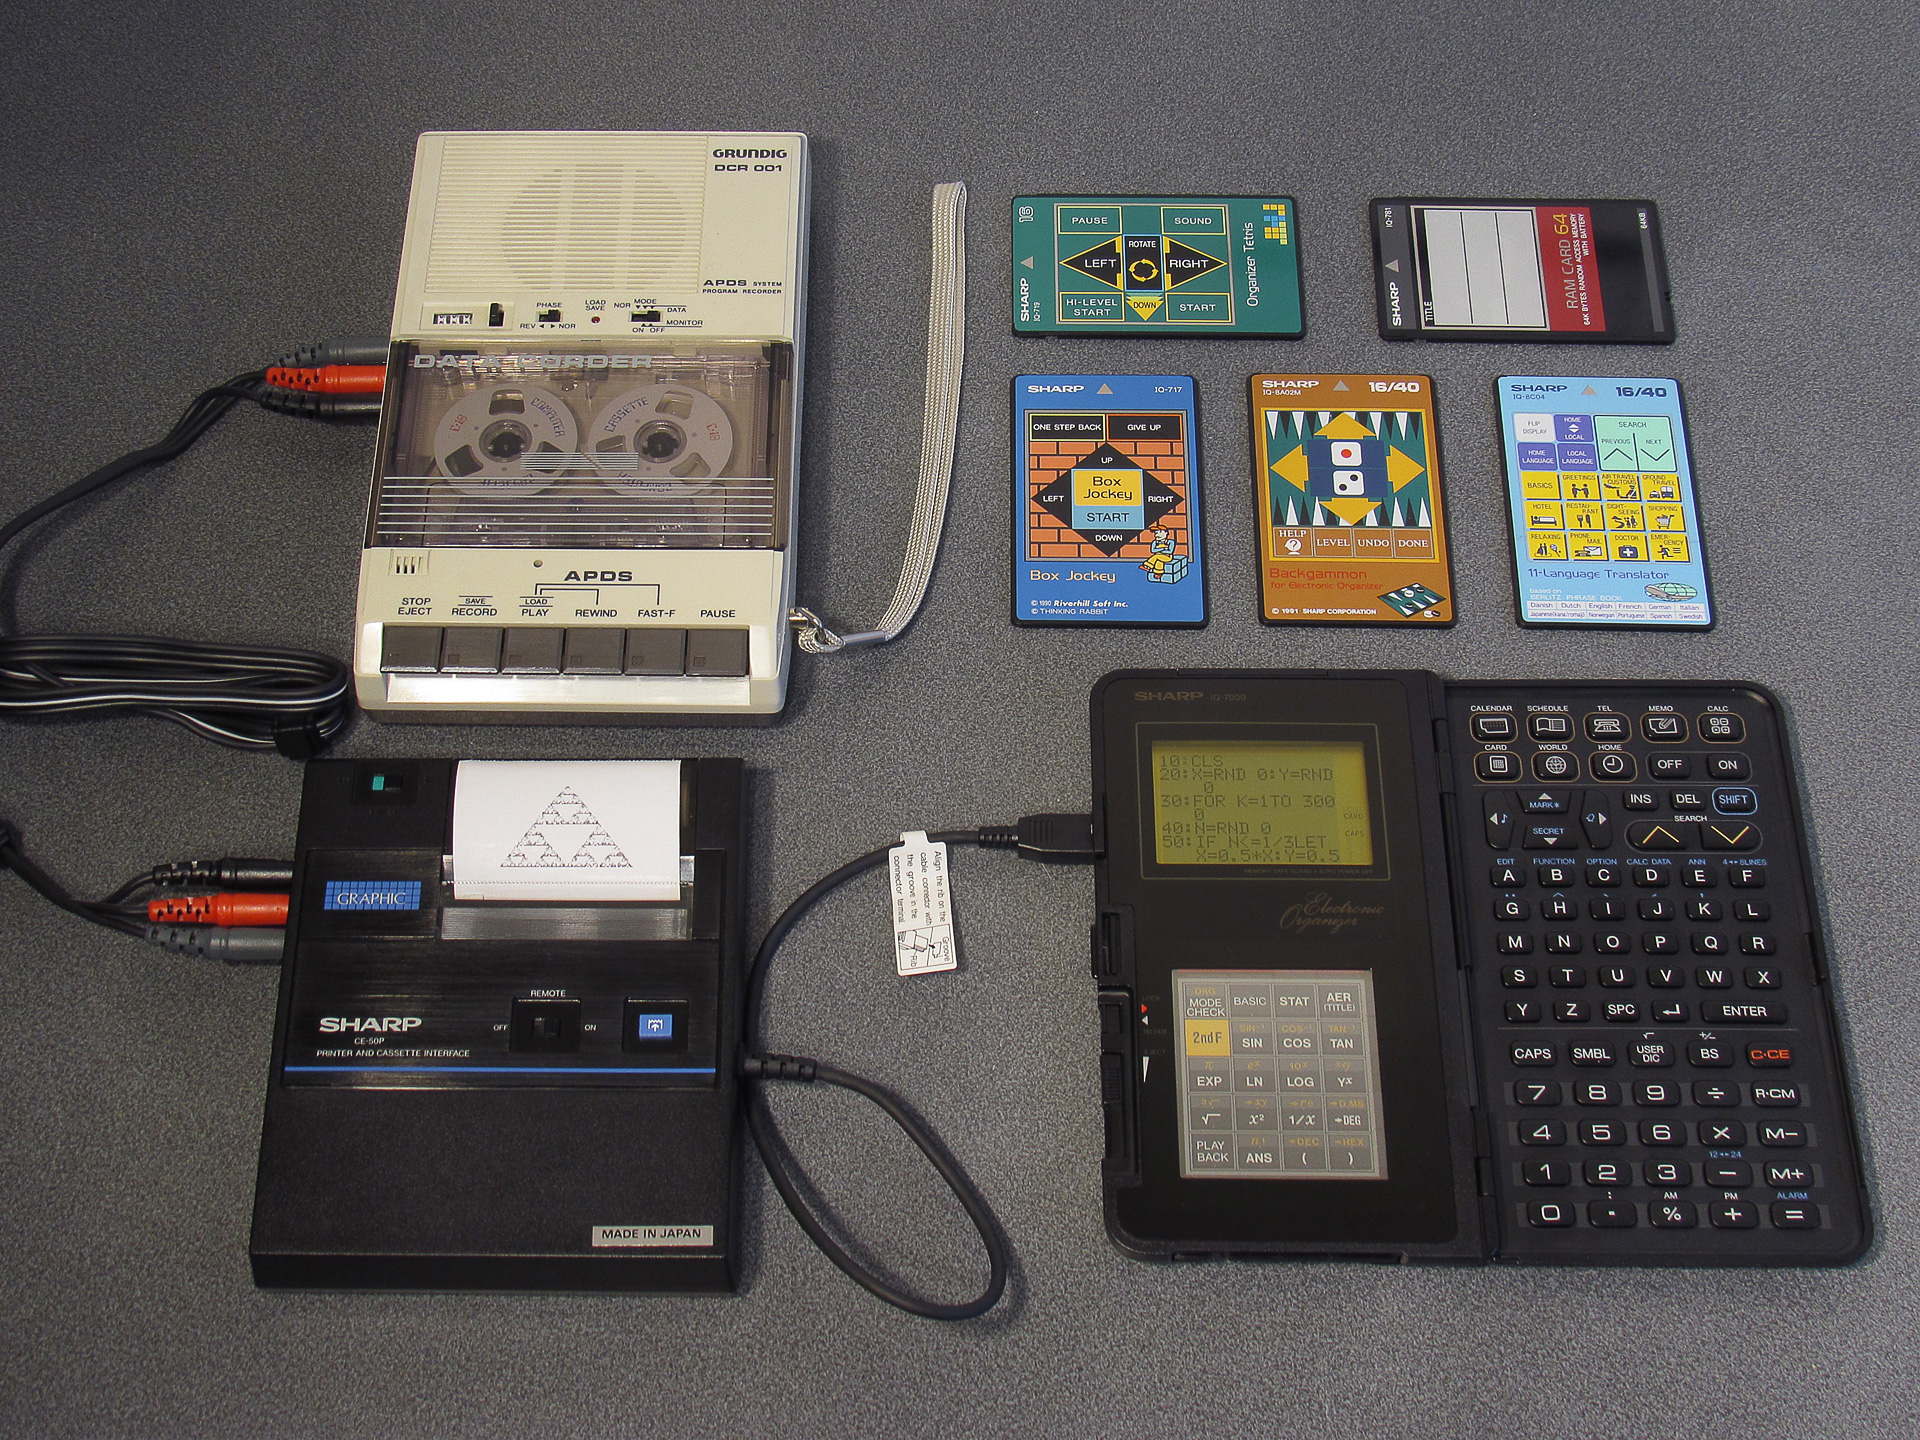
My only real criticism of this arrangement when compared to Sharp's dedicated pocket computers is the IQ-7000's keyboard. It's not too difficult to get used to the non-QWERTY alphabetic characters, but for BASIC programs you often need certain symbols (such as the speech mark, comma, semicolon, colon, less/greater than or ampersand) which are not present on the organiser's keyboard – they're only available via a pop-up menu that appears when you press the SMBL key. This menu only shows 10 options at a time and you need to hunt up and down through it to find the symbol you need; not an ideal experience!
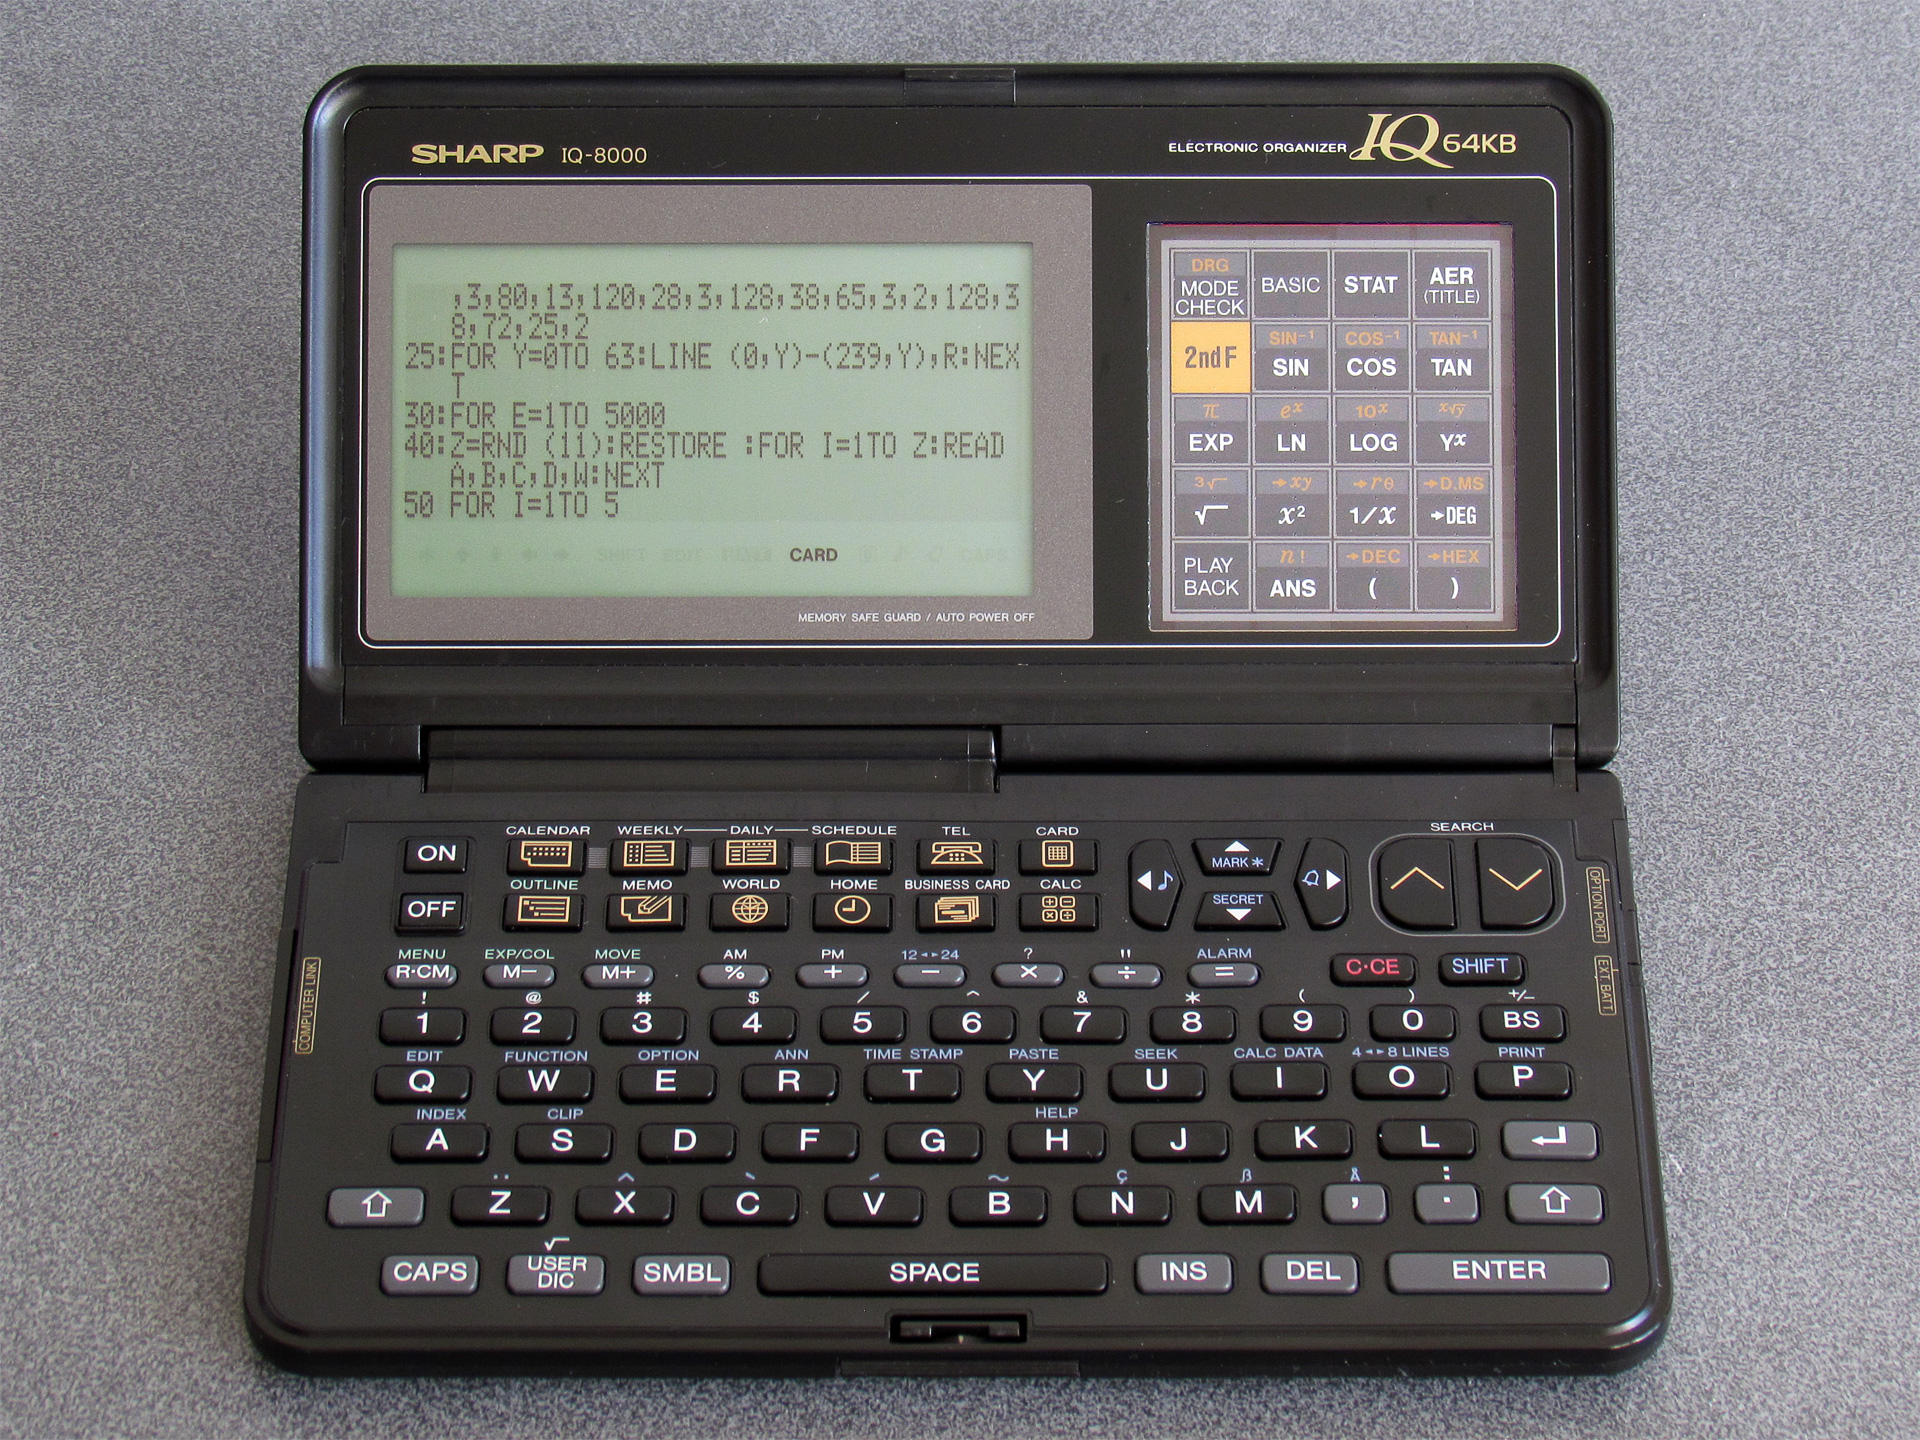
Fortunately, Sharp released later organiser models (such as the IQ-8000) with QWERTY keyboards. Not only are these more comfortable to type on, but most of the symbols are now accessible via a shift key and these organisers retained backwards compatibility with the IC cards from the earlier IQ-7000 organisers.
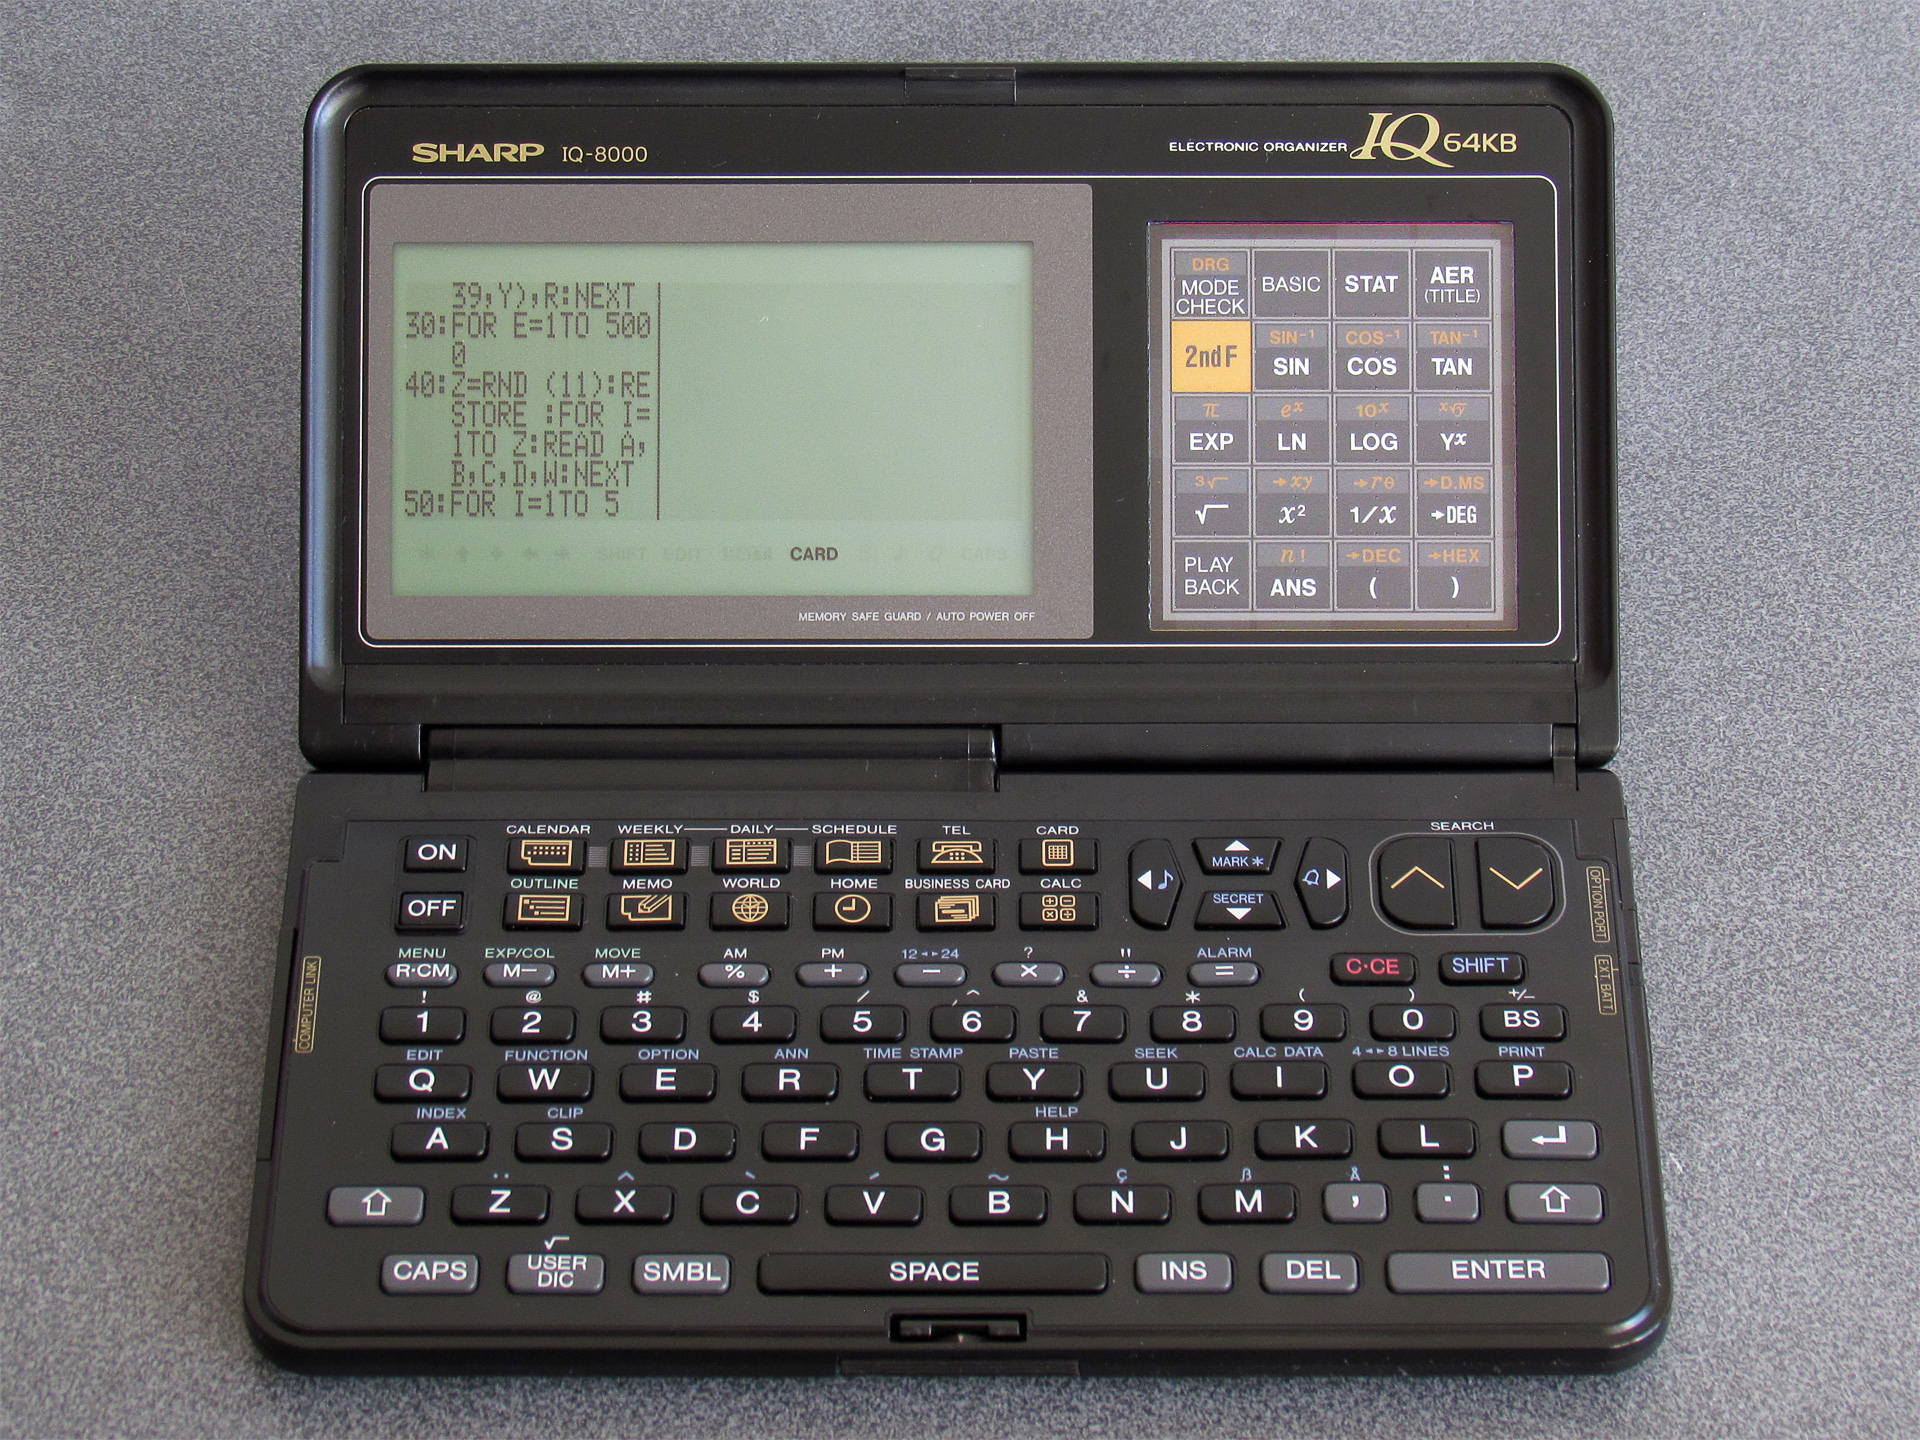
The screen is also quite a bit larger and clearer, albeit now with non-square pixels which can make applications look a little skinny. Unfortunately, old applications developed with the 96×64 pixel display on the IQ-7000 in mind won't know how to take advantage of the 240×64 pixel display of the IQ-8000 and so are rendered on the left hand side of the display with a separator line. That seems like an awful lot of wasted space!
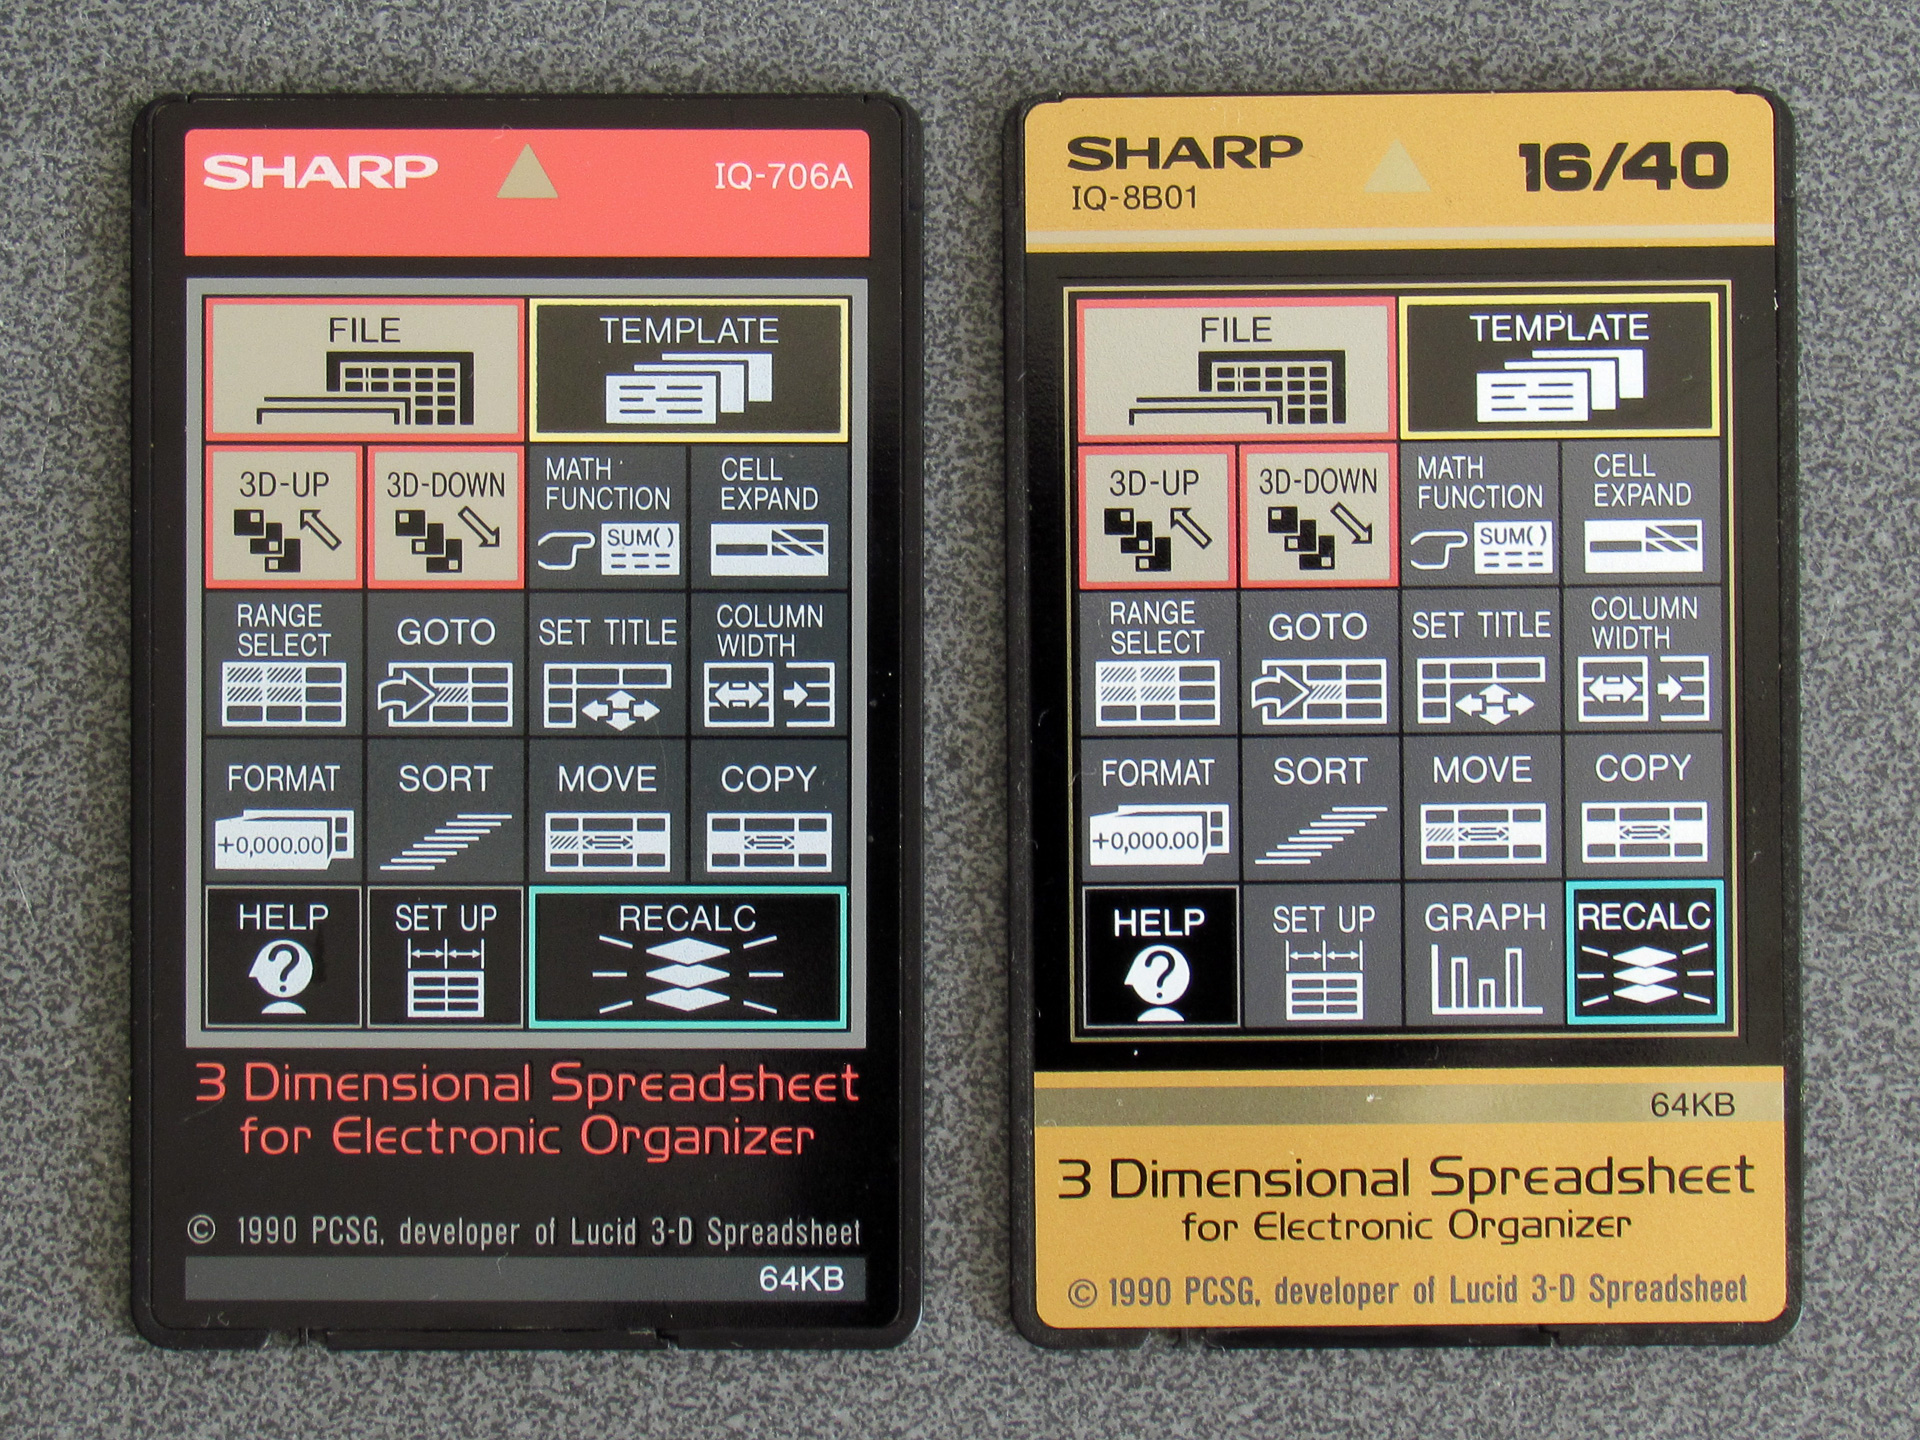
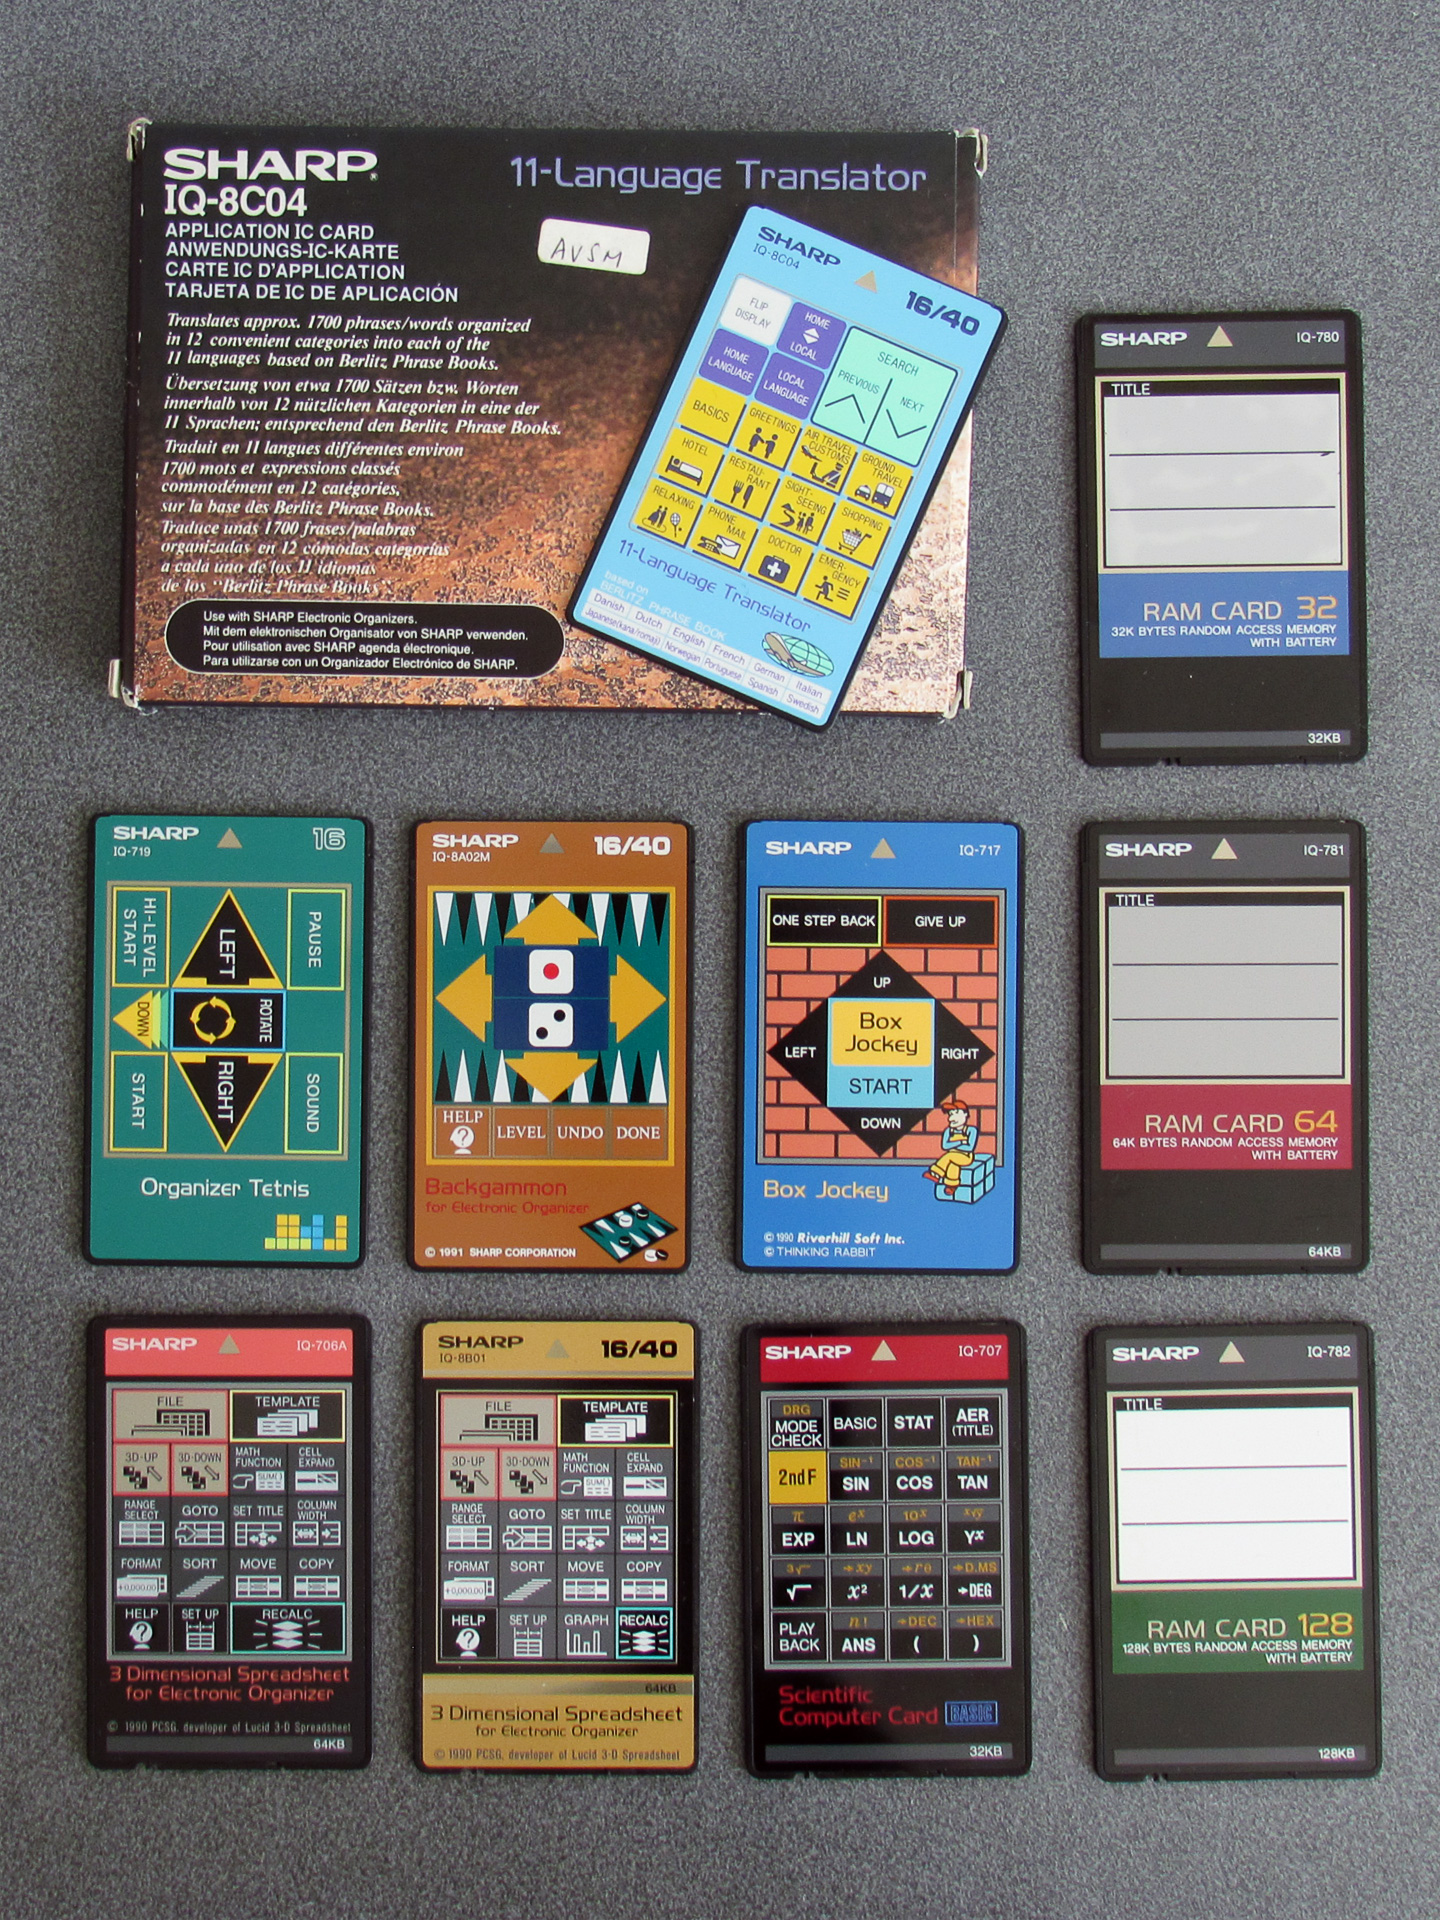
Application cards that took full advantage of the larger screens (up to 40 columns of text) were sometimes sold separately to the versions that were only designed for the smaller-screen devices (16 columns of text). For example, the above photo shows two cards of the same software – 3 Dimensional Spreadsheet for Electronic Organizer – with different card numbers (IQ-706A v IQ-8B01). The card on the right has 16/40 printed in the top right corner, showing it supports both 16-column and 40-column organisers. The card on the left doesn't, and will work in both, but will only display in the leftmost 16 columns.
As an aside, another difference is that the IQ-8B01 version has an extra "Graph" button on it. When the cards are inserted the front labels are visible through a transparent window. That window is touch-sensitive and allows cards to provide custom key shortcuts to certain functions. The graph function will work on a smaller-screen organiser though it is a little cramped; I'm not sure why it wasn't otherwise provided on the IQ-706A.
There was a 40-column version of the Scientific Computer Card available (card number IQ-8B03), however I have yet to find one come up for sale and so I've been making the most of my IQ-707. However, I did find something interesting when I used it on my IQ-8000: certain primitive drawing operations could access the whole screen, even if the rest of the application was constrained to a smaller window.
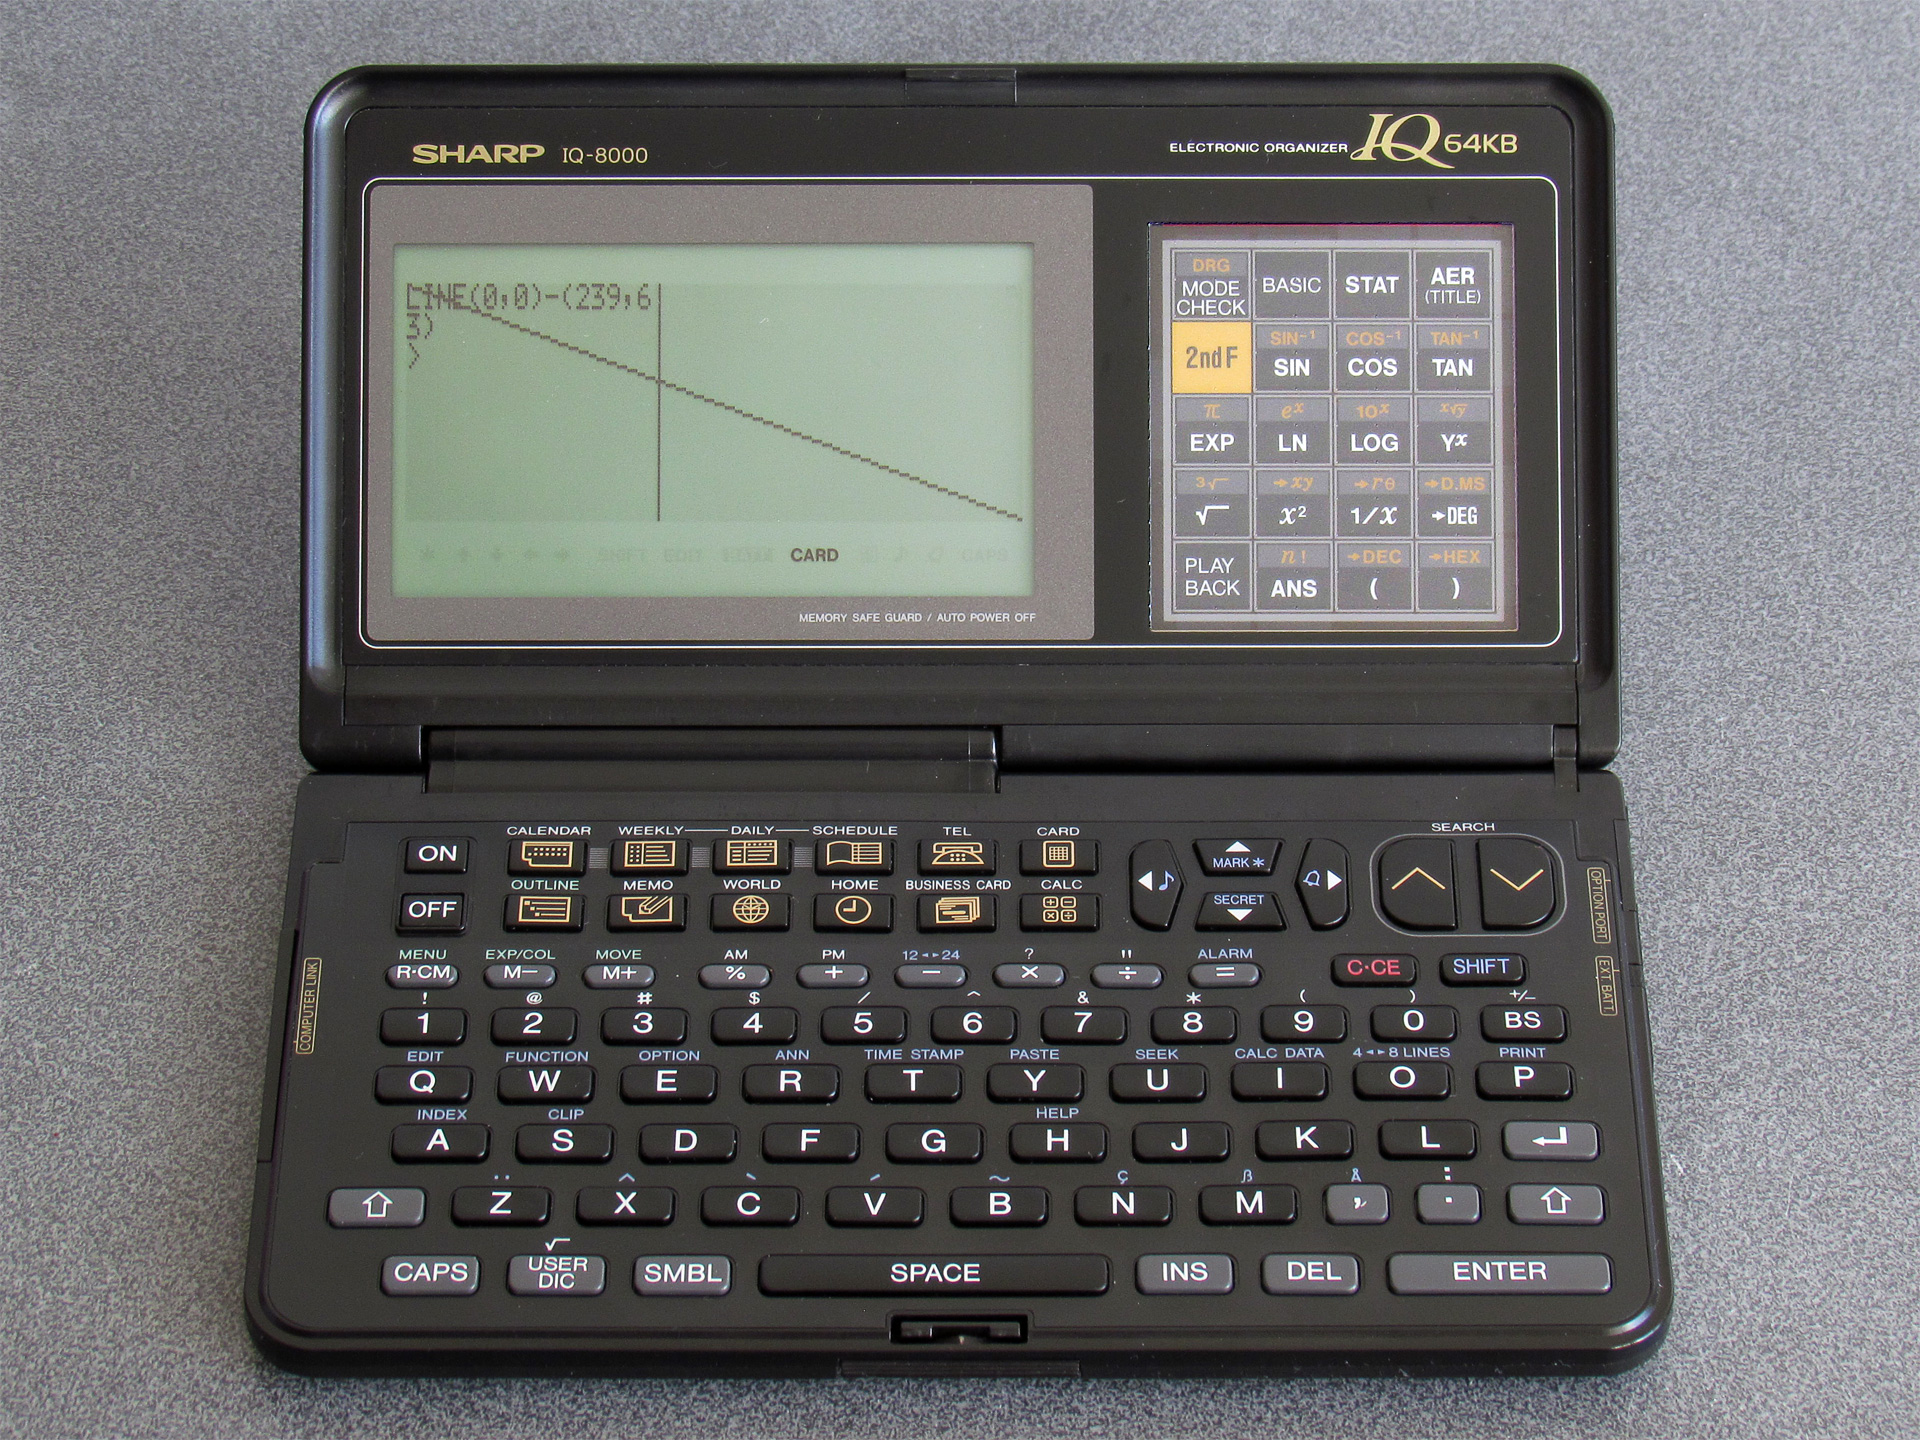
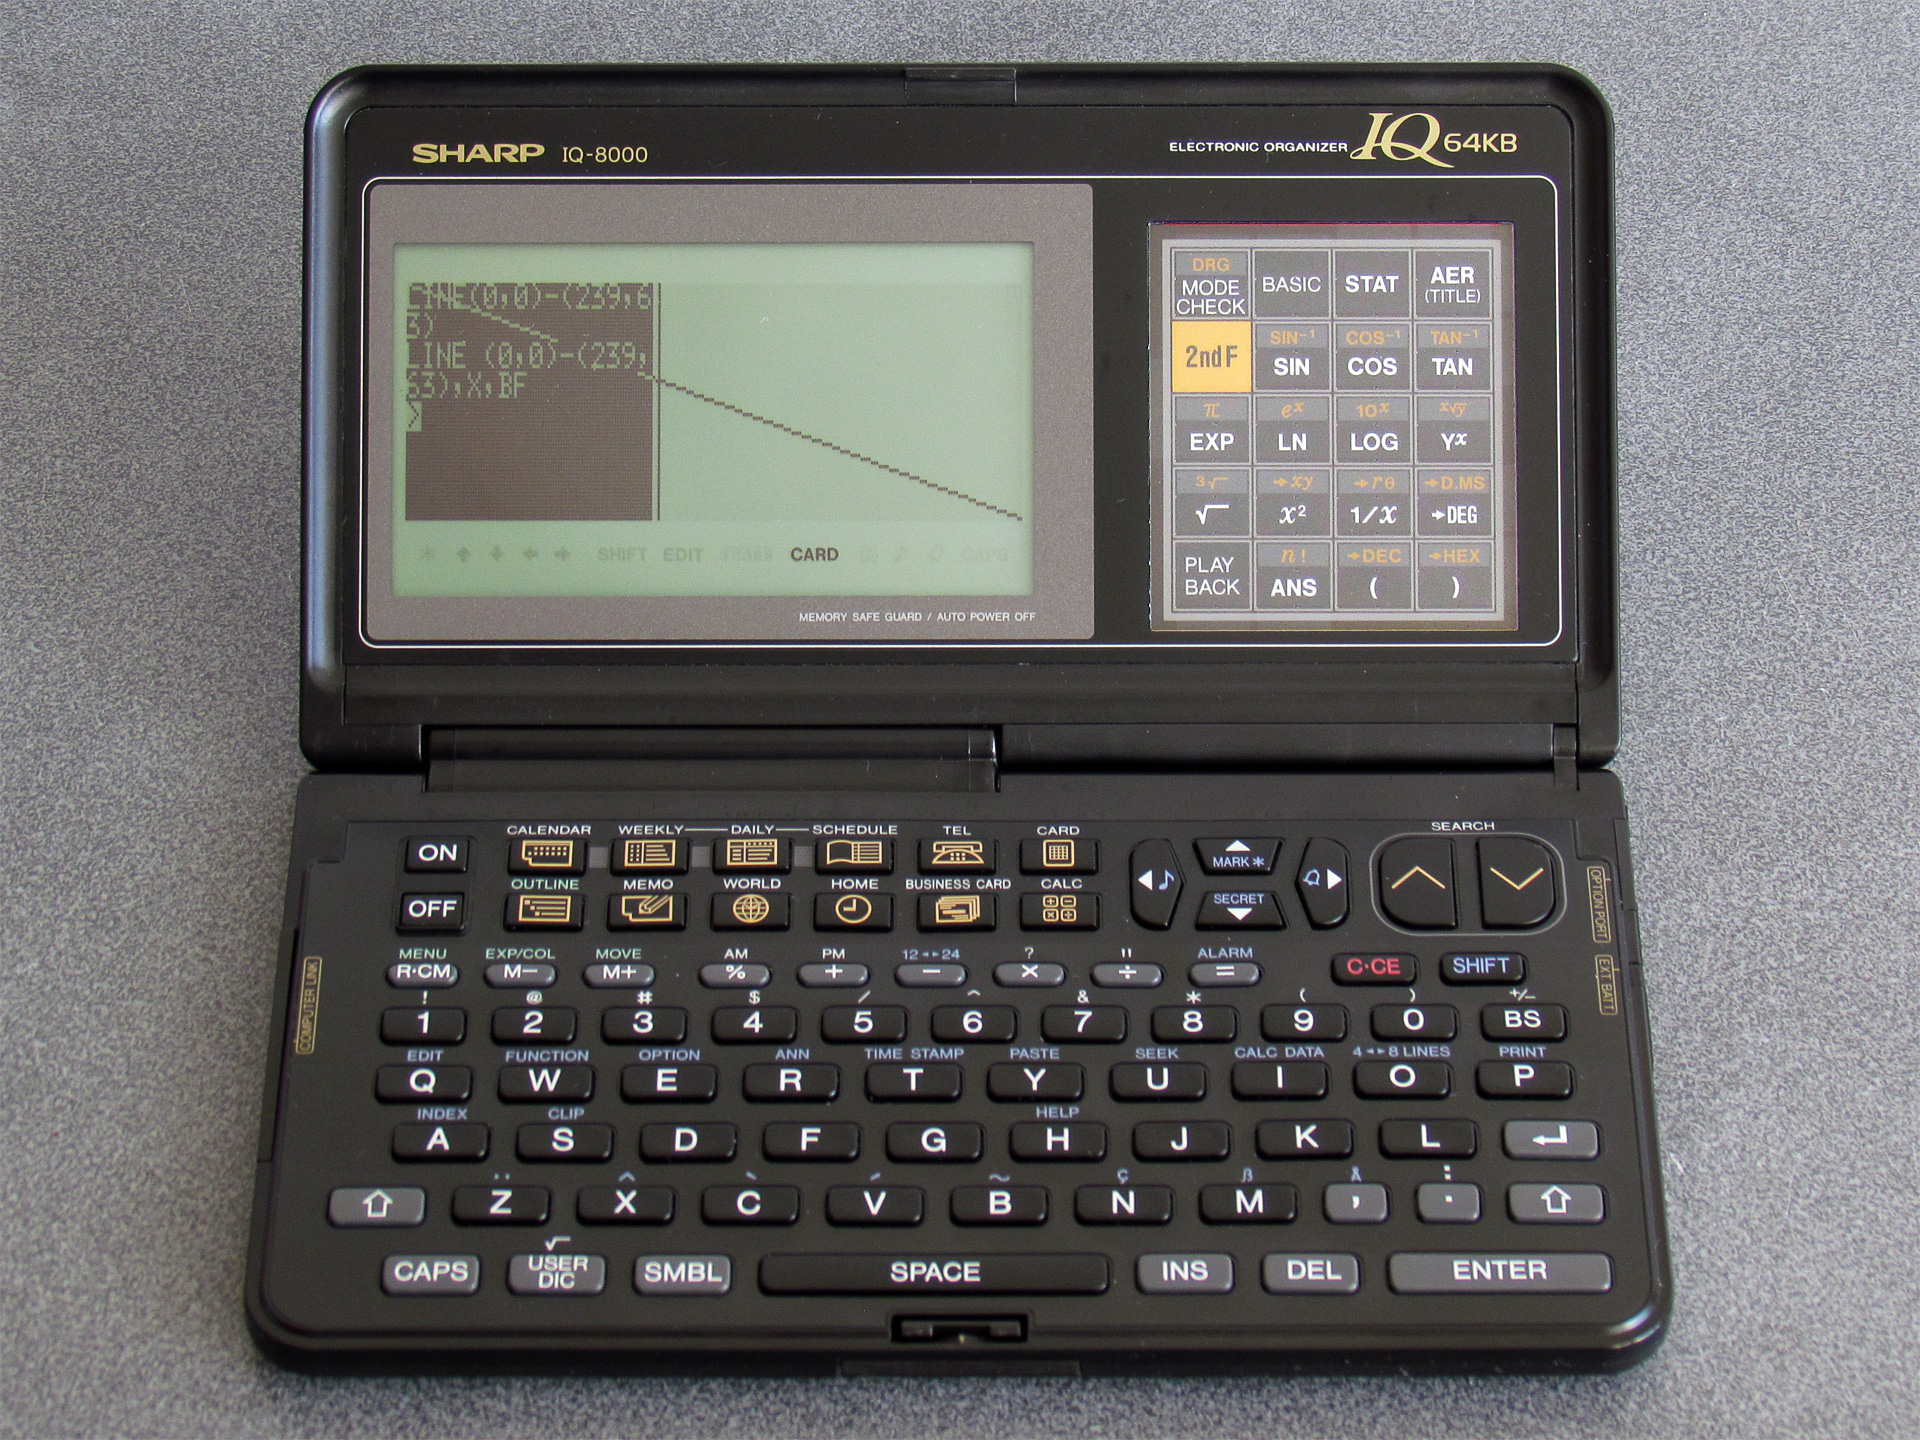
The photo on the left shows the results of drawing a line from (0, 0) to (239, 63) – the line ends up being drawn successfully outside of the 96×64 window at the left of the screen. The second photo uses the same coordinates but also appends the X (invert) and BF (box fill) options which should in theory invert the whole screen, but only ends up inverting the leftmost 96×64 pixels.
Certain other drawing operations (such as PSET and GPRINT) will also happily draw to the whole screen, but text cannot be positioned or drawn outside the 16×8 grid. At this point I wasn't sure if it was the BASIC interpreter or the organiser's OS that was to blame, but I wasn't really sure how to pick apart either of them.
One potential clue came in the form of the WIDTH statement. The IQ-7000 effectively has two screen modes, with differently-sized text characters: the default small font in a 16×8 grid and a larger font that reduces the number of displayed characters to 12×4. These modes can be switched by pressing the button marked 4↔8 Lines, or programatically via WIDTH 16,8 or WIDTH 12,4. The IQ-8000 expands these to 40×8 and 30×4, but trying WIDTH 40,8 or WIDTH 30,4 just displayed an error message. However, something, somewhere must know where the rightmost column number is to allow for proper text wrapping.
I mentioned that the BASIC interpreter is very capable, and it does have an undocumented PEEK function which allows you to read a byte from anywhere in the organiser's memory. I wrote a BASIC program that would scan through memory, switching screen modes with WIDTH and seeing if the value at the address in question changed. Once I'd done this I looked at the addresses that had values that changed in meaningful ways (e.g. between 16 and 12 or 8 and 4).
It looks like the current screen width (in characters) is held in BASIC's memory at &3F988 and the height at &3F989. POKEing a larger width into &3F988 does look like it might start working – if you type then the cursor goes off the right of the 96×64 window and can be seen blinking in the screen beyond, however no characters are printed in this area and certain operations (such as listing programs with long lines) misbehaves in strange ways. There must be more to the puzzle.
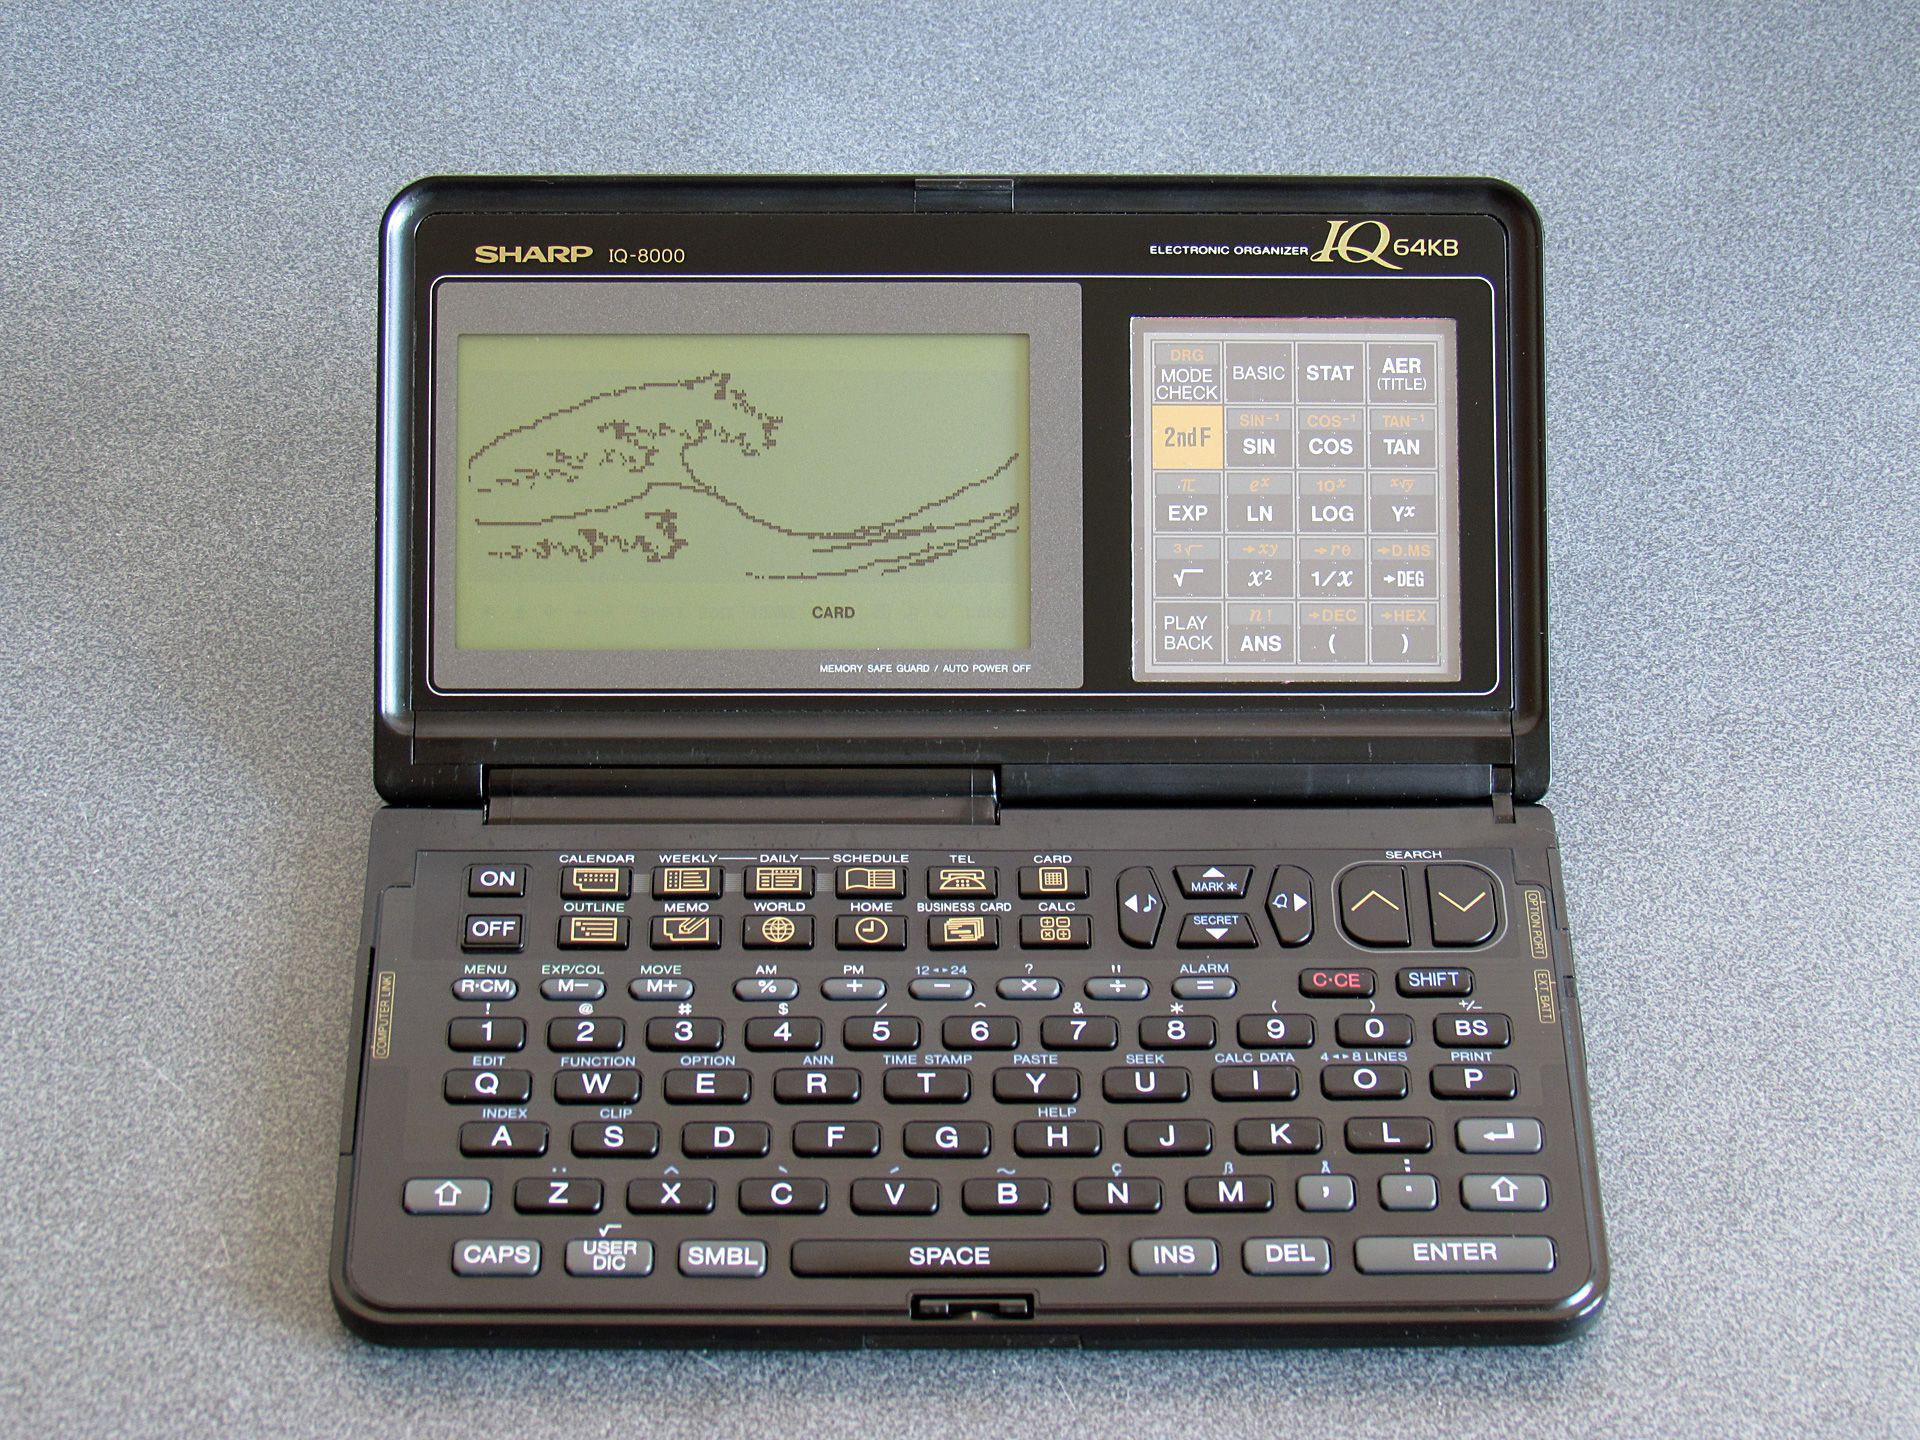
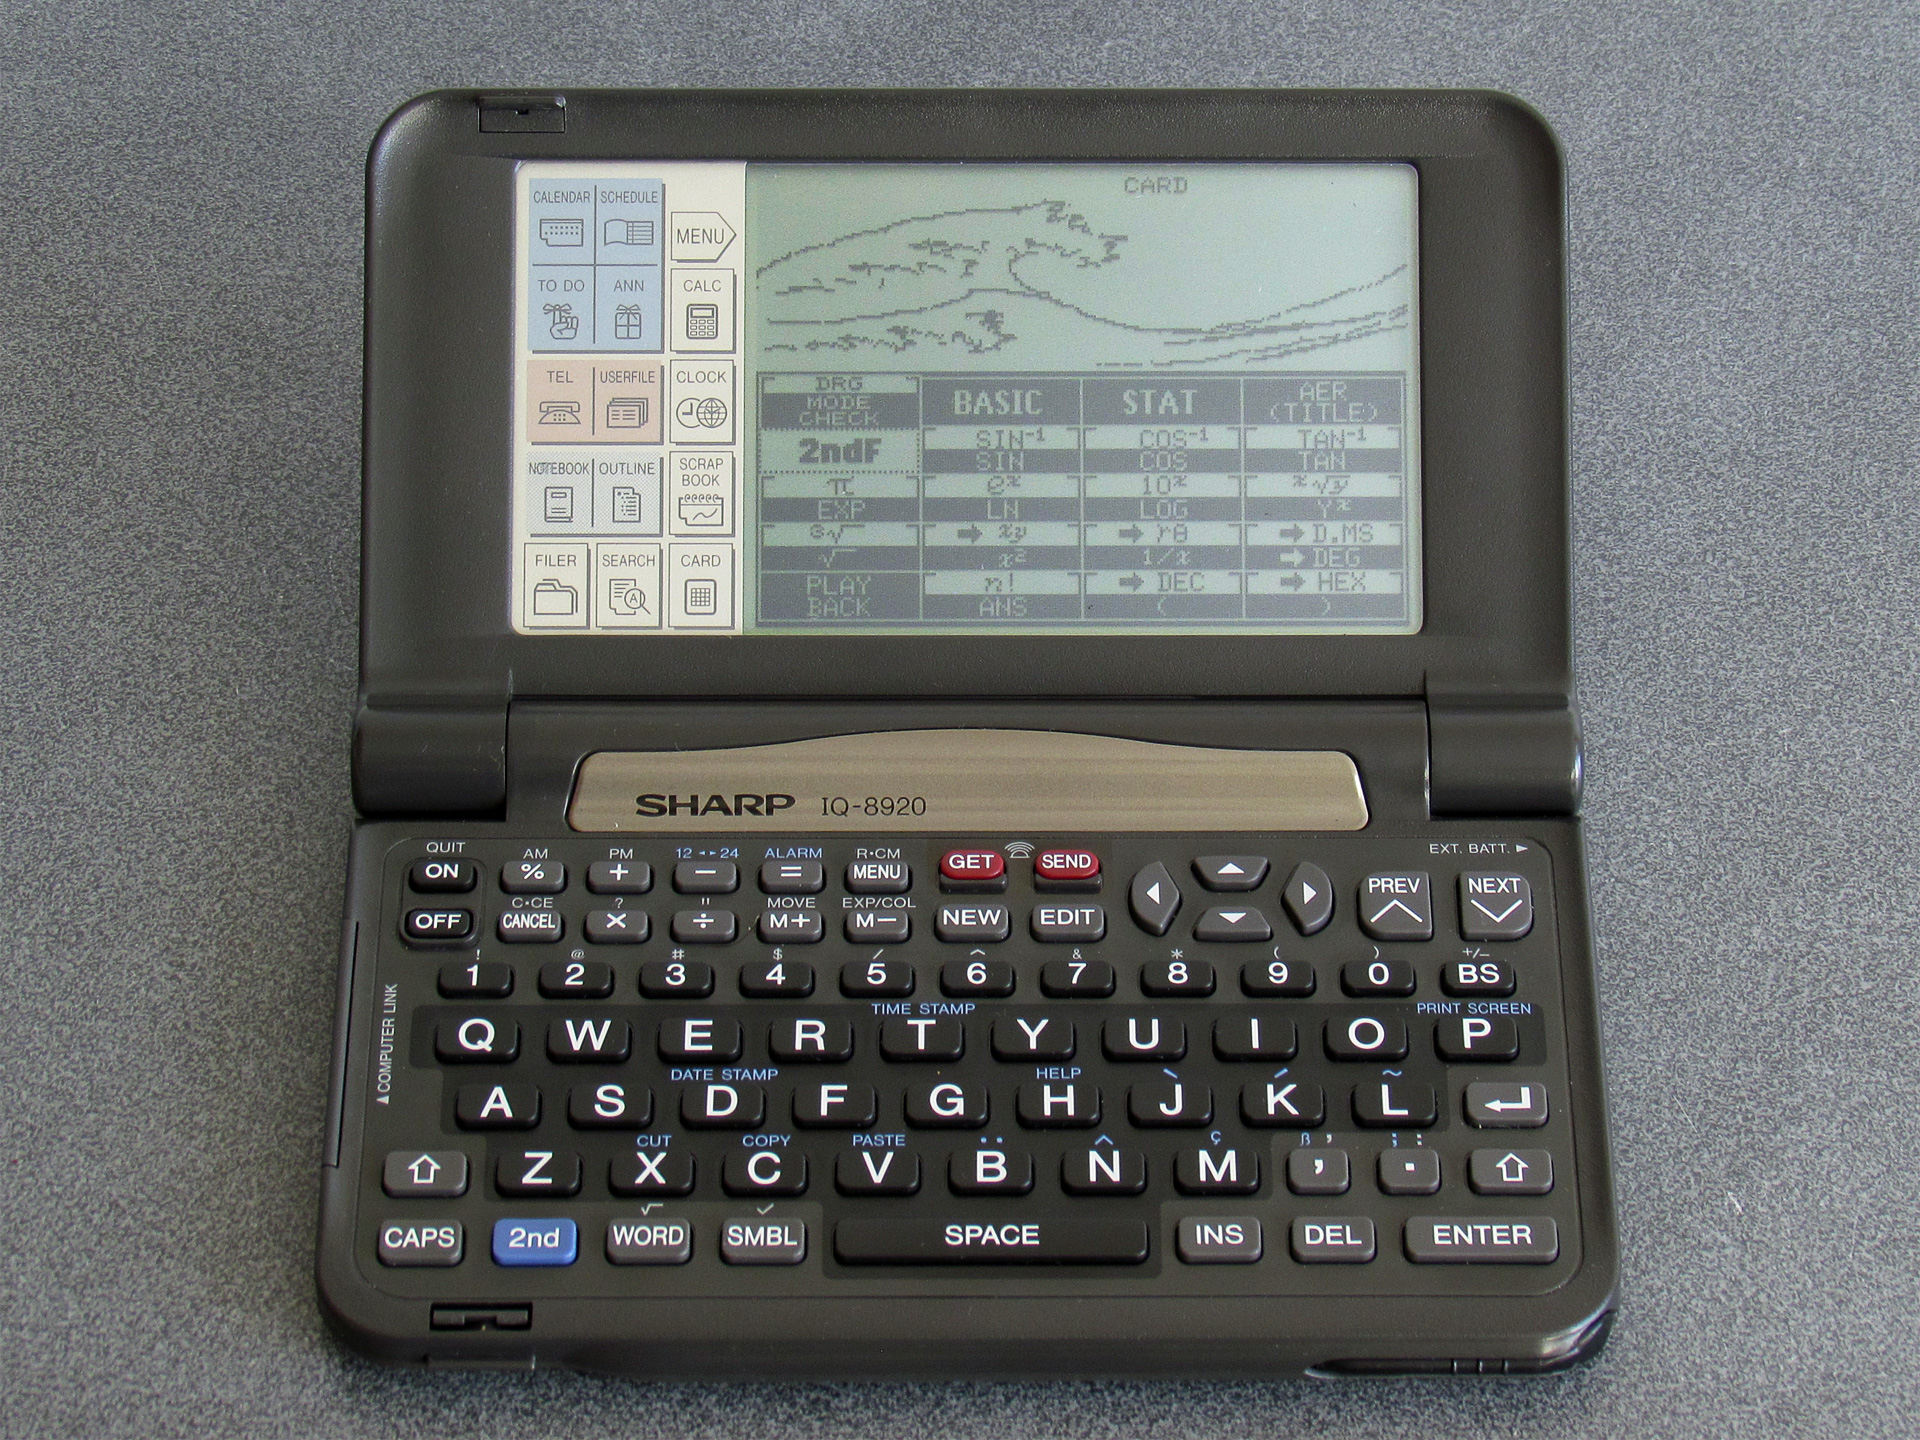
Unfortunately, without knowing more about the internal operation of the operating system or BASIC I wasn't sure where to look. However, having been able to draw lines on the full screen I contented myself with adapting a very clever program by @bazzargh that renders the Great Wave as a fractal for the device (the BASIC listing can be seen here: GREATWAV.BAS).
The next breakthrough was coming across this GitHub repository when looking for other technical reference documents. It has a scan of the "ESR-L Instruction Manual" which documents the Sharp ESR-L microprocessor. Some hand-written notes on the cover of the scan mention that it's "for the PC-E500, OZ-7000 series [and] IQ-7000 series", so should be useful for the IQ-7000 organiser. Looking up the PC-E500 led me to this repository from the same owner which has a PC-E500 reference. Even if the IQ-7000 is not the same as the PC-E500, the use of the same CPU in products from the same company made me think there may be other similarities to help understand how the IQ-7000 works. Using the PC-E500 as a search term also brought me to a page of resources on Andrew Woods' website and from there and digging around in the links (including a few trips to the Internet Archive's Wayback Machine) I was able to source a cross-assembler and disassembler.
I now felt I was in a good position to start pulling apart the BASIC interpreter and OS to figure out if it was possible to use the full screen on my IQ-8000. Of course, I'd need to have a ROM dump to inspect, and fortunately this was quite easy to pull off; after all, I already had a BASIC interpreter running on the device! A simple loop over the desired address ranges, PEEKing each byte then PRINT#ing it to the organiser's serial port with a program on my PC receiving the data and storing it in a file left me with some hefty binaries to dig into.
The size did indeed present a bit of a problem. I did have a disassembler, but not a particularly sophisticated one and feeding it the 128KB of BASIC interpreter ROM didn't provide particularly useful results. I'd normally use Ghidra for a job like this, but it doesn't know about the Sharp ESR-L CPU.
However, Ghidra is user-extensible and I did now have an instruction manual/reference for the CPU, so I did my best to learn how to describe the CPU to Ghidra. This was no small undertaking, as I didn't really know my way around the CPU yet myself. After a bit of work I put together this terrible first attempt. I do not recommend using it yourself, as I haven't fully checked that every instruction disassembles correctly and a very large number of instructions don't describe what they do (or if they do, they might do it incorrectly). The disassembly should be somewhat usable, but the decompilation is mostly useless at the moment.
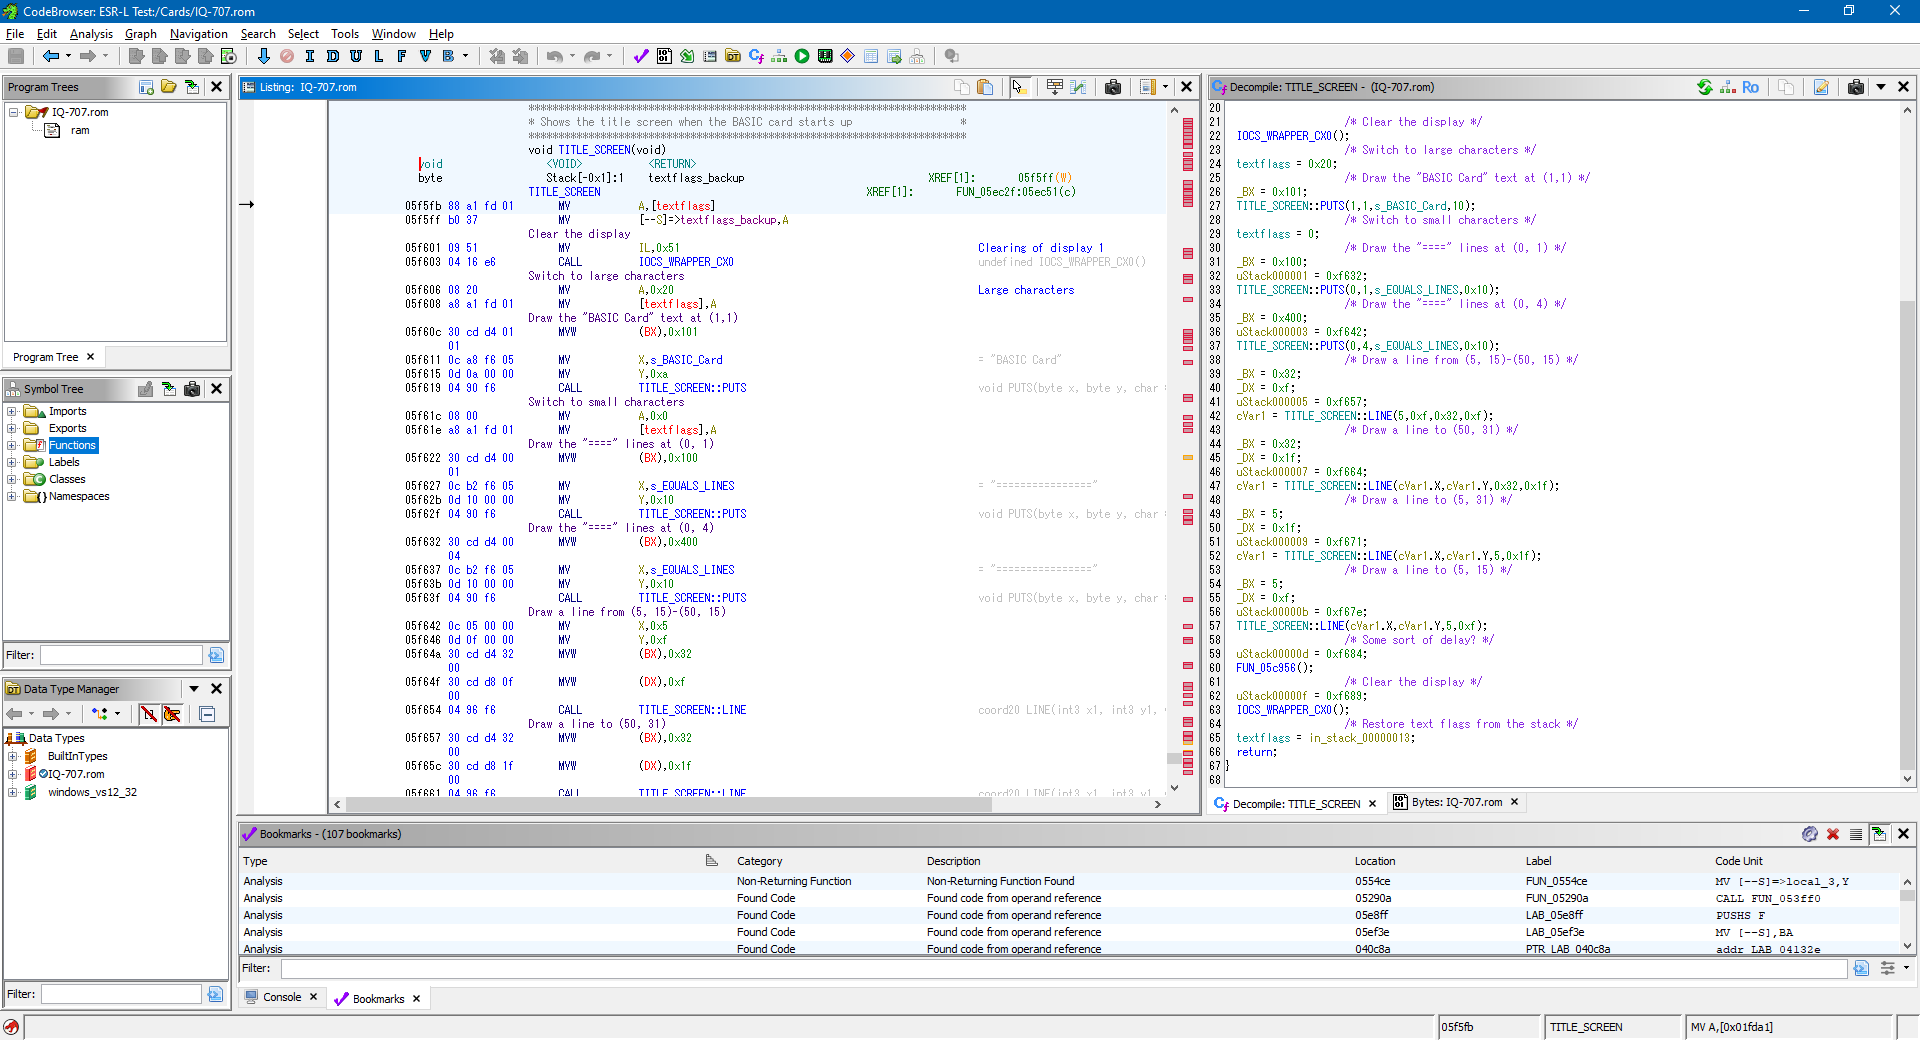
I thought the title screen would be a good starting point to disassemble as I could clearly find where the strings for "BASIC Card" and the equals signs that form the border were in the binary, and from there find out where they were referenced and disassemble the instructions around those references until it made some sort of sense.
This is where the PC-E500 reference ended up being surprisingly useful, as it does share a fair amount in common with the IQ-7000. The way that both operating systems provide access to the hardware is via an IOCS routine at address &FFFE8, and the routine numbers and parameter assignments in the CPU's internal memory appear to be the same on both devices. One difference is certain locations in RAM are different (for example, the location of the text flags or the dot pattern used to draw lines) however these differences are fairly easy to identify.
If you look at the Ghidra screenshot above you'll see that the disassembly on the left looks vaguely sensible but the decompilation on the right is a right mess: for reasons I haven't yet figured out it appears to show stack operations during calls as assignments to variables on the stack (uStack000001 etc) and assignments to variables in RAM which are used as parameters to functions (e.g. BX and DX) are shown as both manual assignments and in the function call parameters.
Trusting the disassembly rather than the decompilation, I dug around in the code, trying to find something that was making use of the magic numbers relating to the screen dimensions: anything with 16, 8, 12 and 4 in close proximity would be a good candidate and I eventually found something promising:
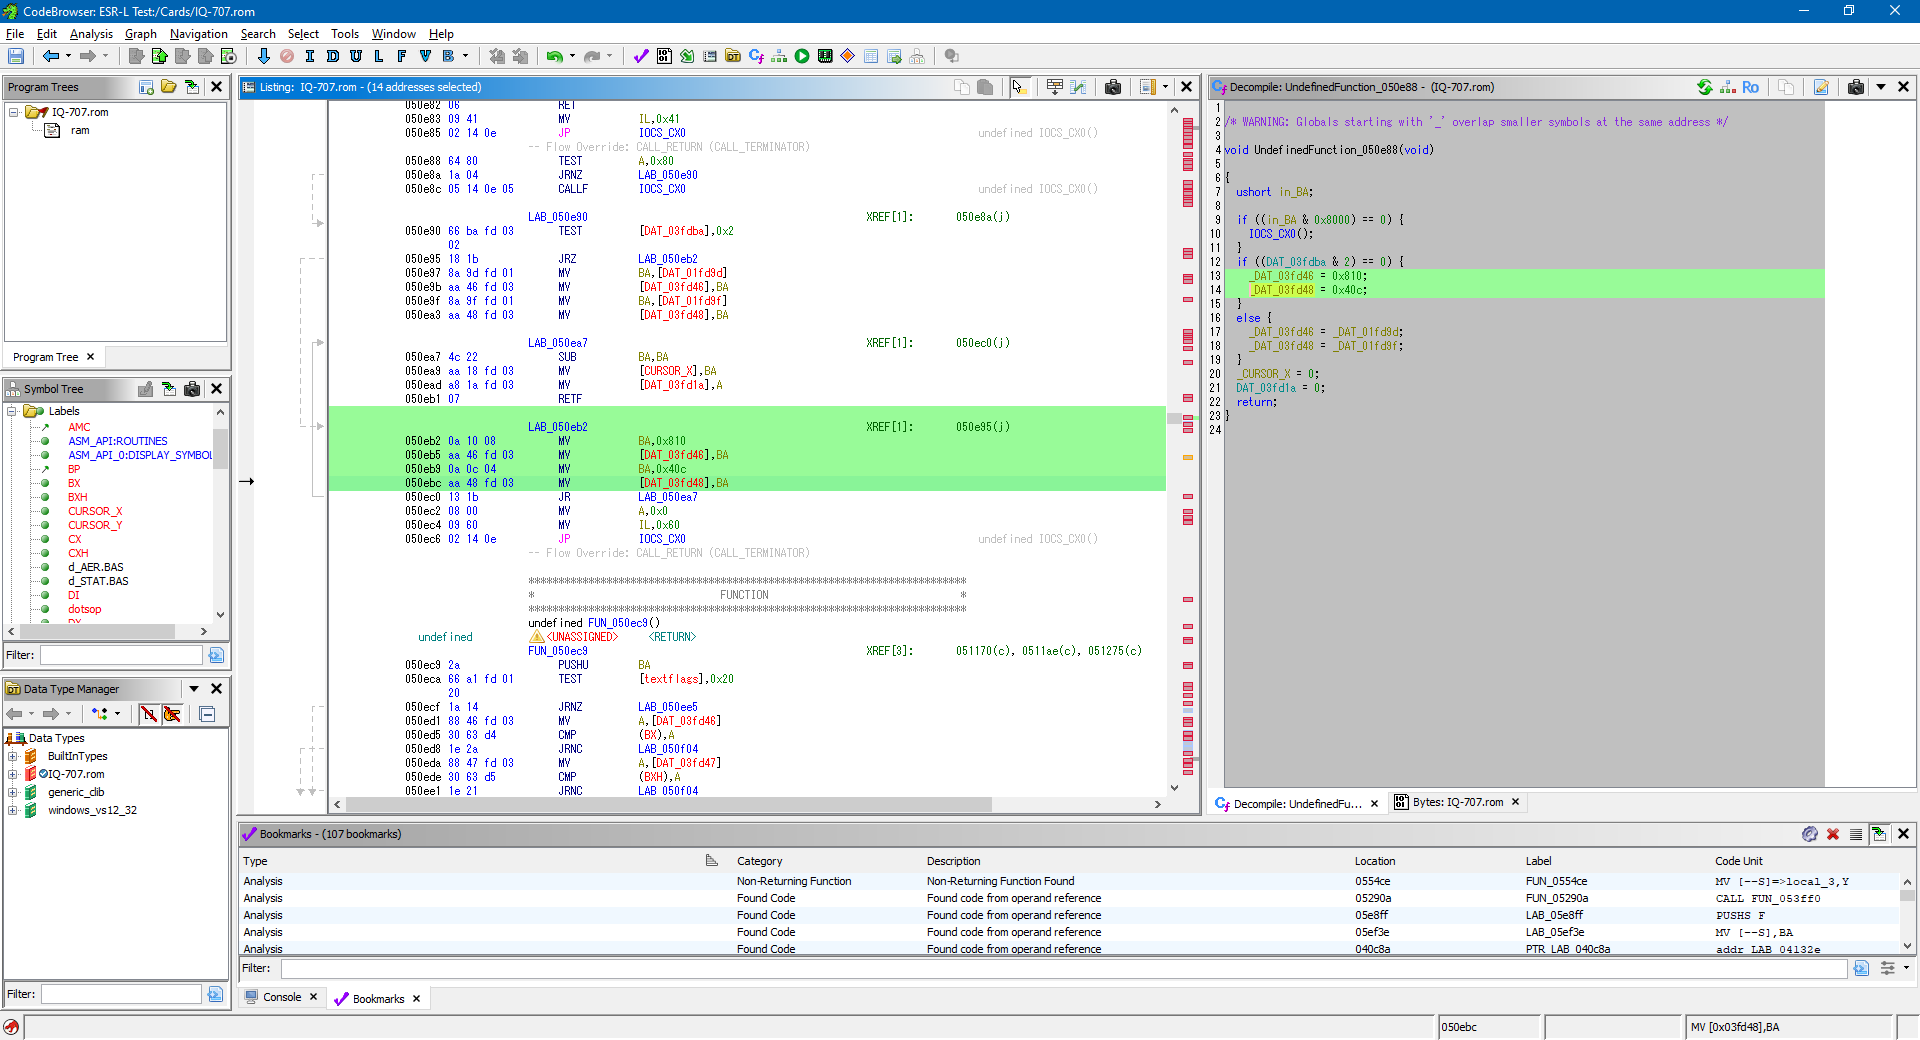
The ESR-L is a little-endian CPU so the hex constants 0x810 and 0x40C in the following code correspond to (16, 8) and (12, 4) in memory.
050eb2 0a 10 08          MV           BA,0x810
050eb5 aa 46 fd 03       MV           [DAT_03fd46],BA
050eb9 0a 0c 04          MV           BA,0x40c
050ebc aa 48 fd 03       MV           [DAT_03fd48],BA
They're stored at &3FD46 and &3FD48 in memory, so directly adjacent to each other, and the surrounding code blocks operate on the cursor's X position and textflags, so it all seems highly relevant to what we're looking for. Those values in memory can be changed with POKE:
POKE &3FD46,40,8,30,4
The side-effect of this change is that you can now use WIDTH 40,8 and WIDTH 30,4 and the mode changes accordingly. However, when you type, text is still invisible once the cursor roams outside the leftmost 96×64 region of the screen. Clearly something else needs to change.
Further up in the code the values at &3FD46 and &3FD48 are copied from other values at &1FD9D and &01FD9F:
050e97 8a 9d fd 01       MV           BA,[DAT_01fd9d]
050e9b aa 46 fd 03       MV           [DAT_03fd46],BA
050e9f 8a 9f fd 01       MV           BA,[DAT_01fd9f]
050ea3 aa 48 fd 03       MV           [DAT_03fd48],BA
These source addresses are in the organiser's own memory rather than the memory built into the BASIC card, so it seems likely that these are the system values for width and height of the screen in the small and large fonts respectively and BASIC maintains its own copies of them which are the values we found before. We could POKE our new text resolutions into those memory locations too, which can be done with this program:
10 POKE &1FD9D,40,8,30,4
20 POKE &3FD46,40,8,30,4
30 WIDTH 40,8
40 CLS
After doing this, the whole screen becomes available to our BASIC program! All graphics operations work on the whole screen and text can be placed and displayed anywhere on it successfully:

I doubt this is the "correct" way to do it, and there is likely a proper IOCS call that updates the screen resolution. As a result there may be other system variables that are not properly updated by directly POKEing values into memory, but so far I haven't run into any significant problems. As I continue to work through the system ROM disassembly I may find the appropriate routines, however.
I did try to see if the full screen size was stored somewhere in the ROM image, as it would be useful to use this to know how to properly set the display mode according to the current organiser's capabilities. I did find the byte sequence (16, 8, 12, 4) in the IQ-7000 (&F083C) and IQ-7400 (&F478A) ROM dumps and the byte sequence (40, 8, 30, 4) in the IQ-8000 (&F1412), IQ-8200 (&F1418) and IQ-8300M (&F1423) ROM dumps. I couldn't find any code that was able to meaningfully access these sequences from a user application. There may be some way to properly identify the device you're running on but I'm not currently sure of a reliable way. One potential option is to use POINT(96,0) – this returns the status of a pixel on the display (0 for off, 1 for on), and crucially it returns -1 if the value is outside the screen bounds. On an IQ-7000 it returns -1, but on an IQ-8000 it returns 0 or 1. However, a later organiser model throws a spanner in the works…
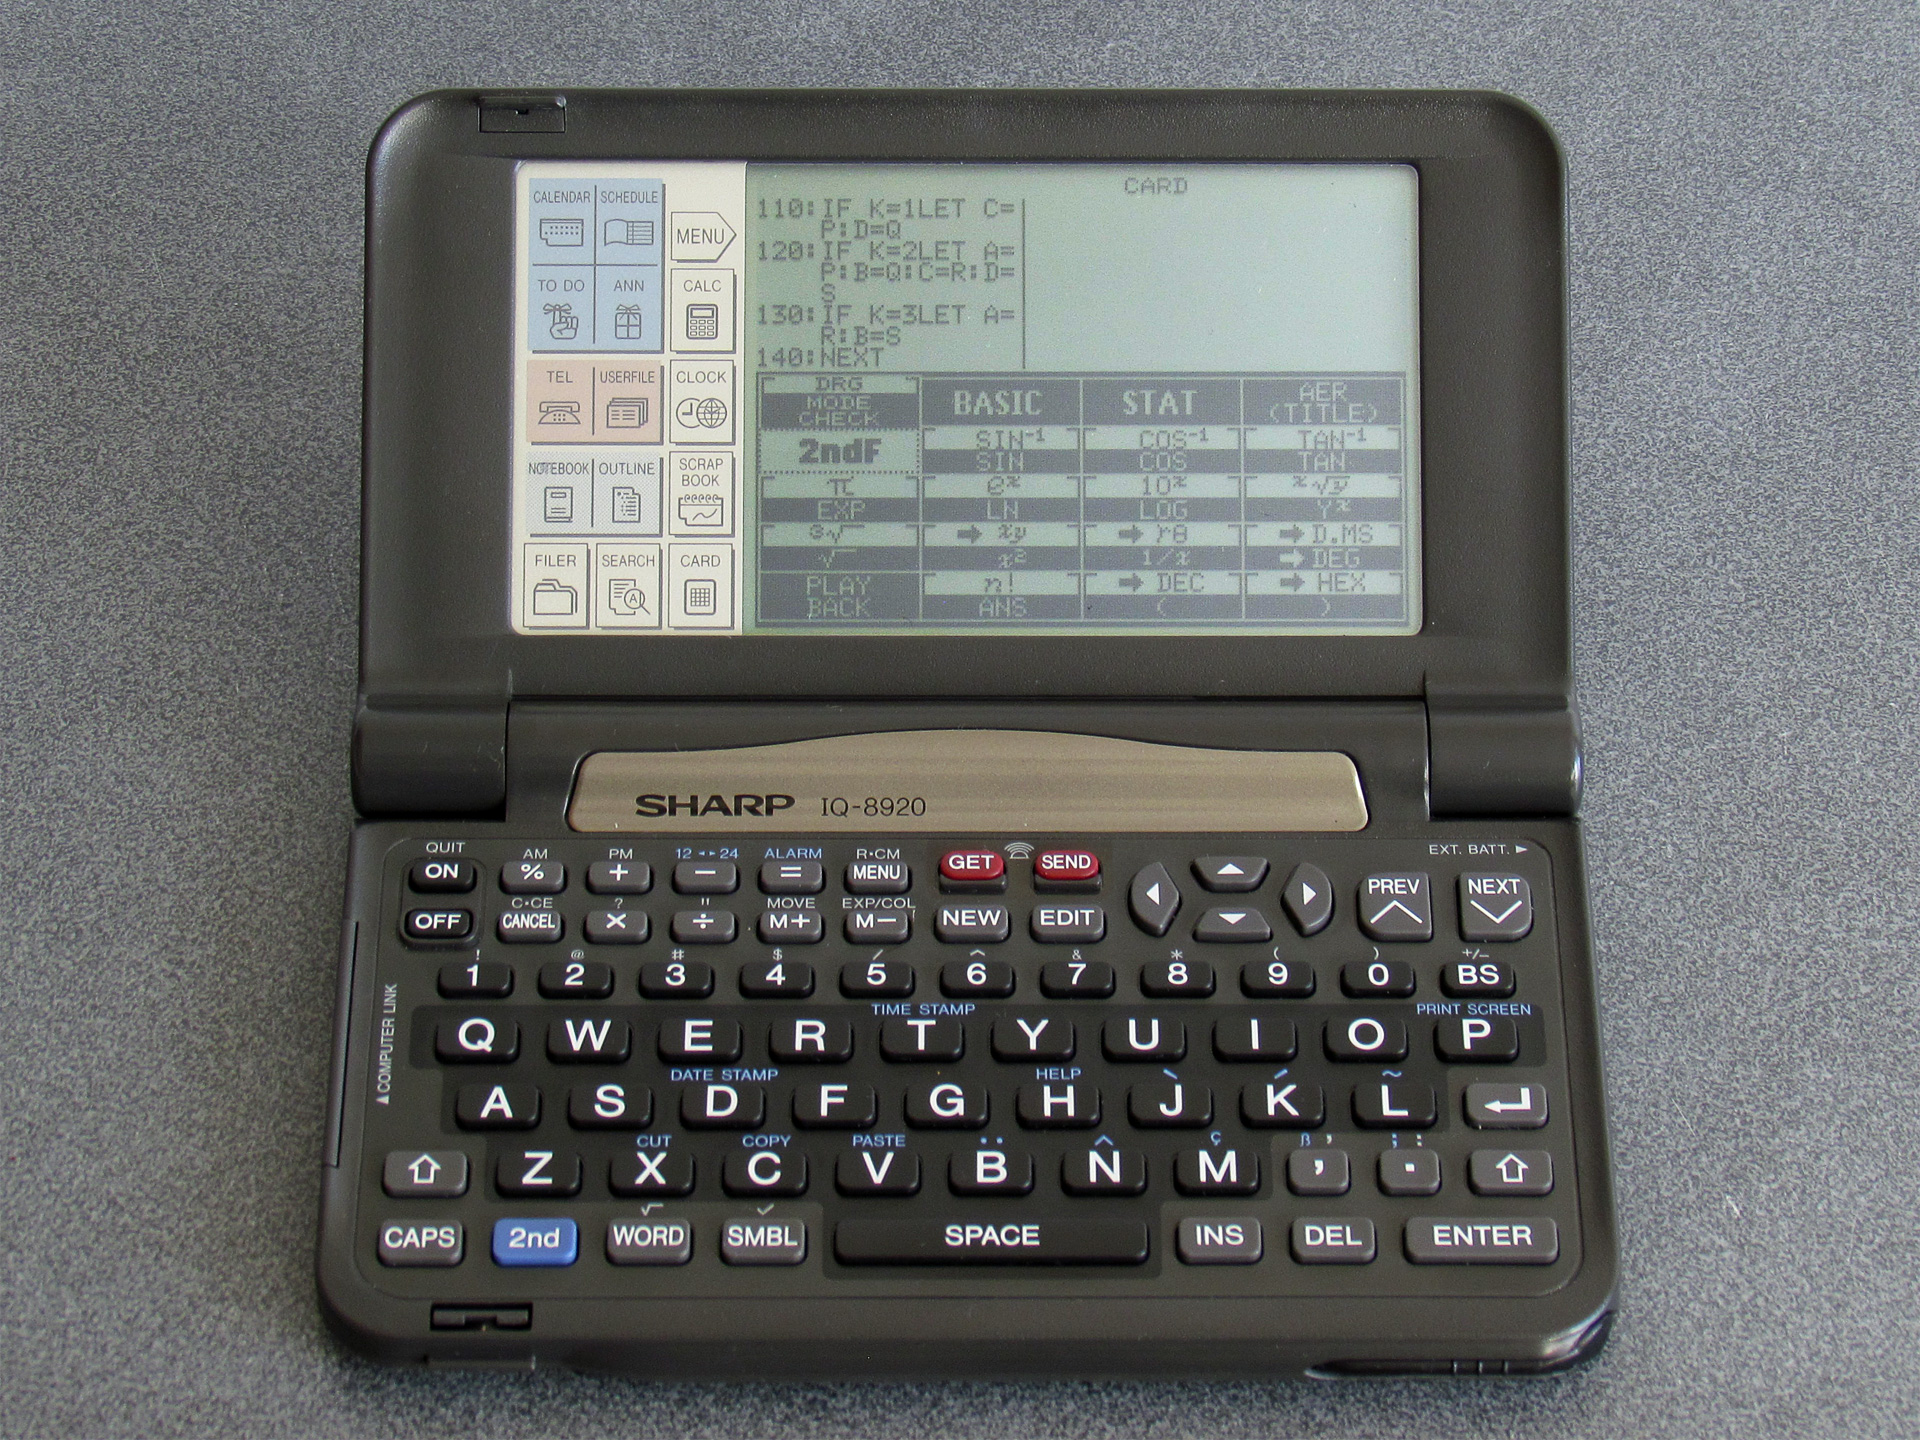
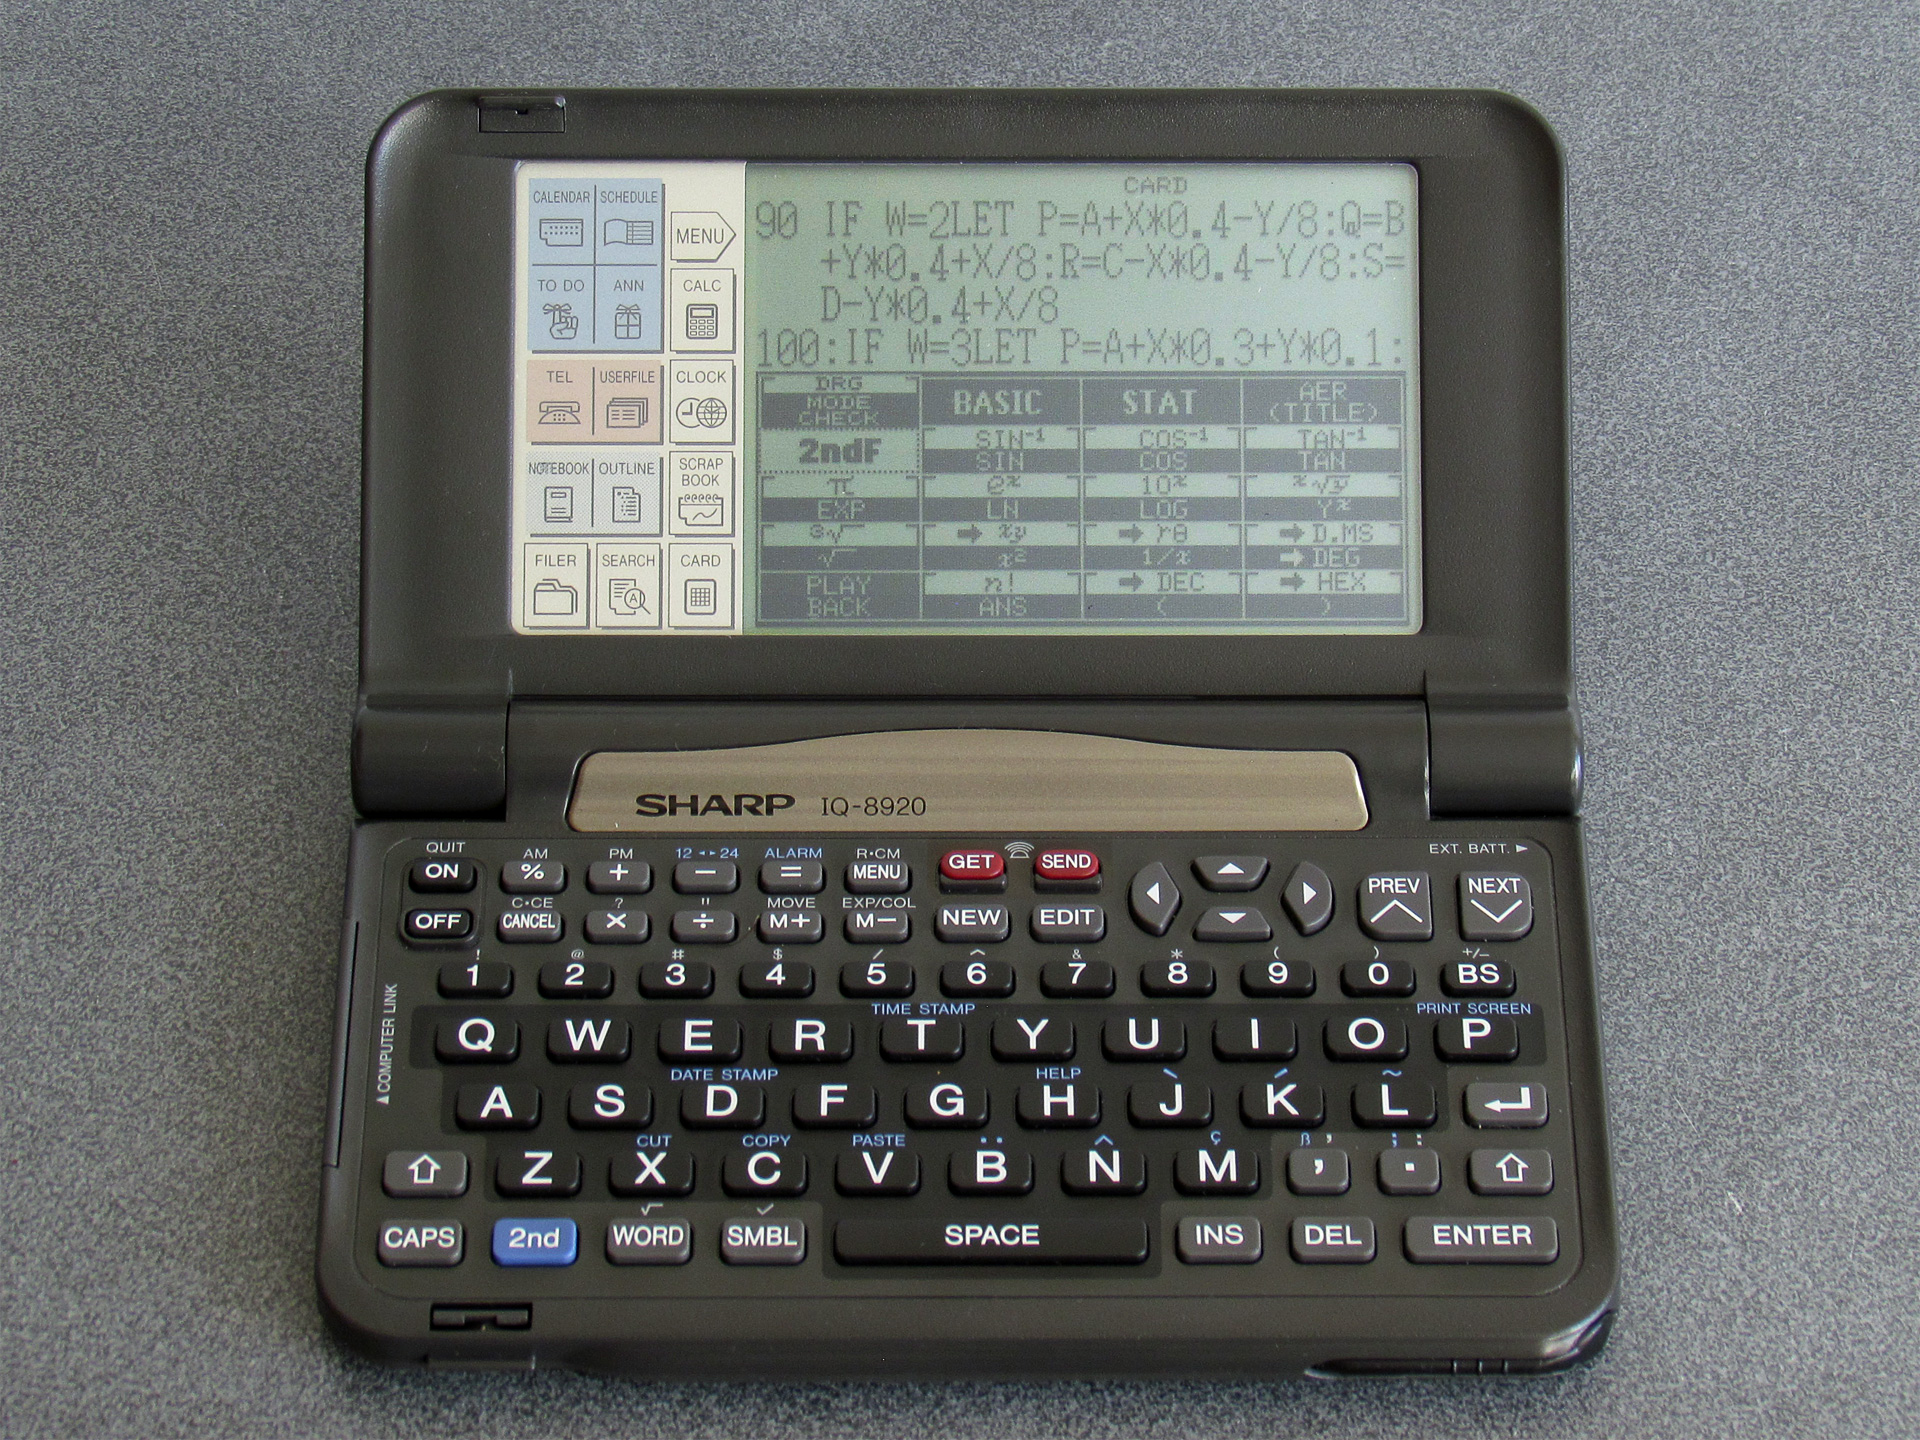
This is the Sharp IQ-8920. Its screen is still 240 pixels wide, like the IQ-8000, but it is significantly taller and has square pixels. When I first saw one of these online I was less interested in it as it didn't have the obvious card slot, but when I looked at a closer photo of it I could see that it still had one on the side. I couldn't see how this would work, as it's missing the window to see the card's buttons through, but I ended up picking one up anyway. It turns out it is still backwards-compatible with the cards from the earlier organisers, and this backwards-compatibility is achieved by displaying the card's buttons directly on the resistive touchscreen (I assume there's a database of cards and their button assignments somewhere in the IQ-8920's ROM). The IQ-8920 also corrects one notable oversight of the IQ-8000…
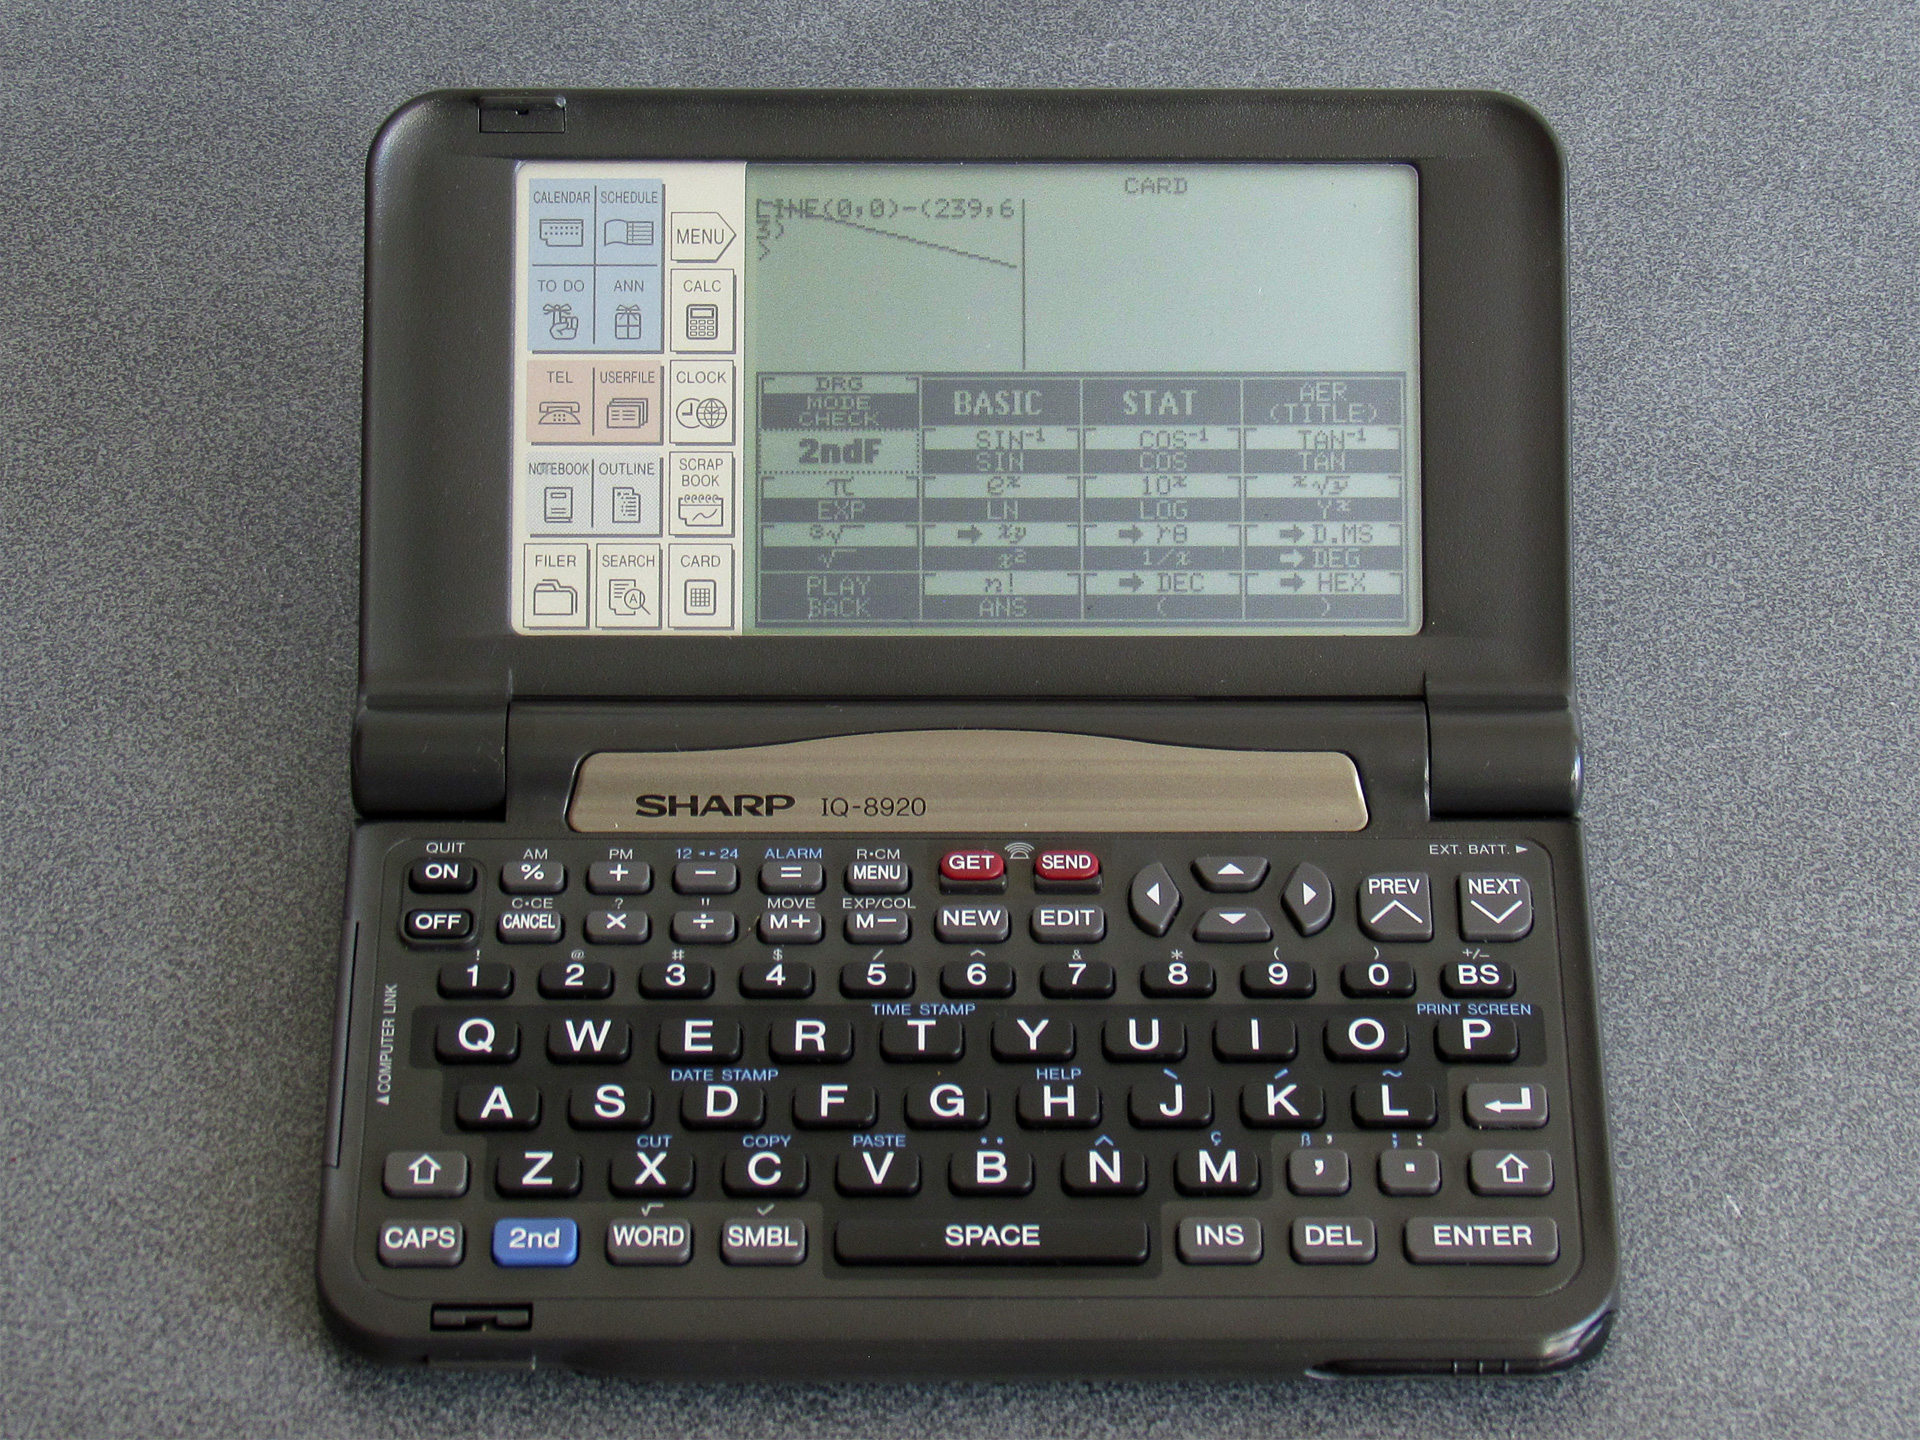
Attempting to draw graphics out-of-bounds on the IQ-8920 results in them being properly clipped, unlike the IQ-8000 which permits some graphics operations to work even when only the leftmost 96×64 region of the screen should be accessible. This means that on the IQ-8920, POINT(96,0) returns -1 by default and so this can't be used to detect a device with a screen that is wider than 96 pixels.
However, the same BASIC POKE program can be used to get the IQ-8920 to use the full width of the display:
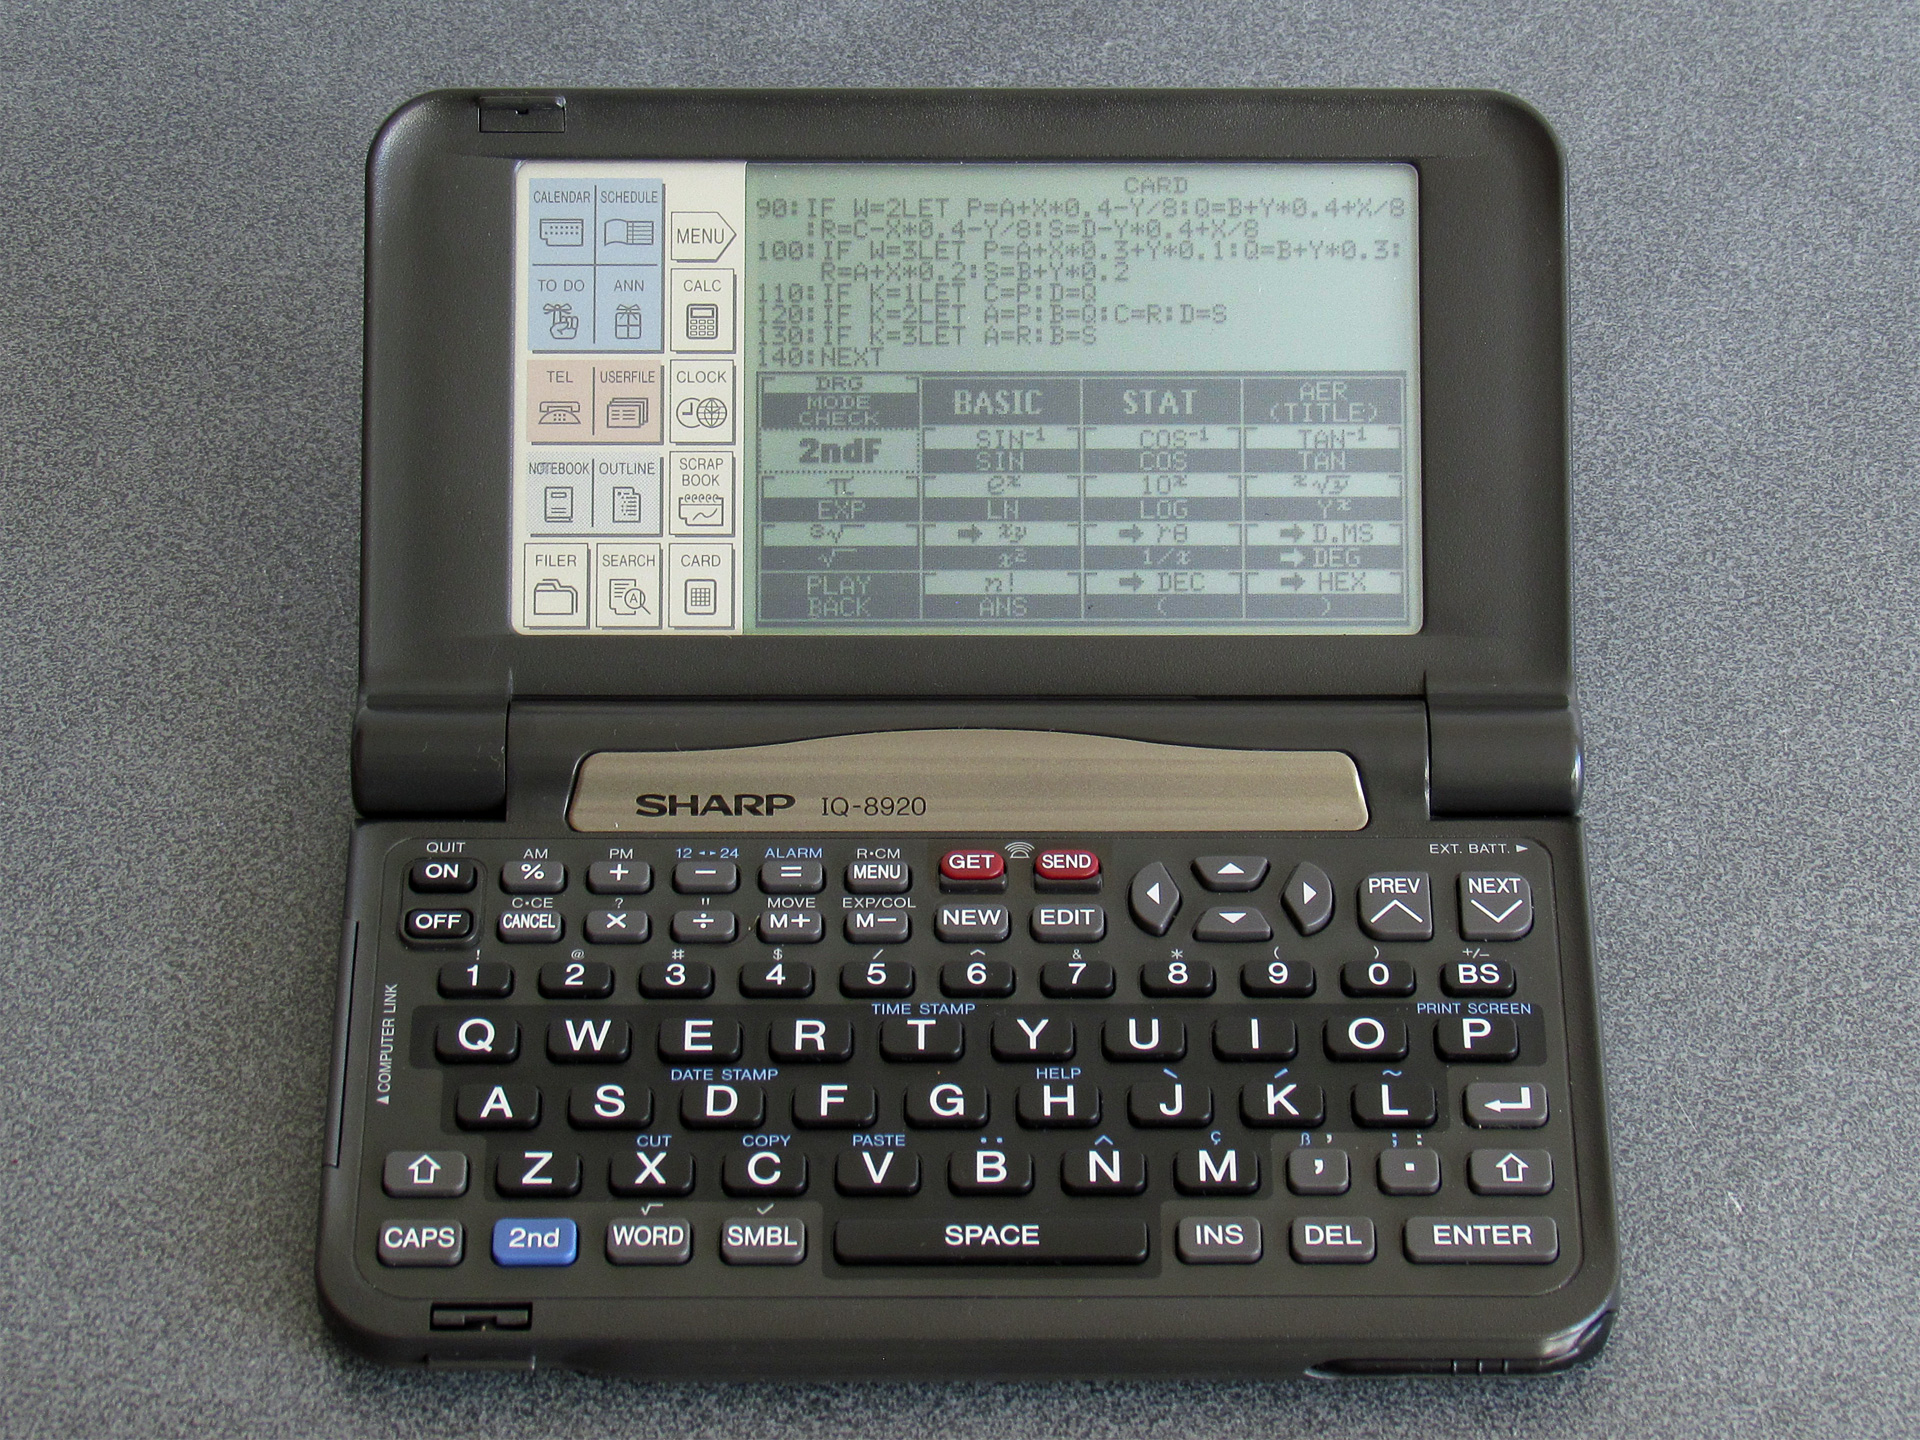
I did also try extending the height of the screen, and though this looks a little promising at the start (as you work down the screen, new lines of text start overwriting the on-screen button display) things go very wrong when the screen tries to scroll and the organiser hangs quite often. Some other scrolling operations do misbehave (e.g. when scrolling through a program listing, occasionally a single line of text may appear invisible) and I'm not entirely sure what the cause is yet. The Great Wave does at least now appear on the IQ-8920:
One thing which susprisingly does not misbehave is if you extend the screen resolution on an original IQ-7000 or IQ-7400. Text disappears off the right of the display, but I haven't seen it crash or hang the organiser. POINT(96,0) still returns -1 with the screen extended on this organiser, so one solution may be to just to try to set the screen to the higher resolution, check if POINT(96,0) is out of bounds, and if it is reset back to the lower resolution. The program would then look like this:
10 POKE &1FD9D,40,8,30,4
20 POKE &3FD46,40,8,30,4
30 WIDTH 40,8
40 CLS
50 IF POINT(96,0)=0THEN END
60 POKE &1FD9D,16,8,12,4
70 POKE &3FD46,16,8,12,4
80 WIDTH 16,8
90 CLS
I will continue to dive into the OS ROM disassemblies to see if I can find ways to make this more reliable and whether there's a more correct way to do this. It would be useful to be able to dump the ROMs for the other 16/40 cards I have to see how they manage the mode switch, however as I've been dumping the ROMs from a BASIC program and I don't have an organiser with two card slots I don't currently have a way to do that. The card lock switch (which causes the organiser to switch off and reset when changing cards) appears to be handled in software (rather than being a hardware interlock) so it may be possible to write a ROM dumping program in assembly, copy it to somewhere safe in RAM from a BASIC program and then hot-swap the cards. There's 2KB of clipboard buffer that looks usable for this process, and you can CALL machine code you've POKEd into memory – I have no idea whether that will be technically possible, though, so this is just something at a very early idea stage.
I did discover a test menu in the IQ-7000 and IQ-7400 ROMs, though. Bear in mind that accessing these will reset your organiser's settings and may clear the RAM, so don't do it on an organiser that contains data you care about!
The one in the IQ-7000 isn't particularly enlightening, but can be accessed by holding ON+9 when pressing the reset button. The one on the IQ-7400 is more interesting and can be accessed by holding ON+CALC when resetting. Of particular note here is a memory dump, which allows you to enter an address and shows the data at that address on the screen. This would allow you to dump an IC card, but it only shows 16 bytes at a time and so could be very time consuming to work through! There is also a memory save and load routine in the test menu that looks like it will transmit the data from the organiser, but unfortunately it doesn't appear to let you enter the start address or length and just exports the built-in RAM rather than letting you enter the address of a card in the slot. The IQ-7400 also has a ROM version screen that can be shown by holding ON+A when resetting.
I don't know if this will have persuaded anyone that Sharp's electronics organisers are more interesting than they might first appear, but if you can pick one up along with a Scientific Computer Card I think you'll find they're fun little devices to experiment with!
Subscribe to an RSS feed that only contains items with the Sharp Electronic Organiser tag.